In the world of knitting, there are many different types of stitches that can be used to create beautiful and intricate patterns. One of the most commonly used stitches is the S1 stitch, which stands for “slip one.” But what exactly does S1 mean in knitting, and how is it used?
The S1 stitch is a technique that involves passing a stitch from the left-hand needle to the right-hand needle without knitting or purling it. Instead of working the stitch, you simply move it from one needle to the other. This creates a smooth and elongated stitch that can be used to add texture and dimension to your knitting.
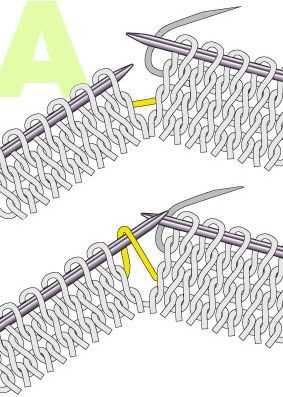
When working the S1 stitch, it’s important to note that you should always slip the stitch as if to purl, unless otherwise specified in the pattern. This means that you insert the right-hand needle into the stitch as if you were going to purl it, but instead of completing the purl stitch, you simply transfer the stitch to the right-hand needle.
The S1 stitch can be used in a variety of ways in knitting. It can be used as a decorative stitch in lace patterns, or to create a smooth edge when transitioning between different stitch patterns. It can also be used to create buttonholes or to join pieces of knitting together.
Understanding S1 Stitch
In the world of knitting, S1 is a commonly used abbreviation that stands for “slip one.” This term refers to a technique in knitting where you pass a stitch from one needle to another without knitting or purling it. Instead, you simply transfer the stitch from the left-hand needle to the right-hand needle.
Slipping a stitch is often used to create various decorative elements in knitting patterns, such as creating a smooth edge, adding texture, or shaping the fabric. It can also be used as a way to join different sections of a garment or create buttonholes.
When you encounter the instruction to “slip one” or see S1 in a knitting pattern, here are a few key points to keep in mind:
- Direction: Slipping a stitch can be done in two ways: knitwise or purlwise. Knitwise involves inserting the right-hand needle into the front of the stitch as if you were going to knit it, while purlwise involves inserting the right-hand needle into the back of the stitch as if you were going to purl it.
- Yarn Position: When slipping a stitch, the yarn should be held at the back of the work if you’re slipping knitwise, or at the front of the work if you’re slipping purlwise.
- Slipping with Purpose: While slipping a stitch is usually straightforward, some patterns may include additional instructions, such as slipping a stitch with the yarn in front to create a decorative border or slipping a stitch onto a cable needle to be worked later.
Slipping stitches can be a versatile technique that adds interest and complexity to your knitting projects. By understanding the purpose and technique behind the S1 stitch, you can confidently tackle knitting patterns that include this instruction.
Purpose of S1 Stitch
In knitting, the S1 stitch refers to the technique of slipping one stitch from the left to the right needle without working it. This stitch is commonly abbreviated as “S1” in knitting patterns. The purpose of the S1 stitch can vary depending on the pattern and the desired effect, but it is commonly used for the following reasons:
- Creating a decorative edge: By slipping the first stitch of each row, you can create a neat and smooth edge that gives your knitting a polished look. This is particularly useful when working on projects like scarves, shawls, and blankets.
- Shaping the fabric: Slipping stitches strategically can help shape your knitting. For example, slipping stitches at the beginning or end of a row can create a selvage stitch that makes it easier to sew pieces together or pick up stitches later for border or edging.
- Working colorwork: In colorwork knitting, where multiple colors are used to create a pattern, slipping stitches can help create clean lines and improve the overall appearance of the design.
- Adding texture: Slipping stitches can also be used to create interesting textures and patterns in your knitting. By slipping stitches and then working them on subsequent rows, you can create elongated or twisted stitches that add depth and visual interest to your project.
It is important to note that the specific instructions for slipping stitches may vary from pattern to pattern. Always refer to the pattern instructions to understand how to execute the S1 stitch in a particular project.
Different Variations of S1 Stitch
While the basic definition of the s1 stitch in knitting involves slipping one stitch from the left needle to the right needle without knitting or purling it, there are several variations of this stitch that can be used to achieve different effects in your knitting projects. Some of the commonly used variations of the s1 stitch include:
- S1 knitwise: This variation involves slipping one stitch knitwise, which means inserting the right needle into the first stitch on the left needle as if to knit it, and then slipping it onto the right needle without actually knitting it. This variation is often used to create a neat, decorative edge or to create a smooth transition between different stitch patterns.
- S1 purlwise: In this variation, the stitch is slipped purlwise, which means inserting the right needle into the first stitch on the left needle as if to purl it, and then slipping it onto the right needle without actually purling it. This variation is commonly used to create a smooth transition or decorative effect in the fabric.
- S1 with yarn in front: This variation involves bringing the yarn to the front of the work before slipping the stitch. This creates a modified version of the s1 stitch and is often used in combination with other stitch patterns to create texture or decorative elements in the fabric.
- S1 with yarn in back: This variation is the opposite of the previous one and involves bringing the yarn to the back of the work before slipping the stitch. This variation is also commonly used in combination with other stitch patterns to create texture or decorative elements.
These are just a few examples of the different variations of the s1 stitch that can be used in knitting. Each variation has its own unique effect and can be used creatively to enhance your knitting projects.
Special Techniques for S1 Stitch
While the S1 stitch is often used in knitting patterns to indicate slipping a stitch, it can also be used in various special techniques to create unique effects in your knitted projects. Here are a few special techniques you can try with the S1 stitch:
-
Slip Stitch Patterns: The S1 stitch can be used in slip stitch patterns, where certain stitches are slipped from the left needle to the right needle without being worked. This can create a textured fabric with interesting patterns and designs.
-
Slip Stitch Colorwork: By slipping stitches in different colors, you can create beautiful colorwork patterns. This technique is often used in stranded knitting or fair isle knitting, where multiple colors are used to create intricate designs.
-
Slip Stitch Edging: Slipping the first stitch of every row can create a neat edge on your knitted project. This technique is often used in garments like scarves, shawls, and blankets to give them a professional finish.
-
Mosaic Knitting: Mosaic knitting is a colorwork technique that involves slipping stitches to create a two-color pattern. By alternating colors and slipping stitches, you can create geometric patterns and designs.
-
Cable Knitting: The S1 stitch can also be used in cable knitting to create crossings and twists in your knitted fabric. By slipping certain stitches on a cable needle and then knitting or purling them, you can create intricate cable patterns.
These are just a few examples of how you can incorporate the S1 stitch into your knitting projects to create unique and interesting designs. Experiment with different techniques and have fun exploring the possibilities!
Common Mistakes with S1 Stitch
When working with the S1 stitch in knitting, there are a few common mistakes that beginners often make. By being aware of these mistakes, you can avoid them and improve the quality of your knitting projects.
1. Forgetting to Slip the Stitch
One of the most common mistakes with the S1 stitch is forgetting to actually slip the stitch. It’s easy to get caught up in the rhythm of knitting and accidentally knit or purl the stitch instead of slipping it. To avoid this mistake, make sure to pay attention to the instructions and take your time when working the S1 stitch.
2. Slipping the Stitch Incorrectly
Another mistake is slipping the stitch incorrectly. When slipping a stitch, it’s important to keep the strand of yarn at the back of the work. If you accidentally bring the yarn to the front while slipping the stitch, it can result in a twisted or dropped stitch. To avoid this, double-check that the yarn is in the correct position before slipping the stitch.
3. Misreading the Instructions
It’s easy to misread the instructions when working with the S1 stitch. For example, if the instructions say “S1, K1, PSSO,” you may accidentally knit the slip stitch instead of slipping it. To prevent this mistake, read the instructions carefully and double-check your work before moving on to the next stitch.
4. Confusing S1 with Other Stitches
Confusing the S1 stitch with other stitches is another common mistake. The S1 stitch is a specific technique that involves slipping a stitch from the left needle to the right needle without knitting or purling it. It’s important to differentiate between the S1 stitch and other stitches, such as knit or purl stitches, to ensure the correct stitch pattern.
5. Not Tensioning the Yarn Properly
Tensioning the yarn properly is crucial for achieving even and consistent stitches, including the S1 stitch. If the yarn is too loose or too tight when slipping the stitch, it can distort the stitch pattern and affect the overall appearance of your knitting. Practice maintaining a consistent tension to avoid this mistake.
6. Skipping the S1 Stitch
Skipping the S1 stitch is another common mistake. This can happen if you accidentally skip a step in the instructions or get distracted while knitting. It’s important to follow the pattern instructions closely and make sure to include the S1 stitch when required.
By being aware of these common mistakes with the S1 stitch, you can avoid them and improve your knitting skills. Take your time, read the instructions carefully, and practice regularly to become more comfortable with the S1 stitch and other knitting techniques. Happy knitting!
Tips and Tricks for Working with S1 Stitch
If you’re familiar with knitting terminology, you may have come across the abbreviation “S1” or “sl 1” in knitting patterns. S1 stitch stands for “slip 1 stitch” and it involves moving a stitch from one needle to another without working it. Here are some tips and tricks to help you work with S1 stitch:
- Use the correct technique: When slipping a stitch, you can either slip it purlwise or knitwise. Slipping purlwise means inserting your needle into the stitch as if to purl, while slipping knitwise means inserting the needle as if to knit. Make sure to follow the pattern instructions to determine which technique to use.
- Keep tension consistent: When slipping a stitch, it’s important to maintain consistent tension to ensure that the stitch doesn’t become stretched or distorted. Pay attention to how tight or loose you are pulling the working yarn when slipping the stitch.
- Keep track of stitch count: When working with S1 stitch, it’s easy to lose track of stitch count. Double-check your stitch count after slipping a stitch to make sure you haven’t accidentally dropped or added any stitches.
- Use markers: If the pattern requires slipping stitches across multiple rows, it can be helpful to use stitch markers to keep track of the slipped stitches. Place a marker on the needle after each slipped stitch to easily count them and ensure accuracy.
- Experiment with different stitch combinations: S1 stitch can be used in various knitting techniques and stitch patterns. Experiment with combining S1 stitch with other elements such as yarn overs, decreases, or different stitch textures to create unique designs and textures in your knitting.
- Practice with scrap yarn: If you’re new to working with S1 stitch, it can be helpful to practice on a small swatch or scrap yarn before incorporating it into a larger project. This will allow you to become comfortable with the technique and test different tension and stitch combinations.
- Check your tension: Slipping stitches can sometimes cause changes in tension, especially if the slipped stitch is not worked for several rows. Take the time to periodically check your tension and adjust as necessary to ensure a consistent fabric throughout your knitting.
By following these tips and tricks, you’ll be able to confidently work with S1 stitch in your knitting projects and create beautiful and intricate designs.
FAQ:
What does the term S1 mean in knitting?
S1 stands for “slip 1 stitch” in knitting. It means to move the next stitch from the left-hand needle to the right-hand needle without knitting or purling it.
How do I slip a stitch in knitting?
To slip a stitch in knitting, you insert your right-hand needle into the next stitch on the left-hand needle as if to knit, but instead of wrapping the working yarn around the needle, you simply slide the stitch onto the right-hand needle.
What is the purpose of slipping a stitch in knitting?
Slipping a stitch in knitting is a technique used to create various textures and patterns in a knitted fabric. It can be used to create decorative stitches, to shape the fabric, or to create an edge.
Can I slip a stitch at the beginning of a row?
Yes, you can slip a stitch at the beginning of a row in knitting. This is often done to create a clean edge or to align a pattern correctly. When slipping a stitch at the beginning of a row, it is usually done with the yarn in front of the work.
Do I need to slip a stitch if the pattern indicates it?
Yes, if a pattern indicates to slip a stitch, it is important to follow the instructions. Slipping a stitch is often an essential part of the pattern and skipping it can affect the final outcome of your knitting project.
Can I slip a stitch in the middle of a row?
Yes, you can slip a stitch in the middle of a row in knitting. This is often done to create decorative stitches or to shape the fabric. When slipping a stitch in the middle of a row, it is usually done with the yarn in front of the work.
What is the difference between slipping a stitch purlwise and slipping a stitch knitwise?
When slipping a stitch knitwise, you insert the right-hand needle into the stitch as if to knit. When slipping a stitch purlwise, you insert the right-hand needle into the stitch as if to purl. The difference in the direction of the needle insertion affects the orientation of the slipped stitch and can create different effects in the knitted fabric.


