If you’re a beginner in data science or statistical analysis, chances are you’re using R for your projects. R is a powerful programming language that is widely used for its data manipulation and visualization capabilities. However, when it comes to presenting your analysis in a professional and reproducible way, using RMarkdown to knit your code to PDF is a great option.
RMarkdown is an R package that allows you to combine text, code, and output in a single document. It provides a seamless way to document your code and results, making it easier for others to understand and reproduce your analysis. In this beginner’s guide, we will walk you through the process of using RMarkdown to knit your code to PDF, step by step.
To get started, you will need to install the RMarkdown package in R. You can do this by running the following code in your R console: install.packages(“rmarkdown”). Once the package is installed, you can create a new RMarkdown document by going to File > New File > R Markdown in RStudio.
Tip: It’s a good practice to save your RMarkdown document with a .Rmd extension so that it’s easily recognizable as an RMarkdown file.
When you create a new RMarkdown document, RStudio will generate a template for you with some default code and text. The template contains three main sections: YAML header, text, and code. The YAML header is where you can specify the document title, author, date, and other metadata. The text section is where you can write your analysis and explanations, and the code section is where you can write your R code.
What is RMarkdown?
RMarkdown is a file format that allows users to generate dynamic, reproducible reports using R and Markdown.
R is a versatile programming language and environment for statistical computing and graphics. It provides a wide variety of statistical and graphical techniques, and is widely used in fields such as data analysis, data science, and bioinformatics.
Markdown is a lightweight markup language that allows users to write simple, plain text documents using a simple formatting syntax. Markdown is widely used for writing documentation, README files, and web content.
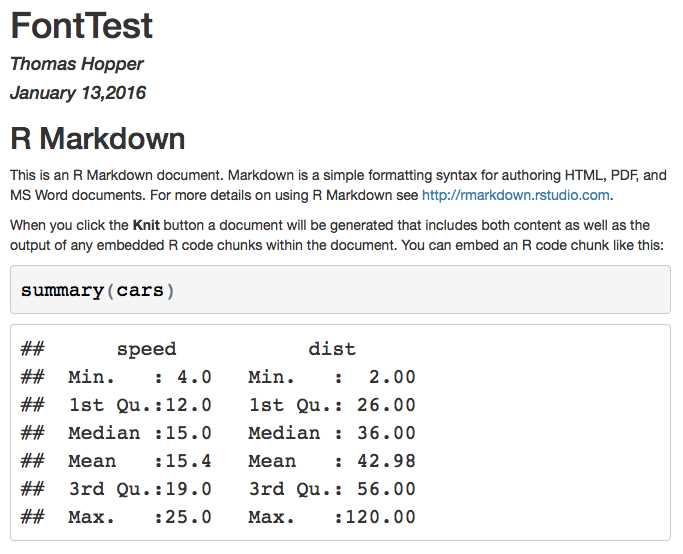
RMarkdown combines the power of R with the simplicity of Markdown, allowing users to seamlessly mix code, text, and output in a single document. By using RMarkdown, users can write code chunks in R, which can be executed and their results displayed within the document. This makes it easy to perform complex calculations, generate plots and tables, and integrate them with explanatory text.
One of the key advantages of RMarkdown is its reproducibility. By including the code used to generate the results, RMarkdown allows others to easily replicate the analysis and verify the validity of the results. This makes it a valuable tool for researchers, analysts, and anyone who needs to create dynamic, reproducible reports.
RMarkdown documents can be rendered in various output formats, such as HTML, PDF, Word, and more. This flexibility allows users to choose the most appropriate format for their needs and audience.
Overall, RMarkdown is a powerful tool for creating dynamic, reproducible reports that combine code, text, and output in a single document. Whether you are a data scientist, a researcher, or someone who needs to generate reports with R, RMarkdown is definitely worth exploring.
Advantages of Using RMarkdown
Simplicity: One of the main advantages of using RMarkdown is its simplicity. With RMarkdown, you can write your text and code in a single document, making it easy to organize and manage your analysis and reports.
Reproducibility: RMarkdown promotes reproducible research by incorporating code, data, and results into a single document. This allows others to easily reproduce your analysis and verify the accuracy of your results.
Flexibility: RMarkdown provides flexibility in terms of output formats. You can easily generate reports in various formats such as PDF, HTML, Word, and PowerPoint, making it convenient to share your work with different audiences.
Dynamic Documents: RMarkdown supports the creation of dynamic documents, where the output is automatically updated when changes are made to the code or data. This enables you to quickly generate updated reports without manually updating all the results and figures.
Integration with R: RMarkdown seamlessly integrates with R, a powerful programming language for statistical computing and data analysis. This allows you to leverage the wide range of R packages and functions to perform complex analyses and create sophisticated reports.
Version Control: RMarkdown files can be easily managed using version control systems such as Git. This allows you to track changes, collaborate with others, and revert to previous versions of your document if needed.
Customization: RMarkdown provides extensive customization options, allowing you to personalize the appearance of your reports. You can customize the layout, fonts, colors, and styles to match your preferences or corporate branding.
Collaboration and Sharing: With RMarkdown, collaboration and sharing become easier as you can share your reports with others who may not have R installed. This makes it convenient for team members or clients to review and provide feedback on your work.
Automatic Document Generation: RMarkdown allows you to automate the process of document generation by knitting the document to its final output format. This saves time and eliminates the need for manual formatting and copying of results.
Documentation and Organization: RMarkdown provides a structured approach to document your analysis and code. You can include sections, headings, tables of contents, and references, making it easier to navigate and understand your work.
- Simplicity
- Reproducibility
- Flexibility
- Dynamic Documents
- Integration with R
- Version Control
- Customization
- Collaboration and Sharing
- Automatic Document Generation
- Documentation and Organization
Overall, using RMarkdown offers a wide range of advantages for creating visually appealing and reproducible reports. It combines the power of R with the simplicity and flexibility of a markdown language, making it a popular choice among data analysts and researchers.
Getting Started with RMarkdown
RMarkdown is a powerful tool for creating dynamic and reproducible reports using R. It allows you to seamlessly integrate code, text, and visualizations into a single document. In this tutorial, we will walk you through the basics of getting started with RMarkdown.
Step 1: Install R and RStudio
The first step is to install R and RStudio, which are both free and open-source.
- Install R: Visit the R website and follow the instructions to download and install the R software for your operating system.
- Install RStudio: Visit the RStudio website and download the free RStudio Desktop edition for your operating system. Once downloaded, double-click the installer file and follow the on-screen instructions to install RStudio.
Step 2: Create a new RMarkdown document
Once you have R and RStudio installed, open RStudio. To create a new RMarkdown document, go to File > New File > R Markdown…. In the dialog box that appears, select the output format you want (e.g., HTML, PDF, Word, etc.), give your document a name, and click OK.
Step 3: Edit and format your document
After creating the new RMarkdown document, you will see that it consists of a YAML header and an empty code chunk. The YAML header specifies the document metadata and the output format, while the code chunk is where you can write your R code.
To add text to your document, you can write directly in the Markdown syntax. For example, you can use the <h1> tag for a main heading, the <h2> tag for a subheading, and the <p> tag for paragraphs. You can also use other Markdown tags like <em> for emphasizing text and <strong> for making text bold.
Step 4: Run the code and knit the document
To run the R code and generate the output, click the Knit button at the top of the document editor. This will execute the code and create a preview of the final document. You can choose to knit the document to various formats, such as HTML, PDF, Word, or even a slideshow.
You can also run the code chunks individually by clicking the Run button that appears when you hover over a code chunk. This allows you to iteratively work on your document and see the output as you go.
Step 5: Customize your document
RMarkdown provides several customization options to make your document more appealing. For instance, you can add headers, footers, table of contents, change the theme, and include external CSS stylesheets.
To customize your document, you can modify the YAML header or use specific R chunk options. You can also refer to the RMarkdown documentation for more advanced customization options.
Conclusion
In this tutorial, we covered the basics of getting started with RMarkdown. You learned how to install R and RStudio, create a new RMarkdown document, edit and format the document, run the code, and customize the output. RMarkdown is a powerful tool for reproducible research and reporting, and we encourage you to explore its capabilities and experiment with different formats and settings.
Writing and Formatting RMarkdown Documents
RMarkdown is a powerful tool for writing documents that combine text, code, and output. In this section, we will explore how to write and format RMarkdown documents to create professional and well-structured reports.
Headers
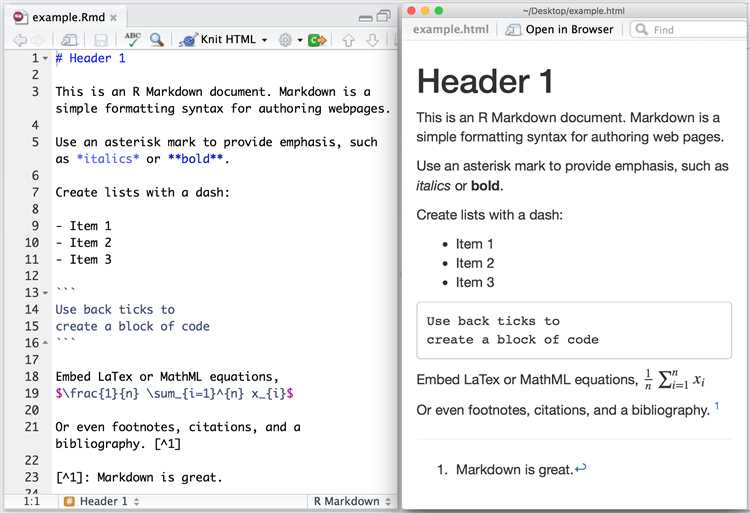
RMarkdown documents use Markdown syntax for headers. Headers can be created by using one or more hash (#) symbols followed by a space and the header text. The number of hash symbols indicates the level of the header, with one indicating the highest level.
Example:
# This is a level 1 header
## This is a level 2 header
### This is a level 3 header
Paragraphs
To create paragraphs in RMarkdown, simply leave an empty line between blocks of text. RMarkdown will automatically detect the empty line and treat the text as a new paragraph.
Example:
This is the first paragraph.
This is the second paragraph.
Emphasis
You can emphasize text in RMarkdown by either using asterisks (*) or underscores (_) around the text. The text will be rendered in italics.
Example:
*This text will be italicized*
_This text will also be italicized_
To make the text bold, use double asterisks (**) or double underscores (__).
Example:
**This text will be bold**
__This text will also be bold__
Lists
RMarkdown supports both ordered (numbered) and unordered (bulleted) lists. To create an ordered list, use numbers followed by a period (.) and a space. To create an unordered list, use an asterisk (*) or a hyphen (-) followed by a space.
Example:
1. First item in the ordered list
2. Second item in the ordered list
3. Third item in the ordered list
* First item in the unordered list
* Second item in the unordered list
* Third item in the unordered list
Tables
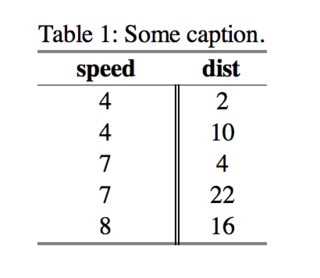
Tables can be created in RMarkdown using simple Markdown syntax. Separate each column with a pipe symbol (|) and use hyphens (-) to create a header row. You can use colons (:) to align the content within each column.
Example:
| Column 1 | Column 2 | Column 3 |
| -------- | -------- | -------- |
| Value 1 | Value 2 | Value 3 |
| Value 4 | Value 5 | Value 6 |
Conclusion
By using the various formatting options available in RMarkdown, you can create well-structured and professional documents. Experiment with headers, paragraphs, emphasis, lists, and tables to make your documents easily readable and visually appealing.
Knitting RMarkdown to PDF
When working with RMarkdown, you have the ability to knit your document to different output formats, including PDF. Knitting to PDF can be useful when you need a printable and shareable version of your document.
To knit an RMarkdown document to PDF, you’ll need to follow these steps:
- Open your RMarkdown document in RStudio.
- Ensure that you have the necessary packages installed for PDF output. This typically includes the
rmarkdownpackage, as well as any other packages required for the specific content of your document. - Make sure that your R code and output are properly formatted and displayed as desired in your RMarkdown document.
- Select the “Knit” button in the toolbar of RStudio, or use the keyboard shortcut
Ctrl + Shift + K. This will prompt you to select the output format for knitting. - Choose the “PDF” option from the list of available formats.
- Specify a file name and location for the PDF file that will be generated.
- Click the “Knit” button to begin the knitting process.
RStudio will then compile your RMarkdown document and generate a PDF file based on the specified format. You can monitor the progress of the knitting process in the “Console” pane of RStudio.
After the knitting process is complete, you can open the generated PDF file to view and share your document. The PDF will contain the formatted text, code, and output from your RMarkdown document.
It’s important to note that the appearance of the PDF may vary depending on the settings and styles you’ve applied in your RMarkdown document, as well as any global options and themes you’ve set in RStudio.
In addition to the basic knitting process, you can also customize the output of your PDF by modifying the YAML front matter in your RMarkdown document. This allows you to specify additional options such as the document title, author, and document template.
Overall, knitting RMarkdown to PDF provides a convenient and flexible way to create professional-looking documents with R code and output. Whether you need to generate reports, manuscripts, or other printable materials, RMarkdown and PDF output can be a powerful combination for reproducible research and data analysis.
Tips and Tricks for Using RMarkdown
When working with RMarkdown, there are several tips and tricks that can help you improve your workflow and enhance the overall look and feel of your documents. Here are some useful tips to consider:
- Use formatting options: RMarkdown supports various formatting options such as headers, bold and italics text, code blocks, and inline code. Take advantage of these options to make your document more readable and visually appealing.
- Organize your content: Use headers and sub-headers to structure your document and make it easy to navigate. You can use a combination of different header levels to create a logical hierarchy.
- Include code chunks: RMarkdown allows you to include executable code chunks within your document. This is particularly useful when presenting data analysis or explaining a particular methodology. Use the appropriate syntax to include code chunks and specify the programming language.
- Customize document appearance: RMarkdown provides options to customize the appearance of your document. You can specify the document title, author name, and even change the theme or style using YAML metadata at the top of your document.
- Add images and tables: Images and tables can greatly enhance the presentation of your document. Use the appropriate markup to include images and create tables with headers, rows, and columns.
- Use lists: Lists can help you organize and present information in a structured manner. RMarkdown supports both ordered (numbered) and unordered (bulleted) lists. Use lists to highlight key points or steps in a process.
- Include citations and references: If you need to include citations or references in your document, you can use the appropriate markup to create citations and specify a bibliography file.
- Knit to different output formats: RMarkdown allows you to knit your document to various output formats such as HTML, PDF, or Word. Take advantage of this flexibility to generate documents suitable for different purposes.
By following these tips and tricks, you can make the most out of RMarkdown and create professional-looking documents with ease. Experiment with different options and explore the vast possibilities that RMarkdown offers.
FAQ:
What is RMarkdown?
RMarkdown is a markup language that allows you to combine text, code, and results in a single document.
How do I install the rmarkdown package?
To install the rmarkdown package, you can use the following command in R: install.packages(“rmarkdown”)
How do I create a new RMarkdown document?
You can create a new RMarkdown document by clicking on File -> New File -> RMarkdown in RStudio, and then selecting the output format you want.
How do I knit an RMarkdown document to PDF?
To knit an RMarkdown document to PDF, you can click on the “Knit” button in the toolbar of RStudio, or use the Ctrl + Shift + K shortcut.


