If you’re new to knitting, one of the first things you’ll need to learn is how to tie a slip knot. A slip knot is the starting point for many knitting projects, as it creates a loop that can be easily adjusted to fit your knitting needle. Knowing how to tie a slip knot is essential for any knitter, whether you’re a beginner or an experienced practitioner.
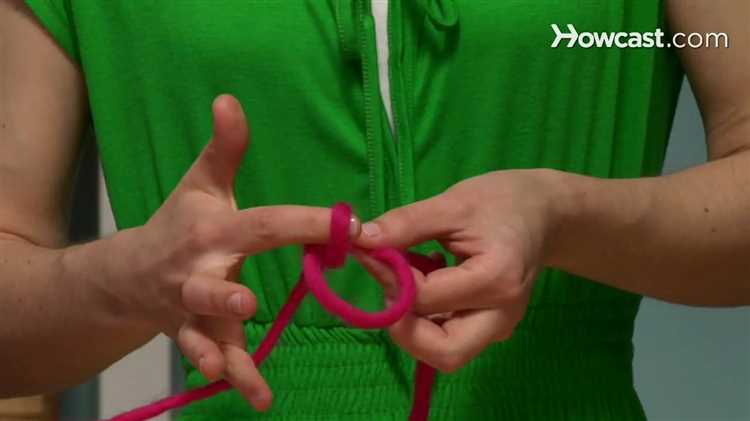
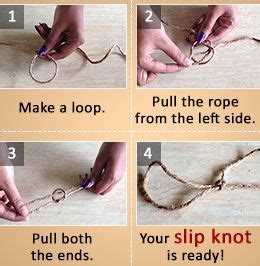
To tie a slip knot, start by creating a loop with your yarn. Hold the end of the yarn in your right hand and drape the yarn over your left hand, letting it dangle down. Take the end of the yarn and bring it behind the loop, then thread it through the loop from front to back. Pull the end of the yarn to tighten the loop, but not too tightly. You want the loop to be loose enough that you can easily slide it onto your knitting needle.
Once you’ve tied the slip knot, you can slide it onto your knitting needle and begin your project. The slip knot will act as the first stitch on your needle, so make sure it’s secure before you start knitting. If the slip knot feels too tight or too loose, you can adjust it by gently pulling on the end of the yarn to loosen or tighten the loop.
Now that you know how to tie a slip knot, you can confidently start your knitting projects. Practice tying slip knots until you feel comfortable with the process, and soon you’ll be on your way to creating beautiful knitted items.
What is a Slip Knot?
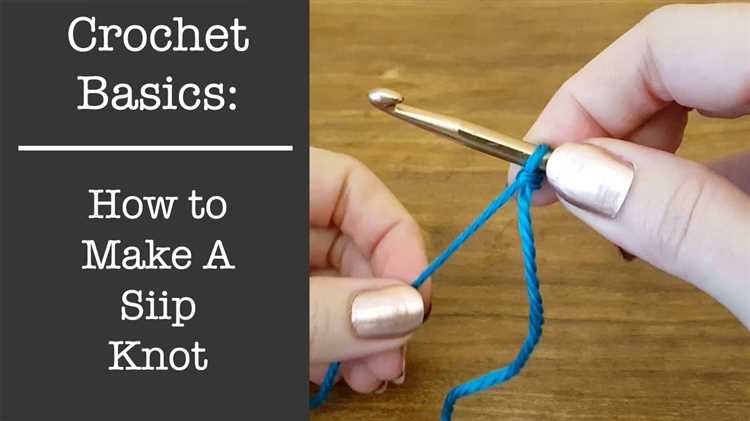
A slip knot is a foundational knot used in knitting to begin a project. It creates an adjustable loop that can be easily tightened or loosened as needed. The slip knot serves as the first stitch on the knitting needle, providing a starting point for the rest of the project.
To create a slip knot, you will need a length of yarn and your hands. The slip knot can be made quickly and easily, making it an essential skill for any knitter, whether they are beginners or experienced.
The slip knot is created by making a loop with the yarn, crossing the yarn over itself, and pulling the end through the center of the loop. This creates a secure loop that can be easily adjusted by pulling on the loose end of the yarn.
Once the slip knot is created, it can be placed on the knitting needle and used as the initial stitch for knitting. It can also be used to join a new ball of yarn or to create a loop to hang the work in progress.
The slip knot is versatile and can be used in various knitting techniques, such as casting on stitches, joining yarn, or creating decorative loops. Understanding how to tie a slip knot is an essential skill for any knitter, as it is the foundation for many knitting projects.
Overall, a slip knot is a simple and easy-to-tie knot that serves as the starting point for knitting. It allows for easy adjustment and provides a secure foundation for knitting projects. Mastering this basic knot will set you up for success in your knitting endeavors.
The Basic Steps to Tie a Slip Knot
Step 1: Start with the working end of your yarn in your right hand and the tail end in your left hand.
Step 2: Cross the working end over the tail end, creating a loop.
Step 3: Bring the working end under the loop and up through the center, creating another loop.
Step 4: Hold onto both loops with your left hand and pull the working end to tighten the knot.
Step 5: Adjust the size of the loop by pulling on the tail or the working end, as needed, to fit your project.
Step 6: Congratulations! You have successfully tied a slip knot.
Choosing the Right Yarn for the Knot
When it comes to choosing the right yarn for the slip knot in knitting, there are a few factors to consider. The type of yarn you choose can affect the ease of tying the knot, the strength of the knot, and the overall appearance of your knitting project.
Here are some tips to help you choose the right yarn for your slip knot:
- Choose a strong yarn: Since the slip knot is the first step in knitting and will be responsible for holding your stitches, it’s important to choose a yarn that is strong and durable. Look for yarns that are made of sturdy fibers, such as wool or cotton, as they are less likely to break or stretch over time.
- Avoid slippery yarns: Slippery yarns, such as silk or acrylic, can be more challenging to tie a secure slip knot with. These yarns may slip or unravel easily, making it difficult to keep your stitches in place. Opt for yarns with more grip, like wool or cotton blends, to ensure a tighter and more secure knot.
- Consider the weight of the yarn: The weight or thickness of the yarn can also affect the knot. Thicker yarns may require a larger slip knot to accommodate their size, while thinner yarns may require a smaller, more delicate knot. Keep in mind the stitch pattern and project you are working on when choosing the appropriate yarn weight for your slip knot.
- Match the yarn color to your project: While the color of the yarn may not directly impact the slip knot, it can have an effect on the visual appearance of your project. Choose a yarn color that complements or enhances the overall look of your knitting project.
By considering these factors, you can choose the right yarn for your slip knot that will provide strength, stability, and beauty to your knitting project.
Tying a Slip Knot with a Single Strand Yarn
To start knitting with a single strand yarn, you will need to tie a slip knot. The slip knot creates a loop that can be easily adjusted and tightened around the knitting needle.
- Begin by holding the end of the yarn in your dominant hand, leaving a tail of about 6 inches.
- With your non-dominant hand, create a loop with the yarn, crossing the tail end over the working end.
- Bring the tail end of the yarn up through the loop, creating a second loop.
- Gently pull on the tail end to tighten the slip knot around the working end of the yarn.
- Insert your knitting needle through the loop of the slip knot, and gently pull on the working end of the yarn to further tighten the knot around the needle.
Once you have tied the slip knot, you are ready to start knitting! Remember to adjust the tension of the slip knot to ensure it slides smoothly along the knitting needle as you work.
Practice tying slip knots with different types of yarn to find the best tension for your knitting projects. With a little practice, tying a slip knot will become second nature, and you’ll be on your way to creating beautiful knitted items!
Tying a Slip Knot with Multiple Strands
Tying a slip knot with multiple strands requires a slightly different technique than when using a single strand. Follow these simple steps to create a slip knot with multiple strands:
- Gather the strands: Collect all the strands you want to use together, ensuring that they are of equal length.
- Hold the strands together: Place one end of the strands in your left hand, and use your right hand to hold the other end.
- Create a loop: With your right hand, make a loop at the midpoint of the strands by crossing the ends over each other.
- Bring the loop through: Take the loop that you just formed and pass it through the opening, pulling it tight enough to form a knot.
- Adjust the knot: If necessary, adjust the slip knot by pulling on the ends of the strands to tighten or loosen the knot as desired.
Tying a slip knot with multiple strands can be a bit trickier than with a single strand, as you need to ensure that all the strands are equally tensioned. Practice this technique to master the art of tying slip knots with multiple strands!
How to Adjust the Slip Knot Size
A slip knot is an essential starting point for many knitting projects, and learning how to adjust its size allows you to have more control over your tension and the fit of your stitches. Here are some simple steps to help you adjust the slip knot size:
- Loosening the Slip Knot: To make the slip knot larger, gently pull on the loop of the knot to loosen it. Gradually increase the size of the loop until it is the desired size. Be careful not to pull too hard, as the yarn may come undone.
- Tightening the Slip Knot: If your slip knot is too loose, you can tighten it by pulling on the longer ends of the yarn. Hold onto the yarn ends with one hand and use your other hand to pull the knot tighter. Adjust the tension until the slip knot is snug but still allows your knitting needle to move through easily.
- Using Different Yarn Lengths: Another way to adjust the slip knot size is by using different lengths of yarn. If you want a larger slip knot, start with a longer length of yarn. If you want a smaller slip knot, use a shorter length of yarn.
- Experimenting with Tension: Adjusting the tension of your slip knot can also affect its size. If you pull the yarn tighter or loosen your grip while making the knot, you can change its size. Practice making slip knots with different tensions to find the right fit for your knitting project.
Remember, the size of your slip knot can impact the overall tension of your knitting. A too-tight slip knot can result in tight stitches, while a too-loose slip knot can result in loose stitches. Finding the right slip knot size for your specific project and tension preferences may require some experimentation and practice.
By following these simple steps, you can easily adjust the size of your slip knot and have better control over your knitting from the very beginning of your project.
Using a Slip Knot in Knitting Projects
A slip knot is an essential starting point for any knitting project. It creates a secure loop that can be easily adjusted to fit the knitting needle. Here are some simple steps to help you master the art of tying a slip knot for your knitting projects:
- Gather your materials: You will need a ball of yarn and a pair of knitting needles.
- Hold the end of the yarn: Take the end of the yarn and hold it between your thumb and index finger.
- Create a loop: With your other hand, bring the yarn over and across your index finger, creating a loop. The end of the yarn should be facing towards you.
- Insert the needle: Insert one knitting needle through the loop from front to back, keeping the yarn end on top.
- Tighten the knot: Pull the yarn end to tighten the loop around the needle. Make sure it is snug but not too tight.
- Adjust the loop size: If needed, you can adjust the size of the loop by sliding it up or down the needle.
- Continue knitting: Once the slip knot is secured on the needle, you are ready to start your knitting project.
Remember, practice makes perfect! Keep practicing the slip knot until you feel comfortable and confident in tying it for your knitting projects. Happy knitting!
Common Mistakes to Avoid when Tying a Slip Knot
Tying a slip knot is the first step in knitting and it’s essential to get it right in order to start your project successfully. However, there are some common mistakes that beginners often make when tying a slip knot. Here are a few things to avoid:
- Using the wrong type of yarn: It’s important to choose a yarn that has enough grip to hold the slip knot securely. Avoid using slippery or silky yarns that may slip out of the knot easily.
- Tying the knot too tightly: A slip knot should be snug enough to hold onto the needle, but not too tight that you can’t slide it easily. Be careful not to pull the yarn too tightly when forming the knot.
- Not leaving enough tail: When tying a slip knot, it’s important to leave a long enough tail of yarn to work with. If the tail is too short, it may be difficult to work the first few stitches or to join a new ball of yarn later on.
- Twisting the loop: One common mistake is accidentally twisting the loop of the slip knot. This can lead to twisted stitches later on in your project. Make sure the loop is flat and not twisted before proceeding with your knitting.
- Forgetting to secure the knot: After tying the slip knot, make sure to secure it properly before starting to knit. You can do this by gently tugging on the yarn tail to tighten the knot further.
- Tying the knot too close to the needle: Give yourself some space between the slip knot and the needle tip. If the knot is too close, it may be difficult to work the first few stitches or it may create tension issues.
- Relying solely on video tutorials: While video tutorials can be helpful, it’s also beneficial to have written instructions or diagrams to refer to. This can help you better understand the steps and avoid making mistakes.
Avoiding these common mistakes when tying a slip knot can save you time and frustration in your knitting projects. Take your time to practice and perfect your slip knot technique, and you’ll be on your way to creating beautiful knitted items in no time!
“`html
Practice and Mastering the Slip Knot Technique
Once you have learned how to tie a slip knot for knitting, it’s important to practice and master the technique. This will help you become more comfortable with the process and allow you to create slip knots quickly and efficiently. Follow these steps to practice and improve your slip knot skills:
- Gather your materials: Before you start practicing, make sure you have the necessary materials, including yarn and knitting needles.
- Secure the yarn: Hold the end of the yarn in one hand, allowing a small tail to hang down. The bulk of the yarn should be in your other hand.
- Create the loop: With your dominant hand, take the working end of the yarn and wrap it over the tail end, creating a loop.
- Insert your needle: Insert the knitting needle through the loop, making sure to keep the tail end of the yarn below the loop.
- Tighten the knot: Pull the working end of the yarn to tighten the knot around the knitting needle. Make sure the knot is secure but not too tight.
- Practice: Repeat the steps above multiple times to practice your slip knot technique. Pay attention to the placement of your hands and the tension of the yarn.
As you practice, you may find it helpful to watch videos or tutorials that demonstrate the slip knot technique. This can provide visual guidance and help you refine your skills.
Remember, mastering the slip knot technique takes time and patience. Don’t be discouraged if your first attempts are a little shaky. With practice, you will become more confident and proficient in creating slip knots for your knitting projects.
“`
FAQ:
What is a slip knot used for in knitting?
A slip knot is the first step in starting a knitting project. It is used to create a loop that can be easily adjusted and tightened around the knitting needle. The loop created by the slip knot will become the first stitch on the needle, from which you can start knitting.
Can I use a slip knot for other crafts besides knitting?
Yes, a slip knot can be used for various crafts and activities besides knitting. It is commonly used in crochet, macrame, jewelry making, and even for tying fishing line. The slip knot is a versatile knot that can be adapted to different purposes depending on the desired outcome.


