Knitting in the round is a popular technique that allows you to create seamless garments and accessories. However, once you finish your project, you need to know how to properly cast off or bind off your knitting to ensure a neat and secure edge. In this step-by-step guide, we will walk you through the process of casting off knitting in the round.
Step 1: Begin by knitting the first two stitches in your round as you normally would.
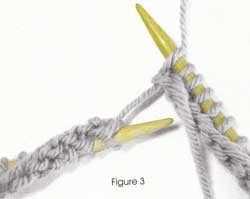
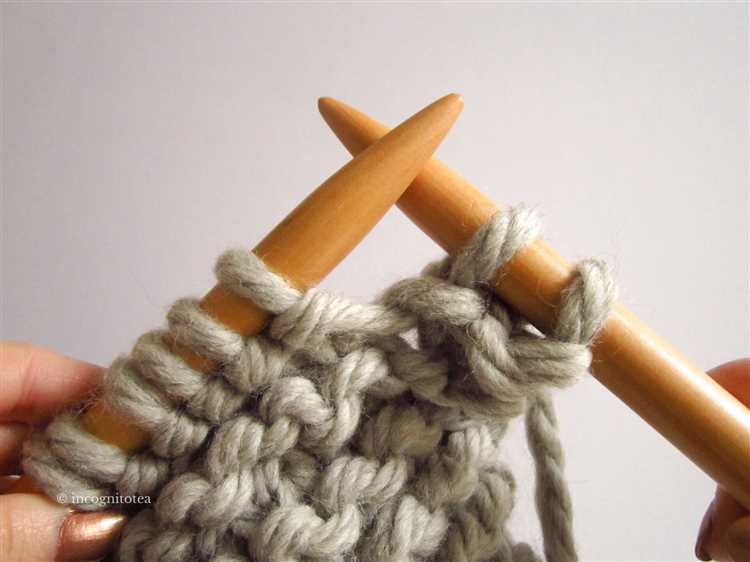
Step 2: Insert the left needle into the front of the first stitch on the right needle, and lift it over the second stitch and off the needle. You now have one stitch remaining on the right needle.
Step 3: Knit the next stitch on the left needle, and repeat step 2. Continue in this manner, knitting one stitch and binding off the previous stitch, until you have reached the end of the round.
Tip: To ensure a stretchy edge, you can use a larger needle or knit the stitches more loosely when binding off.
Step 4: Once you have bound off all the stitches, cut the yarn, leaving a tail of about 6 inches. Thread the tail through the last stitch, and pull it tight to secure the edge.
Step 5: Weave in any loose ends with a darning needle to finish off your project.
By following these simple steps, you can confidently cast off your knitting in the round, leaving you with a professional-looking edge and a completed project ready to be worn or gifted.
Gather the Necessary Materials
Before you start casting off your knitting in the round, make sure you have the following materials:
- A set of double-pointed needles or a circular needle, depending on the length of your knitting
- A stitch marker or a safety pin
- A yarn needle
- A pair of scissors
- Enough yarn left to complete the casting off process
If you have all of these materials ready, you can proceed to the next steps of casting off your knitting in the round. It’s important to have everything prepared before you begin to ensure a smooth and uninterrupted process.
Create a Slipknot
Before you can start casting off your knitting in the round, it’s important to create a slipknot at the beginning of your yarn. The slipknot will serve as the anchor for your cast off stitches.
To create a slipknot, follow these steps:
- Hold the end of your yarn in one hand and make a loop by crossing the end over the main strand.
- Pass the end of the yarn through the loop.
- Pull the end of the yarn tight to secure the slipknot.
Make sure the slipknot is secure but not too tight. You should be able to easily slide the slipknot along the yarn.
Once you have created the slipknot, you can proceed to the next step of casting off your knitting in the round.
Begin the Bind-Off
Once you have completed the final round of your knitting project in the round, it’s time to begin the bind-off process. This is how you will secure the stitches and create a finished edge on your project.
To begin the bind-off, you will need a pair of scissors to cut the yarn, leaving a long enough tail to work with. The general rule of thumb is to leave a tail that is about three times the width of your project.
- Start by knitting the first two stitches of your round as you normally would.
- Insert the left needle into the first stitch on the right needle.
- Lift the first stitch over the second stitch and off the right needle, essentially binding it off.
- Knit the next stitch on the left needle.
- Lift the first stitch over the second stitch and off the right needle again, binding off another stitch.
- Repeat steps 4 and 5 until you have reached the end of your round.
As you bind off each stitch, make sure to keep your tension even and not too tight. You want the edge to be flexible and stretchy, but not loose and floppy.
Once you have reached the end of the round and bound off all the stitches, cut the yarn, leaving a long tail. Thread the tail through the last stitch and pull tight to secure. You can then weave in the loose ends using a yarn needle to ensure they are hidden and secure.
With the bind-off complete, you have successfully finished your knitting project in the round! Your cast-off edge should be neat and tidy, ready for any finishing touches or blocking that may be required for your specific project.
Continue Binding Off
Once you have completed the first round of binding off, continue to bind off each stitch in the round in the same manner as before.
- Insert your right needle into the first stitch on the left needle.
- Wrap the working yarn around the right needle.
- Pull the yarn through the stitch, creating a new stitch on the right needle.
- Slip the old stitch from the left needle onto the right needle.
- Repeat steps 1-4 until you have bound off all the stitches in the round, leaving only one stitch on the right needle.
You can choose to bind off using a basic bind off or a stretchy bind off, depending on the desired finish of your project.
- For a basic bind off, knit two stitches together and pass the first stitch over the second stitch on the right needle.
- For a stretchy bind off, use a stretchy bind off method such as the Russian bind off or the suspended bind off.
Once you have completed the final bind off stitch, cut the working yarn, leaving a tail of about 6 inches. Pull the tail through the last stitch to secure it.
Your knitting in the round is now successfully bound off! You can weave in any remaining yarn tails and block your project if desired to achieve the desired shape and finish.
Finish the Bind-Off
Once you have cast off all your stitches, there are a few finishing touches you can add to ensure that your bind-off is neat and secure.
1. Weave in the ends: Use a yarn needle to weave in the loose ends of your yarn. Thread the needle with the tail of yarn and weave it in and out of the stitches on the wrong side of the fabric. Trim any excess yarn.
2. Block your work: Blocking is the process of wetting or steaming your knitting to even out the stitches and help your finished project hold its shape. Follow the instructions for blocking your specific yarn and project.
3. Try on your work: After blocking, try on your finished project to make sure it fits properly. If any adjustments need to be made, you can do so before the bind-off is fully secured.
4. Secure the bind-off: To prevent your bind-off from unraveling, you can use a small crochet hook or the tail of your yarn to thread it through the last stitch. Pull tight to secure.
5. Enjoy your finished project! Once your bind-off is complete and your project is blocked and secure, you can admire and enjoy your finished knitting project. Whether it’s a hat, a sweater, or a pair of socks, take pride in your work and show it off!
Weave in the Ends
Once you have finished casting off your knitting in the round, you will need to weave in the ends to secure them and give your project a neat and finished appearance.
Here is a step-by-step guide on how to weave in the ends:
- Thread the end of the yarn onto a tapestry needle. Make sure to leave a tail that is long enough to weave in without it unraveling.
- Identify the stitches where you want to weave in the ends. It’s best to weave them in on the wrong side of your knitting, as this will hide the ends and keep them securely in place.
- Insert the needle under the stitches near where the end is located. You can go in a straight line or weave in and out of the stitches for added security.
- Pull the needle through until the end is completely woven in. Be careful not to pull too tight, as this can distort your knitting.
- Cut off any excess yarn close to the fabric. Leave a small tail to prevent the end from unraveling.
- Repeat the process for any other ends you have.
By weaving in the ends, you are ensuring that your knitting project will hold up over time and not come undone. It also gives your finished piece a professional look.
Now that you know how to cast off and weave in the ends, you can confidently finish any knitting project in the round. Happy knitting!
Final Thoughts
Casting off in knitting can sometimes be intimidating, especially when working in the round. However, by following this step-by-step guide, you should now have a good understanding of how to cast off in the round and achieve a clean and professional finish to your project.
Remember to take your time and practice this technique to improve your knitting skills. The more you do it, the more confident you will become in casting off in the round. Don’t be afraid to make mistakes, as they are an opportunity to learn and grow as a knitter.
One important thing to remember is to always check the tension of your stitches while casting off. This will ensure that your finished edge is not too tight or too loose. Adjust your tension if necessary to achieve a neat and even edge.
Additionally, don’t forget to block your finished project after casting off. Blocking will help even out your stitches and give your project a polished and professional look. Follow the blocking instructions for your specific yarn to ensure the best results.
Lastly, have fun with your knitting! Experiment with different cast-off methods and explore new patterns and designs. Knitting should be an enjoyable and creative process, so don’t hesitate to try new things and make your projects uniquely yours.
Happy knitting!
FAQ:
What does “casting off” mean in knitting?
Casting off, also known as binding off, is the process of finishing a knitting project by securing the stitches and removing them from the knitting needles.
Why is it necessary to cast off in knitting?
Casting off is necessary to ensure that the stitches at the end of a knitting project do not unravel or come undone. It gives a clean and finished edge to the knitted piece.
Can you cast off in knitting in the round?
Yes, you can cast off in knitting in the round. The process is similar to casting off in regular knitting, but there are a few additional steps to consider.
What are the steps to cast off knitting in the round?
1. Knit the first two stitches together. 2. Insert the left needle into the front of the stitch on the right needle. 3. Lift the stitch over the top of the right needle and off. 4. Repeat steps 2 and 3 until one stitch remains. 5. Cut the yarn and thread it through the last stitch, pulling tight to secure.


