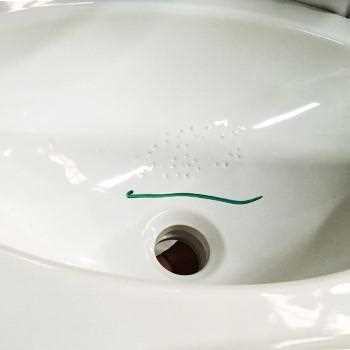
When creating pottery, one of the most frustrating things that can happen is discovering pinholes in your glaze. These tiny holes can ruin the appearance of your piece and make it less functional. However, it is possible to identify and fix the common causes of pinholes, ensuring that your glaze is smooth and flawless.
One of the main causes of pinholes is improper mixing of the glaze. If the ingredients are not thoroughly combined, air bubbles can become trapped, resulting in small holes. It is crucial to mix your glaze properly, using a mixer or a sieve, to eliminate any air bubbles and create a smooth consistency.
Another common cause of pinholes is the presence of impurities in the glaze. These impurities can come from the raw materials used or from contamination during the glazing process. It is essential to use high-quality materials and to strain your glaze before applying it to your pottery to remove any impurities.
The firing process can also contribute to the formation of pinholes. If the kiln temperature is too low or the firing time is too short, the glaze may not have enough time to mature and heal any defects. It is crucial to follow proper firing schedules and to ensure that the kiln reaches the correct temperature for your glaze.
Other causes of pinholes can include inadequate thickness of the glaze layer, improper application techniques, or the use of incompatible materials. By identifying these common causes and taking appropriate measures to address them, you can prevent pinholes in your pottery glaze and create beautiful, flawless pieces.
Inadequate Cleaning of Clay
When working with clay, it is essential to ensure that it is properly cleaned before applying any glaze. Failure to do so can result in pinholes in the finished product. Here are some reasons why inadequate cleaning of clay can lead to pinholes:
- Contaminants on the Clay Surface: If the clay surface is not thoroughly cleaned, contaminants such as dust, oils, or other debris can be trapped beneath the glaze during firing. These contaminants can cause air bubbles to form, resulting in pinholes.
- Residual Moisture: Clay should be completely dry before glazing to prevent steam from being trapped beneath the glaze during firing. If the clay is not properly dried, the moisture can turn into steam and create air pockets, leading to pinholes.
- Poor Clay Preparation: Inadequate clay preparation, such as inadequate wedging or improper kneading, can result in air pockets being trapped within the clay. These air pockets can later become pinholes when glaze is applied and fired.
To prevent pinholes caused by inadequate cleaning of clay, it is important to follow these steps:
- Thoroughly Clean Clay Surfaces: Before applying glaze, ensure that the clay surface is free from any contaminants. Use a sponge or damp cloth to remove any dust, oils, or debris from the clay surface.
- Properly Dry the Clay: Allow the clay to dry completely before glazing. This will prevent any residual moisture from turning into steam during firing and causing pinholes.
- Ensure Proper Clay Preparation: Take the time to properly prepare the clay by wedging or kneading it to remove any air pockets. This will help prevent pinholes caused by trapped air within the clay.
By following these preventative measures and ensuring that the clay is properly cleaned, you can minimize the occurrence of pinholes in your pottery glaze.
Improper Drying Techniques
The way pottery is dried can significantly affect the glaze and can contribute to the formation of pinholes. Here are some common improper drying techniques that can lead to pinholes in pottery glaze:
- Air Drying: Air drying pottery can be a slow and inconsistent process, especially if the conditions are not ideal. If the clay dries too quickly or unevenly, it can create stress in the glaze, leading to pinholes.
- Heat Drying: Applying excessive heat during the drying process can cause the moisture within the clay to escape too quickly, resulting in cracks and pinholes in the glaze.
- Insufficient Drying Time: If pottery is not allowed enough time to fully dry before applying the glaze, the remaining moisture can cause pinholes to form as it evaporates during the firing process.
To avoid pinholes caused by improper drying techniques, it is important to follow these best practices:
- Allow the pottery to dry slowly and evenly in a controlled environment, away from direct sunlight and drafts.
- Use a fan or dehumidifier to help regulate the drying process, ensuring that the clay dries at a consistent rate.
- Avoid applying excessive heat or using techniques like hairdryers to speed up the drying process.
- Take into account the size and thickness of the pottery when determining the drying time needed before glazing.
- Check for any remaining moisture in the pottery by touching the surface or using a moisture meter before applying the glaze.
By properly drying pottery, you can minimize the risk of pinholes occurring in the glaze and achieve a smoother and more consistent finish.
Insufficient Glaze Thickness
One common cause of pinholes in pottery glaze is insufficient glaze thickness. When the glaze layer is too thin, it can result in tiny holes or gaps in the fired glaze surface. These pinholes can occur anywhere on the pottery piece and can be frustrating for potters.
There are several reasons why a glaze layer may be too thin:
- Inadequate application: If the glaze is not applied evenly or if the potter does not use enough glaze when applying it to the pottery surface, the resulting layer may be too thin.
- Inadequate glaze materials: The quality of the glaze materials used can also affect the thickness of the glaze layer. If the glaze materials are not mixed properly or if low-quality materials are used, the glaze layer may not be thick enough.
- Inadequate firing: The firing process plays a crucial role in glaze thickness. If the kiln temperature is too low, it can prevent the glaze from melting and flowing properly, resulting in a thin layer.
To fix the issue of insufficient glaze thickness and prevent pinholes, potters can take several steps:
- Ensure proper glaze application: Potters should make sure to apply the glaze evenly and use enough glaze to achieve the desired thickness. Using a brush or other suitable tools can help in achieving an even application.
- Use quality glaze materials: Using high-quality glaze materials and properly mixing them can help in achieving a thicker glaze layer. Potters should also ensure that the glaze materials are compatible with the clay body being used.
- Optimize firing process: Potters should carefully monitor the kiln temperature and firing schedule to ensure that it reaches the appropriate temperature to melt and flow the glaze properly. Making adjustments to the firing process may be necessary to achieve the desired glaze thickness.
Regular testing and experimentation can help potters determine the right glaze thickness and firing conditions for their specific pottery pieces. By addressing the issue of insufficient glaze thickness, potters can minimize the occurrence of pinholes and achieve the desired surface finish on their pottery.
Contamination from Dust or Debris
One of the most common causes of pinholes in pottery glaze is contamination from dust or debris. When dust or debris particles are present on the surface of the pottery before the glaze is applied, they can create tiny pockets of trapped air. As the glaze melts and flows during firing, these pockets of air can cause pinholes to form.
To prevent contamination from dust or debris, it is important to keep your pottery studio clean and free from dust and other particles. Here are a few tips:
- Regularly clean your workspace, including your pottery wheel, kiln, and any other tools or equipment you use.
- Keep your glaze materials covered when not in use to prevent dust from settling on them.
- Wash your hands thoroughly before handling pottery to remove any dirt or debris.
- Use a clean brush or sponge to apply glaze, and avoid touching the surface of the pottery with your hands.
If you notice pinholes in your glaze despite taking these precautions, you may need to examine your glaze materials for contamination. Sometimes, tiny particles can be present in the glaze itself, causing pinholes. In this case, it may be necessary to sieve or strain your glaze before applying it to your pottery.
Overall, maintaining a clean and dust-free pottery studio will help minimize the risk of contamination from dust or debris and reduce the occurrence of pinholes in your pottery glaze.
Incorrect Firing Temperature
One of the common causes of pinholes in pottery glaze is an incorrect firing temperature. The firing temperature plays a crucial role in the glaze development process, and if it is not properly controlled, it can lead to pinholes.
Here are some factors related to firing temperature that can cause pinholes:
- Low firing temperature: If the pottery is not fired at a high enough temperature, the glaze may not fully mature. This can result in pinholes as the glaze is not able to properly melt and form a smooth surface.
- Rapid cooling: Rapid cooling after firing can also lead to pinholes. If the pottery is cooled too quickly, the glaze may not have enough time to properly develop, resulting in pinholes.
- Overfiring: On the other hand, firing the pottery at a temperature that is too high can also cause pinholes. The excessive heat can cause the glaze to become gas-permeable, leading to the formation of pinholes.
To fix pinholes caused by incorrect firing temperature, it is important to ensure that the firing schedule is carefully followed. This includes accurately setting the firing temperature, controlling the rate of heating and cooling, and maintaining optimal firing conditions.
Additionally, it is advisable to conduct test firings to determine the optimal firing temperature for the specific glaze being used. This can help identify the correct temperature range that will result in a smooth and pinhole-free glaze surface.
| Cause | Description |
|---|---|
| Incorrect Firing Temperature | The firing temperature is too low, too high, or the pottery is cooled too rapidly. |
| Poor Glaze Application | The glaze is applied unevenly or too thickly. |
| Impurities in the Glaze | Contaminants in the glaze can cause gas bubbles and pinholes. |
| Inadequate Ventilation | Lack of proper ventilation can lead to trapped gases in the glaze. |
| Insufficient Bisque Firing | The bisque firing is not done properly, resulting in pinholes in the glaze. |
| Glaze Too Thick | Applying the glaze too thickly can cause pinholes during firing. |
Use of Incompatible Glazes
Incompatible glazes can cause pinholes in pottery. This occurs when different glazes used on the same piece of pottery do not adhere to each other properly. When these incompatible glazes are fired together, they can create a barrier that prevents gases from escaping, resulting in pinholes.
There are several reasons why glazes may be incompatible:
- Different firing temperatures: If glazes have different firing temperatures, they may not melt and flow together properly, creating a barrier that leads to pinholes.
- Chemical reactions: Some glazes contain ingredients that react with each other when fired, resulting in the formation of gases that can cause pinholes.
- Different compositions: Glazes with different compositions may not have compatible fluxes or glass formers, which can lead to the formation of gas bubbles and pinholes.
To avoid pinholes caused by incompatible glazes, it is important to use glazes that are compatible with each other. This can be achieved by:
- Testing: Before applying glazes to a pottery piece, it is recommended to test their compatibility first. This can be done by applying the glazes to small test tiles and firing them together to observe the results.
- Using compatible glaze recipes: Stick to glaze recipes that are known to be compatible with each other. This can be obtained through research or by consulting experienced potters.
- Layering glazes: If you want to use different glazes on a pottery piece, consider layering them instead of applying them side by side. Layering can help create a smoother transition between glazes and reduce the risk of pinholes caused by incompatibility.
By taking these precautions, you can minimize the risk of pinholes caused by incompatible glazes and create pottery pieces with a smooth, flawless appearance.
Solutions for Pinhole Prevention
Preventing pinholes in pottery glaze can be challenging, but with the right techniques and precautions, you can significantly reduce their occurrence. Here are some solutions to consider:
- Sieve your glaze: Using a fine mesh sieve will help remove any impurities or particles that could cause pinholes in the glaze. This will result in a smoother and more consistent application.
- Avoid overloading the glaze: Applying a thick layer of glaze can increase the likelihood of pinholes. Instead, apply multiple thin layers, allowing each layer to dry before applying the next.
- Control the drying process: Rapid drying can cause the formation of pinholes. To avoid this, gradually dry your pottery by placing it on a drying rack or using a controlled drying cabinet.
- Clean your kiln shelves: Dust, debris, or leftover glaze on your kiln shelves can transfer to your pottery during firing and cause pinholes. Regularly clean your kiln shelves to prevent this from happening.
- Experiment with glaze recipes: Some glaze materials are more prone to pinholes than others. Experimenting with different glaze recipes or adjusting the composition of your current glaze might help reduce pinhole formation.
- Optimize firing schedule: A well-designed firing schedule can help minimize the occurrence of pinholes. Adjusting the temperature, ramp rates, and holds during the firing process can make a significant difference.
By implementing these pinhole prevention techniques, you can improve the overall quality of your pottery glaze and minimize the occurrence of pinholes.
Troubleshooting and Repairing Pinholes
Pinholes in pottery glaze can be frustrating, but with some troubleshooting and careful repair work, they can be resolved. Here are some steps to help you identify and fix pinholes in your pottery glaze:
- Clean the Surface: Before troubleshooting and repairing pinholes, make sure the surface of the pottery is clean and free from any debris or dust.
- Identify the Cause: Pinholes can have various causes, such as incorrect application techniques, impurities in the glaze, or firing issues. Carefully examine the pottery to determine the specific cause of the pinholes.
- Troubleshoot and Prevent: Once you have identified the cause, take appropriate measures to troubleshoot and prevent the pinholes from occurring in the future. This may involve adjusting your application technique, refining your glaze recipe, or ensuring proper firing conditions.
- Repairing Pinholes: If you have already fired the pottery and pinholes are present, you can still repair them. One method is to mix a small amount of glaze with a fine clay and apply it directly to the pinholes using a small brush or tool. Smooth out the surface and carefully blend the repair into the surrounding glaze.
- Re-firing: Once you have repaired the pinholes, you will need to re-fire the pottery. Follow the recommended firing schedule for your glaze and make sure to monitor the process closely to avoid any further issues.
- Finishing Touches: After re-firing, inspect the pottery for any remaining pinholes. If necessary, repeat the repair process until all pinholes are resolved. Once you are satisfied with the results, apply any desired finishing touches, such as additional glaze layers or decorative techniques.
Remember, troubleshooting and repairing pinholes in pottery glaze can be a trial-and-error process. It may require some experimentation and adjustments to find the best solution for your specific situation. With patience and perseverance, you can achieve a smooth and flawless glazed surface on your pottery.
FAQ:
What are pinholes in pottery glaze?
Pinholes in pottery glaze are tiny holes or spots that appear on the surface of the glazed pottery after firing. They are usually caused by trapped air or gases escaping during the firing process.
Why do pinholes occur in pottery glaze?
There are several common causes of pinholes in pottery glaze. These include improper application of glaze, presence of impurities in the glaze, firing too quickly or at too high a temperature, inadequate venting of the kiln, and contamination from other materials.
How can I identify pinholes in pottery glaze?
Pinholes in pottery glaze are easy to identify. They typically appear as small, round craters or dots on the surface of the glazed pottery. They can vary in size and density, and may be more noticeable on certain glaze colors or finishes.
Can pinholes in pottery glaze be fixed?
Yes, pinholes in pottery glaze can be fixed. The method of fixing them depends on the specific cause. Some common fixes include adjusting the glaze thickness, improving the application technique, adding a flux material to the glaze, increasing the firing time or temperature, and ensuring proper ventilation in the kiln.
How can I prevent pinholes in pottery glaze?
There are several steps you can take to prevent pinholes in pottery glaze. These include properly preparing the glaze, ensuring proper application and thickness, avoiding contamination from other materials, using a high-quality kiln with adequate ventilation, and following proper firing techniques and schedules.


