Knitting is a popular craft that involves creating fabric by interlocking loops of yarn with knitting needles. One of the essential techniques in knitting is the decrease stitch, which allows you to shape your knitting by reducing the number of stitches. Decreasing is crucial for creating shaping in patterns, such as shaping a neckline or making decreases at the toe of a sock. In this beginner’s guide, we will walk you through the basics of knitting decrease stitches, so you can add this important skill to your knitting repertoire.
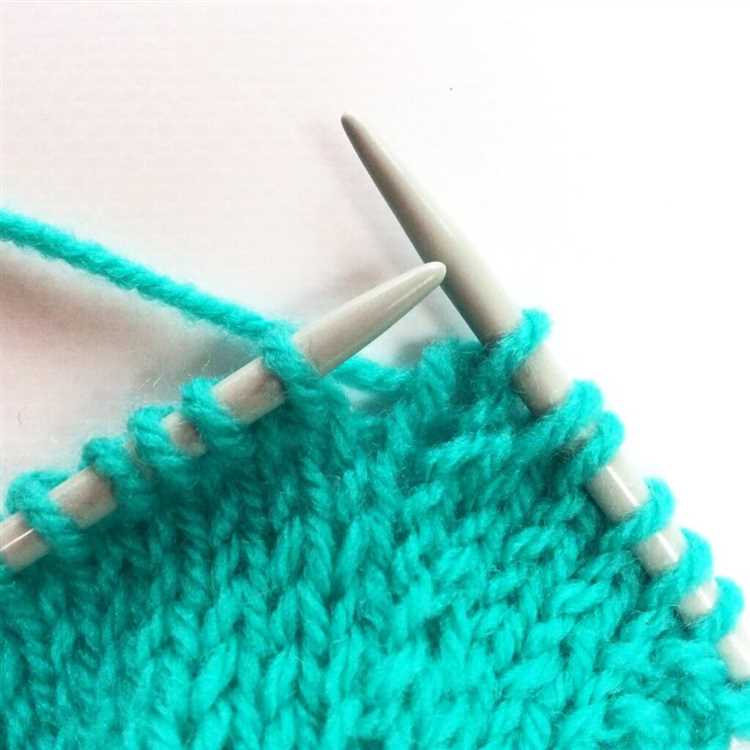
There are several methods for decreasing in knitting, and each method creates a different effect. One common decrease stitch is the knit two together (k2tog). To execute this decrease, insert the right needle into the next two stitches on the left needle and knit them together as if they were one stitch. This decreases the stitch count by one while maintaining the pattern’s integrity. The k2tog decrease is most commonly used in patterns that require a subtle decrease.
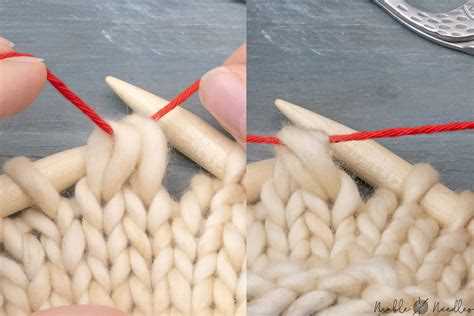
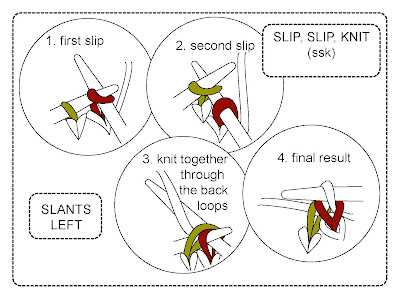
Another widely used decrease stitch is the slip slip knit (ssk). To perform this decrease, slip two stitches from the left needle to the right needle one at a time knitwise. Then, insert the left needle into the front loops of the slipped stitches and knit them together through the back loop. The ssk decrease creates a left-leaning decrease and is often used in shaping garments, such as sleeves or waistlines.
Pro tip: Remember to count your stitches before and after each decrease to ensure you maintain the correct stitch count in your pattern. It’s easy to lose track, especially if you’re working on a complex pattern with multiple decrease points.
By learning how to knit decrease stitches, you’ll have the power to shape your knitting projects to your desired fit and appearance. Practice these basic decrease stitches, and soon you’ll be able to tackle more intricate patterns that require shaping. Happy knitting!
What is Knitting Decrease?
In knitting, decrease refers to a technique used to reduce the number of stitches in a row or round. This technique is commonly used in shaping projects such as sleeves, yokes, and waistlines where you need to create a tapered or curved effect.
When you decrease stitches, you essentially combine two or more stitches into one, reducing the overall stitch count. This creates a tighter fabric and alters the shape of the knitted piece.
There are several methods for decreasing stitches in knitting, including:
- Knit Two Together (k2tog): In this method, you insert your right needle into the next two stitches on the left needle as if to knit, and then knit them together as one stitch.
- Purl Two Together (p2tog): Similar to k2tog, but used when you’re working in purl stitches.
- Slip, Slip, Knit (ssk): In this method, you slip the next two stitches knitwise onto the right needle, then insert the left needle into the front of these two stitches and knit them together through the back loops.
- Knit Three Together (k3tog): This method is used when you need to decrease three stitches into one.
- Slip, Slip, Purl (ssp): Similar to ssk, but used when you’re working in purl stitches.
- And many more, depending on the stitch pattern and desired effect.
It’s important to follow the pattern instructions or charts carefully when it comes to decreasing stitches. The type and frequency of decrease stitches will vary depending on the pattern and the specific design you’re working on.
By learning how to decrease stitches, you’ll have more control over the shape and fit of your knitting projects. It’s a valuable technique to have in your knitting repertoire and opens up a world of creative possibilities.
Tools and Materials for Knitting Decrease
In order to learn how to knit decrease, you will need a few tools and materials to get started. Here’s a list of essentials:
- Knitting Needles: Choose a pair of knitting needles that are appropriate for the yarn you will be using. Different projects may require different needle sizes, so make sure to check the pattern instructions.
- Yarn: Select a suitable yarn for your project. The weight and texture of the yarn will affect the outcome of your knitting, so choose one that is appropriate for the pattern and your personal preference.
- Tapestry Needle: This needle is used for weaving in loose ends and sewing pieces together. It should have a large eye and a blunt tip to easily maneuver through the stitches.
- Scissors: You will need a pair of sharp scissors to cut the yarn when needed. Make sure they are small and easy to handle.
- Stitch Markers: These handy little tools can be placed on your needles to mark important points in your knitting, such as the beginning and end of a pattern repeat or the location of a decrease.
- Row Counter: Keeping track of your rows is important when knitting decrease. A row counter can be a physical device or a digital app that helps you keep count and stay organized.
Having these tools and materials ready will set you up for success as you learn and practice knitting decrease techniques. With a little time and patience, you’ll be creating beautiful decreases in no time!
Common Types of Knitting Decrease Techniques
When knitting, it is often necessary to decrease the number of stitches in a row in order to shape the fabric. This can be done in several different ways, each with its own purpose and effect. Here are some common types of knitting decrease techniques:
- Knit Two Together (K2tog): This is one of the most basic decrease techniques. To knit two together, simply insert the right needle into the next two stitches on the left needle and knit them as if they were one stitch.
- Purl Two Together (P2tog): Similar to K2tog, P2tog is used to decrease the number of stitches in a purl row. Insert the right needle into the next two stitches on the left needle and purl them together.
- Slip, Slip, Knit (SSK): SSK is another commonly used decrease technique. To perform SSK, slip the next two stitches on the left needle knitwise, insert the left needle into the front of the slipped stitches, and knit them together through the back loops.
- Knit Three Together (K3tog): K3tog is used to decrease three stitches at once. Insert the right needle into the next three stitches on the left needle and knit them together.
- S1, K2tog, PSSO: This decrease technique is often referred to as “slip, knit, pass.” Slip the next stitch from the left needle to the right needle knitwise, knit the next two stitches together, and then pass the slipped stitch over the knitted stitch.
These are just a few examples of the many knitting decrease techniques available. Experiment with different techniques to achieve the desired shaping and appearance in your knitted projects. Remember to always follow the pattern instructions for the specific decrease technique to use.
How to Knit Decrease: Step-by-Step Guide
Knitting decrease is an important technique for shaping your knitted fabric, and it’s a skill that every knitter should master. Decreasing stitches helps create a tapered or fitted look, and it’s often used in shaping garments such as sleeves, necklines, and waistlines. In this step-by-step guide, we’ll walk you through the process of knitting decrease.
Materials Needed:
- Knitting needles
- Yarn
- Scissors
Step 1: Identify the Decrease Stitch
To start, you need to identify the stitch you want to decrease. It’s usually indicated in your knitting pattern and denoted as “k2tog” or “ssk.” The “k2tog” is a right-leaning decrease, while the “ssk” is a left-leaning decrease.
Step 2: Right-Leaning Decrease (k2tog)
- Insert the right needle into the next two stitches on the left needle as if to knit.
- Wrap the yarn around the right needle from back to front.
- Slide the right needle through the two stitches, and pull the loop through to the front of your work.
- Drop the two stitches off the left needle.
Step 3: Left-Leaning Decrease (ssk)
- Slip the next stitch from the left needle to the right needle as if to knit.
- Slip the following stitch from the left needle to the right needle as if to purl.
- Insert the left needle into the front loops of both slipped stitches from left to right.
- Wrap the yarn around the left needle from back to front.
- Slide the left needle through the two stitches, and pull the loop through to the front of your work.
- Drop the two stitches off the right needle.
Step 4: Practice and Experiment
As with any knitting technique, practice makes perfect. Try knitting decrease on a small swatch before attempting it on your project. Experiment with different decrease methods and see which one works best for your project. Don’t be afraid to make mistakes and learn from them!
Mastering the art of knitting decrease opens up a whole new world of possibilities in your knitting projects. Whether you’re shaping a garment or creating intricate stitch patterns, this technique will be invaluable. So grab your needles and yarn, and start knitting decrease today!
Troubleshooting Common Issues with Knitting Decrease
Knitting decrease is an essential technique for creating shaping and texture in your knitted projects. However, like any new skill, it can take some practice to get it right. Here are some common issues knitters face when learning how to knit decrease and how to troubleshoot them:
- Holes in the fabric: If you notice small holes near your decrease stitches, it is likely due to not pulling the working yarn tight enough after completing the decrease. Make sure to give the working yarn a gentle tug to close up any gaps.
- Uneven stitches: If your decrease stitches appear uneven or sloppy, it could be due to inconsistent tension. Pay attention to how tightly you pull the yarn when working the decrease and try to maintain the same tension as the rest of your knitting.
- Twisted stitches: Twisting your decrease stitches can happen if you insert your needle incorrectly. Take extra care to insert your needle into the correct part of the stitch when working the decrease to avoid twisting.
- Inconsistent stitch count: If you find that your stitch count is off after working a decrease, it may be because you missed or accidentally worked an extra decrease. Double-check your pattern instructions and count your stitches carefully to ensure accuracy.
Remember, practice makes perfect when it comes to knitting decrease. Don’t be discouraged if you encounter these common issues – they can easily be remedied with a bit of patience and attention to detail. Keep practicing and soon you’ll be creating beautiful, well-executed decreases in your knitting projects!
Tips and Tricks for Knitting Decrease
If you’re a beginner knitter, learning how to decrease stitches can be a bit intimidating. However, with a few tips and tricks, you’ll be able to master this technique in no time. Here are some helpful suggestions to make knitting decrease easier:
1. Choose the Right Decrease Method
There are several methods for decreasing stitches in knitting, including knit two stitches together (K2tog), slip slip knit (SSK), and knit two stitches through the back loop (K2tbl). Experiment with different methods to find the one that works best for you.
2. Use Stitch Markers
When working on a complex knitting pattern that requires multiple decrease stitches, it can be helpful to use stitch markers. These markers can help you keep track of where to make your decreases and prevent mistakes.
3. Pay Attention to Tension
While knitting decrease stitches, it’s important to maintain an even tension to ensure that your finished project looks neat and uniform. Practice knitting decrease stitches slowly and pay attention to your tension to achieve consistent results.
4. Count Your Stitches
Always count your stitches after making a decrease to ensure that you haven’t accidentally skipped or added any stitches. This step will help you avoid any mistakes that could affect the final shape and size of your project.
5. Practice on Scrap Yarn
If you’re feeling unsure about knitting decrease stitches, try practicing on scrap yarn before attempting them on your actual project. This will help you gain confidence and improve your technique without the fear of ruining your work.
6. Use a Stitch Dictionary
A stitch dictionary can be a great resource for learning different decrease stitches and understanding how they are used in knitting patterns. Refer to a stitch dictionary for inspiration and guidance when working on new projects.
7. Take Breaks
Learning a new knitting technique can be mentally and physically tiring. Remember to take breaks and give yourself time to rest and relax. This will help you stay focused and avoid frustration or fatigue.
8. Don’t Be Afraid to Ask for Help
If you’re struggling with knitting decrease stitches, don’t hesitate to ask for help. Join a knitting group or seek advice from experienced knitters who can provide guidance and share their own tips and tricks.
With these tips and tricks, you’ll be well on your way to mastering knitting decrease stitches. Practice regularly and be patient with yourself, and soon you’ll be able to tackle more complex knitting projects with confidence!
Projects to Practice Knitting Decrease
Once you have learned how to knit a decrease, it’s time to put your new skill to the test with some fun and practical projects. Here are a few ideas to get you started:
1. Knitted Hat
A knitted hat is a great project to practice knitting decrease as it often requires shaping at the crown. Choose a pattern that includes decrease stitches such as knit two together (k2tog) or slip, slip, knit (ssk) to create a tapered crown. You’ll be able to master the decrease techniques while creating a stylish accessory.
2. Fingerless Gloves
Fingerless gloves are another project that allows you to practice knitting decrease. These gloves often require shaping around the thumb opening. Look for patterns that include decreases to shape the thumb gusset or create a ribbed section for a snug fit. Fingerless gloves are not only practical but also a great way to show off your newly acquired skills.
3. Baby Booties
If you’re looking for a smaller project, baby booties are perfect to practice knitting decrease. These adorable accessories usually involve shaping at the toe to create a nice rounded shape. Look for patterns that use decrease stitches like slip, slip, knit (ssk) or knit two together (k2tog) to shape the toe. Knitting baby booties can be a quick and rewarding project.
4. Dishcloths
Dishcloths are versatile projects that allow you to practice knitting decrease in a practical way. Choose patterns that include decrease stitches to create interesting texture and design. Dishcloths are quick to knit, and they make great gifts or additions to your own kitchen.
5. Scarf with a Chevron Design
If you’re up for a bit more challenge, try knitting a scarf with a chevron design. This project will help you practice knitting decrease for shaping the peaks and valleys of the chevron pattern. Look for patterns that include decrease stitches like slip, slip, knit (ssk) or knit two together (k2tog) to achieve the desired effect. A chevron scarf will add a stylish touch to any outfit.
Remember, practice makes perfect! The more projects you tackle that involve knitting decrease, the more comfortable and skilled you’ll become. Don’t be afraid to experiment and try new patterns to keep challenging yourself and honing your knitting skills.
FAQ:
What is knitting decrease?
Knitting decrease is a technique used in knitting to reduce the number of stitches in a row. It is typically used to shape knitting projects, such as creating waist shaping in sweaters or decreasing the size of a hat crown.
How do I knit a decrease stitch?
To knit a decrease stitch, you can use various techniques depending on the desired result. One common decrease is the knit two together (k2tog) method, where you insert the needle into the next two stitches on the left needle as if to knit, and then knit them together as one stitch. Another popular decrease is the slip, slip, knit (ssk) method, where you slip two stitches knitwise one by one onto the right needle, then insert the left needle from left to right into the front loops of the slipped stitches and knit them together. There are other decrease methods as well, such as the centered double decrease (cdd) or the slip slip knit pass (sskp).
Can knitting decrease be done on any knitting project?
Knitting decrease can be done on most knitting projects, depending on the desired shaping and design. It is commonly used in projects like sweaters, hats, socks, and mittens to create shaping, decrease stitch counts, or form specific patterns. However, it may not be necessary or appropriate for all knitting projects, such as scarves or blankets without any shaping. It is important to assess the pattern and design of your project to determine if knitting decrease is required.


