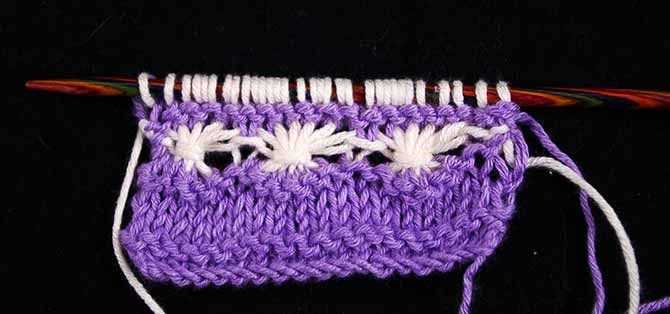
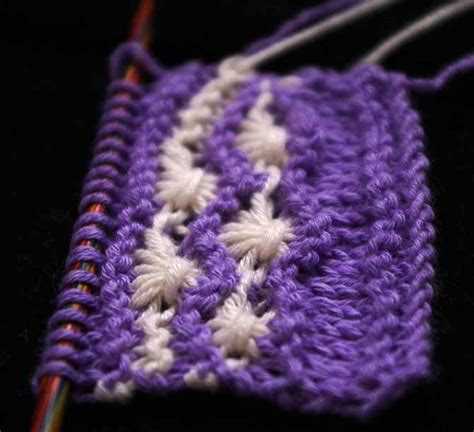
Knitting wrapped stitches is a technique that adds texture and visual interest to your knitted projects. Whether you’re a beginner or an experienced knitter, learning how to knit wrapped stitches can elevate your knitting skills to the next level. In this step-by-step guide, we’ll walk you through the process of knitting wrapped stitches, from understanding the technique to practicing it on your own projects.
Wrapped stitches are created by wrapping the yarn around the needle before knitting the stitch. This creates a loop that adds texture and dimension. Wrapped stitches can be used to create beautiful patterns, such as cables, lace, and decorative borders. They can also be used to create unique and intricate designs on garments like sweaters, scarves, and hats.
One of the best things about learning how to knit wrapped stitches is that it’s a relatively simple technique that can be easily mastered by beginners. All you need is some yarn, knitting needles, and a little bit of patience. Once you understand the basic steps and practice a few times, you’ll be able to incorporate wrapped stitches into your knitting projects with confidence.
In this guide, we’ll break down the process of knitting wrapped stitches into easy-to-follow steps. We’ll provide detailed instructions, along with helpful tips and tricks, to ensure that you’re able to successfully knit wrapped stitches. By the end of this guide, you’ll be able to add this versatile technique to your repertoire and explore the endless possibilities it offers in your knitting projects.
Benefits of knitting wrapped stitches
Knitting wrapped stitches can add texture and visual interest to your knitting projects. Here are some benefits of incorporating wrapped stitches into your knitting:
- Enhanced texture: Wrapping a stitch creates an additional loop that adds depth and texture to your fabric. This can be particularly effective when working on projects such as scarves, shawls, or blankets.
- Elevated design: Wrapped stitches can create unique design elements in your knitting, making your projects stand out. Whether you want to add a decorative detail or incorporate a different stitch pattern, wrapped stitches offer endless possibilities.
- Improved stitch definition: Wrapping a stitch can help define it more clearly, making intricate stitch patterns more noticeable. This is especially beneficial when working with complex stitch patterns or when you want to showcase specific stitches in your design.
- Increased warmth and insulation: The wrapped stitches create an extra layer of yarn on the fabric, which can help trap air and improve insulation. This makes wrapped stitch projects great for colder climates or for when you want to create cozy accessories like hats or mittens.
Furthermore, learning how to knit wrapped stitches expands your knitting skills and repertoire, allowing you to tackle more advanced patterns and techniques. It adds diversity to your knitting projects and gives you the opportunity to explore new possibilities.
In conclusion, incorporating wrapped stitches into your knitting offers various advantages, including enhanced texture, elevated design, improved stitch definition, increased warmth, and expanded knitting skills. Whether you’re a beginner or an experienced knitter, experimenting with wrapped stitches can take your projects to a whole new level.
Choosing the right yarn and needles
Before you start knitting wrapped stitches, it is important to choose the right yarn and needles for your project. Here are some factors to consider:
- Yarn weight: Yarn comes in different weights, ranging from lace to super bulky. The weight of the yarn you choose will depend on the desired thickness and drape of your finished project. For wrapped stitches, it is recommended to use a yarn that is not too bulky or too thin, as it may affect the stitch definition.
- Fiber content: Yarn can be made from various fibers, such as wool, cotton, acrylic, or blends. Each fiber has its own characteristics, so consider the qualities you want in your finished project. Wool, for example, is known for its warmth and elasticity, while cotton is more breathable and suitable for warmer climates.
- Needle size: The size of your needles will determine the gauge and the overall size of your project. Wrapping stitches may require slightly larger needles to create loose and airy stitches. However, it is important to follow the recommended needle size on the yarn label or the pattern you are using to achieve the desired tension.
When selecting yarn and needles, it is also helpful to consider your own knitting style and preferences. Experiment with different combinations to find the right match for your skills and desired outcome.
Basic knitting techniques for wrapped stitches
When it comes to knitting, understanding various techniques can open up a whole new world of possibilities. Wrapped stitches are one such technique that can add texture and depth to your knitting projects. In this guide, we will explore the basic knitting techniques for wrapped stitches.
1. Yarn over (YO)
A yarn over is a fundamental stitch used in wrapped stitches. It creates an extra loop on the needle, increasing the stitch count. To perform a yarn over:
- Bring the yarn to the front of the work.
- Wrap the yarn over the right-hand needle, from back to front, creating a new loop.
- Continue with the next stitch as directed in the pattern.
2. Slip stitch (SL)
A slip stitch is used to move a stitch from one needle to another without knitting or purling it. Slip stitches are often used in wrapped stitch patterns to create the wrapped effect. To perform a slip stitch:
- Insert the right-hand needle into the next stitch as if to purl.
- Slide the stitch from the left-hand needle to the right-hand needle without knitting or purling it.
3. Wrap and turn (W&T)
A wrap and turn is a technique used to create the wrap in wrapped stitches. It involves wrapping the working yarn around a stitch before turning the work. To perform a wrap and turn:
- Knit or purl the specified number of stitches as directed in the pattern.
- Bring the yarn to the front of the work.
- Slip the next stitch purlwise from the left-hand needle to the right-hand needle.
- Bring the yarn to the back of the work.
- Slip the slipped stitch back to the left-hand needle.
- Turn the work, ready to work the next row.
4. Unwrap stitch (UW)
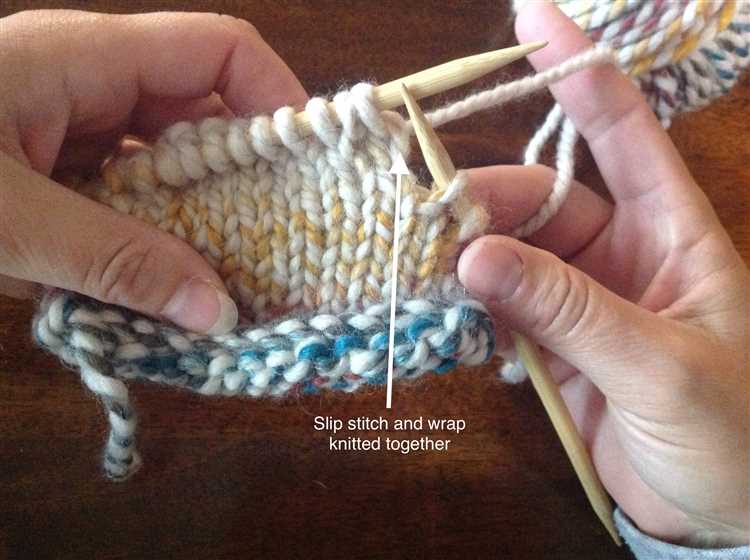
To unwrap a stitch in wrapped stitch patterns, you need to undo the wrap created by the wrap and turn. To unwrap a stitch:
- Insert the right-hand needle into both the wrapped stitch and the wrap.
- Knit or purl the two together as a single stitch.
These are some of the basic knitting techniques for wrapped stitches. By incorporating these techniques into your knitting projects, you can create beautiful textures and patterns. Practice and experiment with different wrap stitches to unlock the full potential of your knitting skills.
Step 1: Casting on
Before you can start knitting wrapped stitches, you first need to cast on your stitches. Casting on is the process of creating the foundation row of stitches on your knitting needle. Here’s a step-by-step guide on how to cast on:
- Hold the knitting needle in your right hand – If you’re right-handed, hold the knitting needle in your right hand. If you’re left-handed, hold it in your left hand.
- Make a slipknot – Take the end of the yarn and form a loop. Pass the end of the yarn through the loop to create a slipknot. Pull on the tail to tighten the slipknot around the knitting needle.
- Insert the needle through the slipknot – Insert the knitting needle through the slipknot from right to left. Hold the slipknot securely with your thumb and index finger.
- Bring the yarn over the needle – With your left hand, bring the working yarn (the yarn attached to the ball or skein) over the top of the needle, from back to front.
- Pull the yarn through the slipknot – Using the right needle, pull the working yarn through the slipknot. This creates a new stitch on the right needle.
- Repeat steps 3-5 – Repeat steps 3 to 5 until you have the desired number of stitches on your needle. Keep the stitches loose enough to easily slide along the needle, but not too loose that they fall off.
- Continue knitting – Once you have cast on the number of stitches required for your project, you can proceed to knit wrapped stitches.
Now that you know how to cast on, you’re ready to move on to the next step in learning how to knit wrapped stitches!
Step 2: Making the first wrapped stitch
Now that you have your materials ready and have cast on your stitches, it’s time to make your first wrapped stitch. This stitch will create a beautiful texture and add depth to your knitting project.
- Insert the right needle into the first stitch. Take the right needle and insert it into the first stitch on the left needle, as if you were going to knit it.
- Wrap the working yarn around the right needle. Take the working yarn and wrap it around the right needle from back to front.
- Bring the right needle through the wrapped loop. Keeping the wrapped yarn in place, bring the right needle through the wrapped loop and pull it through the stitch.
- Place the new stitch on the right needle. Slip the new stitch from the left needle onto the right needle, making sure to keep the wrapped yarn in place.
- Repeat steps 1-4. Continue making wrapped stitches following the same steps for each stitch until you reach the end of the row.
Remember to keep a consistent tension on your yarn as you work and practice these steps to get the hang of making wrapped stitches. Once you’re comfortable with this technique, you’ll be able to create a variety of patterns and textures in your knitting projects.
Step 3: Knitting subsequent wrapped stitches
Once you have successfully knit your first wrapped stitch, it’s time to continue knitting subsequent wrapped stitches. Follow these steps:
- Take your working needle with the yarn in your right hand and insert it into the first wrapped stitch from left to right, just like you would for a regular knit stitch.
- Bring the yarn over the working needle from back to front.
- Use the working needle to pull the loop of the wrap and the stitch through the wrapped stitch.
- Slide the wrapped stitch off the left needle, transferring it to the right needle.
- Repeat steps 1-4 for each subsequent wrapped stitch.
If you have wrapped multiple stitches in a row, make sure to knit each wrapped stitch individually before moving on to the next one. This will ensure that the wraps are secure and won’t unravel.
Continue knitting subsequent wrapped stitches until you reach the end of the row or until your pattern specifies a different instruction.
Remember to take your time and practice each step to get comfortable with knitting wrapped stitches. With practice, you’ll be able to incorporate wrapped stitches into your knitting projects for added texture and visual interest.
Finishing and troubleshooting tips
Once you have finished your project, there are a few steps you can take to give your knitted item a polished look and ensure its longevity:
- Weave in the ends: Use a tapestry needle to carefully weave in any loose yarn ends into the back of the work, ensuring that they are secure and not visible.
- Block your work: Blocking is the process of shaping your knitted piece by wetting it and then allowing it to dry in the desired shape. This can help even out any inconsistencies in tension and help your stitches look more defined.
- Add finishing touches: Depending on your project, you may want to add buttons, embellishments, or other decorative elements. Sew them on securely with a needle and thread.
If you encounter any issues or challenges while knitting wrapped stitches, here are some troubleshooting tips:
- Uneven tension: If your stitches are too tight or too loose, try adjusting your tension. Practice knitting wrapped stitches on a swatch first to find your desired tension.
- Dropped stitches: If you accidentally drop a stitch, you can use a crochet hook or a smaller knitting needle to pick it up and repair it.
- Confusion with the wrapping technique: If you’re having trouble figuring out how to wrap your stitches, try watching video tutorials or seeking guidance from more experienced knitters.
Remember, practice makes perfect! Don’t be discouraged if you don’t get it right the first time. With patience and persistence, you’ll soon master the art of knitting wrapped stitches.
FAQ:
What are wrapped stitches in knitting?
Wrapped stitches in knitting are a technique used to create decorative patterns and textures by wrapping the working yarn around the stitches rather than knitting or purling them as usual.
Why would I want to learn how to knit wrapped stitches?
Learning how to knit wrapped stitches can add variety and complexity to your knitting projects. They can be used to create beautiful lace patterns, cables, or even just add texture to your fabric.
Are wrapped stitches difficult to learn for beginners?
No, wrapped stitches are not difficult to learn for beginners. With a little bit of practice, anyone can master this technique. It is recommended to start with simple patterns and gradually move on to more complex ones as you gain confidence.


