Underglazing pottery is a popular technique used to add color and pattern to ceramic pieces. It involves applying pigmented colors to the surface of the pottery before it is glazed and fired. This process allows for vibrant and detailed designs, making the finished pieces truly stunning.
In this step-by-step guide, we will walk you through the process of underglazing pottery, from preparing your materials to applying the underglaze and finishing touches. Whether you are a beginner or experienced potter, you can follow these instructions to achieve beautiful and professional-looking results.
First, you will need to gather your materials. This includes underglaze paints in the colors of your choice, pottery pieces ready for underglazing, brushes in different sizes, water, and a paint palette. It’s important to choose underglazes that are specifically formulated for ceramic use, as they will withstand the high temperatures of the firing process without fading or running.
Next, prepare your pottery pieces by cleaning them thoroughly and ensuring they are bone dry. Any moisture on the surface can prevent the underglaze from adhering properly. Once your pieces are clean and dry, you can start applying the underglaze using your brushes. It’s best to start with lighter colors as a base and gradually build up the layers, allowing each coat to dry before applying the next. This will create depth and intensity in your design.
Gather the necessary materials
Before you start underglazing pottery, make sure you have all the necessary materials at hand. Here is a list of what you will need:
- Pottery pieces: Choose the pottery pieces you want to underglaze. They should be bisque-fired and free from any dust or debris.
- Underglaze paints: Purchase underglaze paints in various colors. Make sure they are compatible with the type of clay you are using.
- Brushes: Get a set of brushes with different sizes and shapes. This will help you achieve different effects and details in your design.
- Water and containers: Prepare containers of water to clean your brushes and dilute the underglaze paints if needed.
- Newspapers or plastic sheets: Lay down newspapers or plastic sheets to protect your work surface from any mess or spills.
- Palette or small dishes: Use a palette or small dishes to mix and store the underglaze paints.
- Tape: Use tape to create clean edges and borders in your design.
- Sponges or paper towels: Keep sponges or paper towels handy to remove any excess or mistakes.
- Cleaning supplies: Have cleaning supplies ready to clean your brushes and workspace once you are done.
Having all these materials in place will make the underglazing process smoother and more enjoyable. Make sure you have everything you need before you start, so you can fully focus on the creative process.
Prepare the pottery surface
Before you begin underglazing your pottery, it is important to prepare the surface to ensure that the underglaze adheres properly and creates the desired effect. Follow these steps to prepare your pottery surface:
- Clean the pottery: Start by cleaning the surface of the pottery with a damp sponge or cloth to remove any dirt, dust, or debris. Make sure the pottery is completely dry before moving on to the next step.
- Sand the pottery: If the pottery has any rough spots or imperfections, gently sand the surface using fine-grit sandpaper. This will create a smoother surface for the underglaze to adhere to.
- Apply a layer of underglaze on the surface: Using a brush or sponge, apply a thin layer of underglaze on the surface of the pottery. Make sure to cover the entire surface evenly. Allow the underglaze to dry completely before proceeding.
Preparing the pottery surface ensures that the underglaze adheres properly and creates a vibrant and long-lasting effect. Take your time during this step to ensure that your pottery turns out stunning.
Choose the right underglaze colors
When it comes to underglaze pottery, choosing the right colors is essential to achieving stunning results. The underglaze colors you select will determine the overall appearance of your finished piece, so it’s important to choose wisely. Here are some factors to consider when choosing underglaze colors:
- Color palette: Decide on the color palette you want for your pottery piece. Consider whether you want a monochromatic look or a combination of complementary or contrasting colors.
- Color theory: Familiarize yourself with color theory to understand how different colors interact with each other. This knowledge can help you create harmonious color combinations.
- Surface type: Consider the surface on which you’ll be applying the underglaze. Some colors may appear more vibrant on a glossy surface, while others may work better on a matte finish.
- Firing temperature: Check the firing temperature range of the underglaze colors you’re considering. Make sure they are compatible with the clay body you’re using and the firing temperature you plan to use.
- Personal preference: Ultimately, choose underglaze colors that you personally find appealing. Trust your instincts and go with colors that you feel will enhance the overall aesthetic of your pottery piece.
Once you’ve considered these factors, you can start selecting specific underglaze colors. Look for a reputable supplier that offers a wide range of colors and experiment with different combinations to find the perfect ones for your project.
Apply the underglaze with a brush
Once you have prepared your pottery piece and chosen the desired underglaze colors, it’s time to start applying the underglaze using a brush.
Here are the steps to follow:
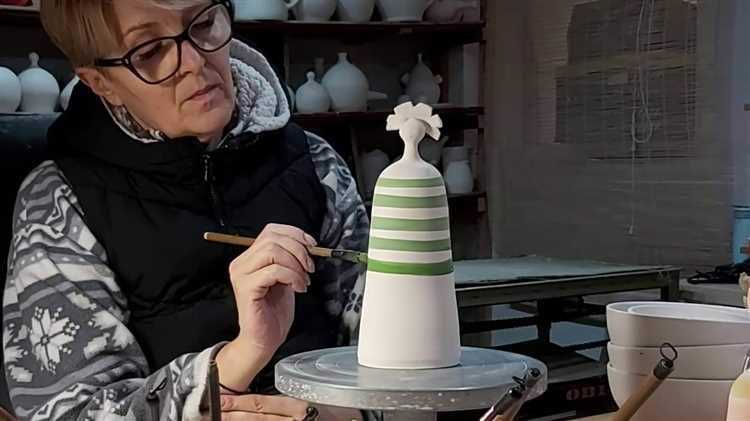
- Prepare your brushes: Make sure you have clean brushes that are appropriate for the size of your design. Different brushes can create different effects, so experiment with different types to achieve the desired results.
- Moisten your brush: Dip your brush in water and then gently squeeze out any excess moisture. This will help the underglaze adhere better to the pottery.
- Start with the base color: Begin by applying the base color of the underglaze to your pottery piece. Use smooth, even strokes to cover the desired areas. Make sure to cover the entire surface evenly to avoid any patchy appearance.
- Add additional colors: Once the base color is dry, you can add additional colors to create patterns, designs, or intricate details. Use smaller brushes for more precision.
- Layering: Underglazes can be layered to create depth and dimension. Allow each layer to dry before applying the next one. You can experiment with layering different colors or shades to achieve the desired effect.
- Clean up: If you make any mistakes or want to remove any excess underglaze, use a damp cloth or sponge to carefully wipe away the unwanted areas. Be gentle to avoid damaging the underglaze you want to keep.
- Firing: Once you have finished applying the underglaze and are satisfied with the design, the pottery piece needs to be fired in a kiln according to the underglaze manufacturer’s instructions. Firing will transform the underglaze into a permanent, vibrant color.
Remember, practice makes perfect when it comes to applying underglaze with a brush. Experiment with different techniques and colors to create stunning results on your pottery.
Experiment with different application techniques
Underglazing pottery allows for a wide range of creative possibilities. One way to unlock your artistic potential is by experimenting with different application techniques. Here are some techniques you can try:
- Brushing: This is the most common technique for underglazing pottery. Use a soft-bristle brush to apply the underglaze onto the surface of the pottery. You can create bold and precise lines or blend colors together for a gradient effect.
- Sponging: Sponging creates a textured look on the pottery’s surface. Dip a natural sponge into the underglaze and gently dab it onto the pottery. Vary the pressure to create different texture patterns.
- Dipping: Dipping your pottery into a container filled with thinned underglaze is an efficient way to apply a base coat. You can then add details or layers using other techniques.
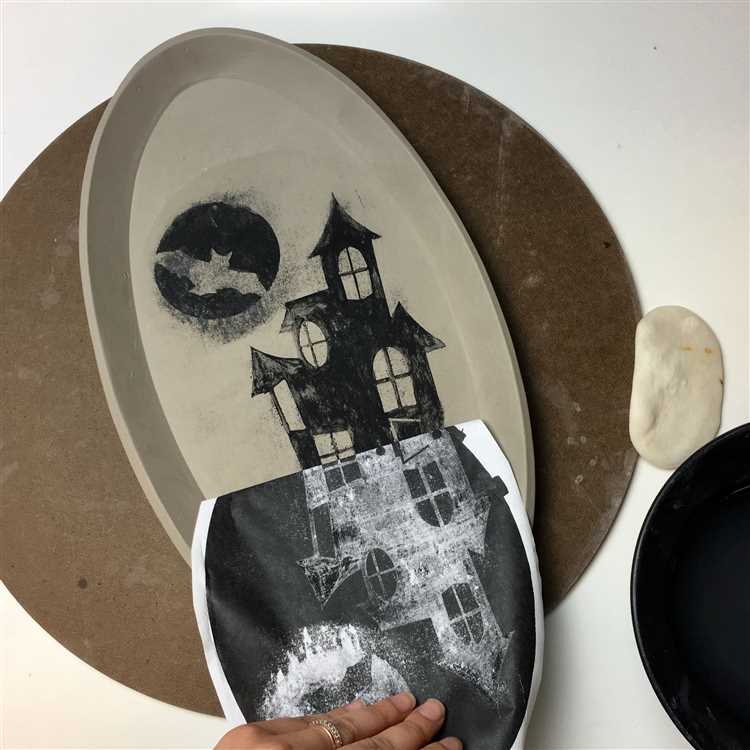
- Stamping: Use various stamps or found objects to create patterns on your pottery. Dip the stamp into the underglaze and firmly press it onto the surface. Repeat the process to create a repeating pattern.
- Spraying: Spraying underglaze onto your pottery creates a smooth and even coat. Use an airbrush or a spray bottle with a fine mist nozzle to achieve the desired effect. This technique works well for creating backgrounds or adding subtle shading.
Remember to practice these techniques on sample tiles before applying them to your finished pottery. This will allow you to become familiar with each technique’s effects and determine which ones you prefer. Don’t be afraid to mix and match techniques and colors to create unique and stunning results.
Allow the underglaze to dry completely
Once you have applied the underglaze to your pottery piece, it is important to let it dry completely before moving on to the next step. Drying allows the underglaze to set and fuse with the clay, ensuring its longevity and durability.
Here are some steps to follow for drying the underglaze:
- Place your pottery piece on a clean, flat surface.
- Avoid touching the underglazed areas as much as possible to prevent smudging or smearing.
- Set your pottery piece aside in a cool, dry area where it is not exposed to direct sunlight or extreme temperature changes.
- Allow the underglaze to air dry for at least 24 hours. The drying time may vary depending on the thickness of the underglaze and the humidity of your environment.
- Check the underglaze periodically to ensure that it is completely dry. If it feels tacky or moist to the touch, give it more time to dry.
It is crucial to ensure that the underglaze is completely dry before proceeding to the next step, as any moisture left in the underglaze can cause issues during the firing process, such as bubbling or cracking.
Fire the pottery in a kiln
After the underglaze has dried completely, it is time to fire the pottery in a kiln. Firing is an essential step as it transforms the underglaze into a permanent and vibrant finish on the pottery. Here are the steps to fire your pottery:
- Preheat the kiln: Start by preheating the kiln to the recommended firing temperature. This temperature may vary depending on the type of clay and underglaze you are using, so refer to the instructions provided by the manufacturer.
- Load the kiln: Carefully place your pottery pieces in the kiln, making sure they are not touching each other or the sides of the kiln. Leave enough space between the pieces for the heat to circulate evenly.
- Set the firing schedule: Depending on the type of underglaze and clay, you will need to set the firing schedule accordingly. This schedule includes the ramp rate, soaking time, and temperature. Again, refer to the instructions provided by the manufacturer for the recommended firing schedule.
- Start the firing process: Once the kiln is loaded and the firing schedule is set, start the firing process by turning on the kiln. Make sure to monitor the firing process closely to ensure everything goes smoothly.
- Monitor the temperature: Throughout the firing process, keep an eye on the kiln’s temperature. Use a pyrometer or temperature gauge to monitor the temperature accurately. Adjust the kiln’s settings if necessary to maintain the desired temperature.
- Allow the kiln to cool: Once the firing process is complete and the pottery has reached the desired temperature and soak time, turn off the kiln and allow it to cool completely. This cooling process should be slow and gradual to prevent thermal shock and cracking of the pottery.
- Unload the kiln: When the kiln has cooled down completely, it is safe to open it. Carefully remove the fired pottery pieces from the kiln and inspect them for any imperfections or damage.
Firing pottery in a kiln can be a time-consuming and delicate process, but it is crucial for achieving the desired results. Take your time and follow the recommended firing instructions to ensure your underglazed pottery comes out stunning and durable.
Finish and display your stunning underglazed pottery
Once you have applied the underglaze to your pottery and it has been fired, it’s time to finish and display your beautiful creations. Here are some steps to help you complete the process:
- Inspect your pottery: Carefully examine each piece of pottery to ensure the underglaze has been applied evenly and that there are no visible imperfections.
- Apply a clear glaze: To protect the underglaze and give your pottery a glossy finish, apply a clear glaze over the underglazed surface. This will also enhance the colors of the underglaze and make them more vibrant.
- Fire the pottery: Place your pottery back in the kiln and fire it according to the specific instructions for the clear glaze you are using. Make sure to allow enough time for the glaze to fully melt and bond with the clay body.
- Remove from the kiln: Once the pottery has cooled down, carefully remove it from the kiln. Use caution as the pieces may be hot and always wear appropriate protective gear.
- Inspect again: Take a close look at your pottery to ensure the clear glaze has worked as intended and that there are no new imperfections or issues.
- Display your pottery: Now that your underglazed pottery is fully finished, it’s time to display it. You can showcase your pieces in a variety of ways, such as using a display shelf, a glass cabinet, or even mounting them on a wall. Get creative and find a display option that best highlights the beauty of your pottery.
Remember to always handle your finished underglazed pottery with care to avoid any accidental damage. With these steps, you can enjoy the stunning results of your underglazing process and proudly show off your beautiful creations. Happy pottery making!
FAQ:
Can I use any type of underglaze colors?
No, it is important to use underglaze colors that are specifically made for pottery. They have the right consistency and firing temperature to ensure good results.
How do I prepare the pottery piece before underglazing?
Before underglazing, make sure the pottery piece is clean and free from any dust or debris. You can lightly sand the surface to ensure better adhesion of the underglaze.
Do I need to apply a base coat before underglazing?
Applying a base coat is optional, but it can help enhance the colors of the underglaze and create a more vibrant result. If you choose to apply a base coat, let it dry completely before underglazing.
How do I apply the underglaze colors?
Using a brush, apply the underglaze colors on the pottery piece. You can apply the colors in layers to create depth and different shades. Make sure to let each layer dry before applying the next one.
Can I mix underglaze colors to create new shades?
Yes, you can mix underglaze colors to create new shades. Experiment with different combinations to get the desired colors. It’s always a good idea to test the colors on a small piece of pottery before applying them to your main piece.
How do I finish the underglazed pottery piece?
After applying the underglaze colors, let the pottery piece dry completely. You can then apply a clear glaze over the underglaze for added protection and a glossy finish. Fire the piece in a kiln according to the instructions of the underglaze and glaze you are using.


