Knitting is a popular craft that allows you to create beautiful and unique items by using different types of yarn and needles. Whether you’re a beginner or an experienced knitter, one important skill to master is tying off your knitting. Tying off, also known as binding off, is the process of finishing your project and securing the stitches to prevent them from unraveling. In this step-by-step guide, we will walk you through the process of tying off in knitting like a pro.
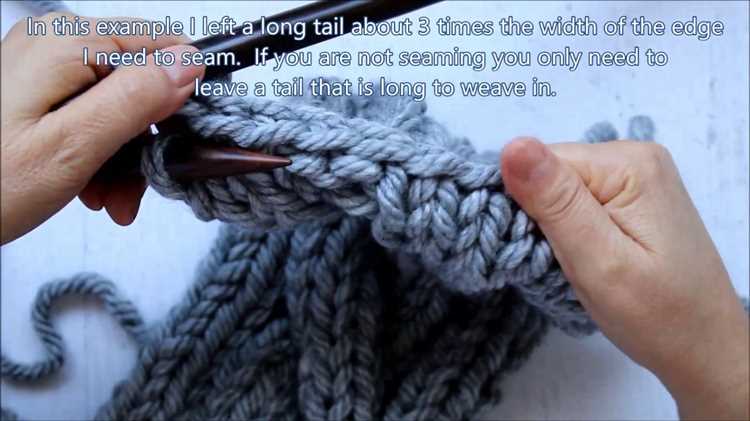
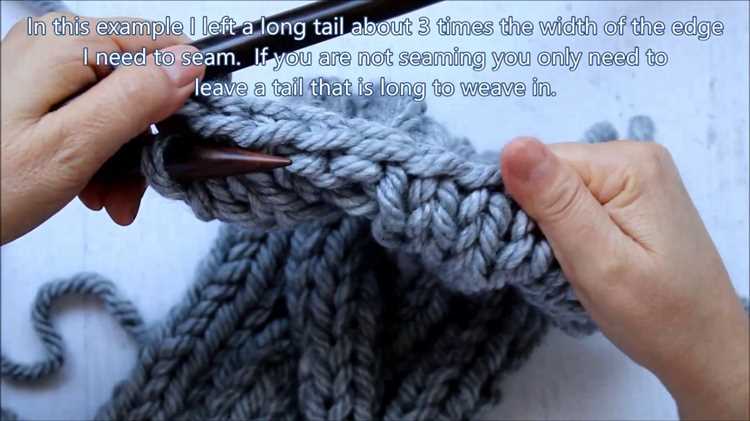
To start, you will need a pair of knitting needles, a yarn needle, and a length of yarn. Begin by knitting the last stitch in your row as you normally would. Once you have completed the stitch, take the yarn needle and thread it with the yarn tail. Insert the needle through the loop of the last stitch, from front to back.
Next, pull the yarn tail through the loop, making sure to leave a long enough tail for weaving in later. This creates a new loop on the yarn needle. Slip the knitting needle out of the loop and pull the yarn needle through the loop to tighten it. This secures the last stitch and prevents it from coming undone. Repeat this process for each stitch until you reach the end of your project.
Pro Tip: When tying off in knitting, it’s important to maintain an even tension. Too loose, and your stitches may unravel; too tight, and your finished project may pucker. Practice and experimentation will help you find the perfect tension for your projects.
Once you have tied off all of your stitches, you can remove the knitting needles. Take the yarn needle and weave the yarn tail through the stitches on your knitting, following the pattern of the stitches. This creates a polished finished edge and hides the yarn tail. Continue weaving the yarn tail for a few inches, and then trim the excess yarn.
Congratulations! You have successfully tied off in knitting like a pro. With this skill in your toolkit, you can confidently finish your knitting projects and create beautiful and professional-looking pieces. Remember to practice and experiment with different yarns and tension to achieve the best results. Happy knitting!
Start with the Right Technique
When tying off in knitting, it’s important to start with the right technique to ensure that your finished project is secure and professional-looking. Here is a step-by-step guide to help you get started:
- Step 1: To begin tying off, cut the yarn leaving a long tail, approximately 6-8 inches.
- Step 2: Take the needle and thread it through the last stitch on your knitting needle.
- Step 3: Carefully slide the stitch off the knitting needle, making sure to keep the tension of the stitch intact.
- Step 4: Using the needle, thread the long tail of yarn through the loop of the last stitch.
- Step 5: Pull the tail gently to tighten the loop and secure the stitch.
- Step 6: Repeat steps 2-5 for any remaining stitches on your knitting needle.
- Step 7: Once all stitches are securely tied off, trim the excess yarn tail, leaving a small tail to prevent unraveling.
By following these steps, you’ll be able to tie off your knitting like a pro. Remember to take your time and keep the tension even to ensure a neat and professional finish to your project.
Secure the Last Stitch
After you have completed the last stitch of your knitting project, it’s important to secure it properly to ensure that your work doesn’t unravel. Here are a few methods you can use to secure the last stitch:
- Finish the stitch: Complete the last stitch as you normally would, whether it’s a knit or purl stitch. Make sure the stitch is not too loose or too tight.
- Weaving in the tail: Thread the tail of your yarn onto a tapestry needle and weave it in and out of the stitches on the wrong side of your work. This will help secure the last stitch and prevent unraveling.
- Tying a knot: If you are using a slippery or delicate yarn, you may want to tie a knot at the end of your work to secure the last stitch. However, keep in mind that knots can be bulky and may affect the drape of your finished piece, so use this method with caution.
Tip: It’s always a good idea to leave a long enough tail when you finish your project to be able to secure the last stitch properly.
Once you have secured the last stitch, you can trim any excess yarn tail, leaving just enough for weaving in and hiding it within your work.
Remember, properly securing the last stitch is an essential step in completing your knitting project. It ensures that your hard work doesn’t come undone and helps create a neat and professional finish.
Cut the Yarn
Once you have finished knitting your desired length or completed the pattern, it’s time to cut the yarn. Cutting the yarn is an essential step in the knitting process as it allows you to secure the stitches and finish your project.
Before cutting the yarn, make sure you leave a tail that is long enough to work with. Typically, a tail of about 6-8 inches is sufficient. This will give you enough yarn to weave in later and prevent your project from unraveling.
Using a pair of sharp scissors, carefully cut the yarn, ensuring that the tail is long enough. Be cautious not to cut any stitches or accidentally snip any other yarn strands.
Once you have cut the yarn, you can use a yarn needle or your fingers to weave in the loose end. This involves threading the tail through the stitches on the backside of your work to secure it and prevent it from coming undone.
Alternatively, if you prefer a cleaner finish, you can tie a knot at the cut end of the yarn, making sure it is secure before trimming any excess. However, keep in mind that knots may be visible depending on the project and yarn used, so it’s important to consider the final look you desire.
With the yarn cut and secured, you have successfully completed the final step of tying off in knitting. Take a moment to admire your finished project and celebrate your knitting accomplishment!
Secure the Ends
Once you have finished knitting your project, it’s important to secure the ends to prevent your work from unraveling. Here are a few different methods you can use to secure the ends:
1. Weave in the ends
One common method is to weave in the ends of the yarn into the fabric of your knitting. To do this, thread the end of your yarn onto a tapestry needle, and then weave it in and out of the stitches on the wrong side of your work. Make sure to weave in the end for at least an inch to ensure it is secure.
2. Knot the ends
Another option is to tie a knot at the end of your yarn. This can be done by creating a small loop with the end of the yarn, passing the end through the loop, and pulling it tight. However, be cautious when using this method, as knots can sometimes create bulkiness or unevenness in your finished product.
3. Use a yarn needle
If your project has a lot of loose ends, you can also use a yarn needle to secure them. Simply thread the end of the yarn onto the needle and weave it through the stitches, creating a loop. Then, thread the needle back through the loop, pull it tight, and trim any excess yarn.
4. Use a crochet hook
If you’re comfortable with crochet, you can use a crochet hook to secure the ends. Insert the hook into the stitch, hook the yarn end, and pull it through the stitch. Then, repeat this process with the next stitch until the end is secure.
Regardless of the method you choose, be sure to trim any excess yarn close to the fabric, leaving just enough to prevent the end from coming undone. This will give your project a clean, finished look.
By securing the ends of your knitting, you can ensure that your hard work stays intact and your project will last for years to come.
Weave in the Loose Threads
Once you have finished knitting your project and have bound off your stitches, you will often be left with loose threads or tails hanging from your work. These loose threads can be unsightly and can potentially unravel your project if not properly secured. Weaving in the loose threads is an essential step in finishing your knitting project and giving it a polished, professional look. Follow these steps to seamlessly weave in the loose threads:
- Thread the loose end onto a yarn needle. Take one of the loose threads and thread it onto a yarn needle with a large eye.
- Identify the stitches to weave into. Look for a column of stitches that runs parallel to the loose thread. This will be the area where you will weave in the loose thread.
- Insert the needle under the stitches. Insert the needle under a few stitches, making sure to catch the yarn from the front to the back.
- Pull the needle through. Pull the needle and thread all the way through until there is a small loop left on the front side of your work.
- Weave through the stitches. Bring the needle back down and weave it through the same column of stitches, going in the opposite direction. This will secure the loose thread even further.
- Continue weaving. Repeat steps 3-5, weaving the loose thread through different columns of stitches in the area until you have securely woven in the entire length of the thread.
- Trim the excess thread. Once you have woven in the loose thread, use a pair of scissors to carefully trim the excess, leaving a small tail.
By following these steps, you can ensure that your loose threads are securely woven in and your knitting project looks seamless and professional.
Use a Tapestry Needle
When it comes to tying off in knitting, using a tapestry needle is a helpful tool to have. A tapestry needle, also known as a yarn needle or a darning needle, is a large needle with a blunt tip and a big eye. It is designed specifically for sewing or weaving in yarn ends.
Follow these steps to tie off with a tapestry needle:
- Thread the tapestry needle with the yarn end that needs to be tied off.
- Insert the needle through the stitches on the wrong side of the fabric, going under the yarn loops to secure the end.
- Continue weaving the needle in and out of the stitches for a few inches, making sure the yarn is securely fastened.
- Once you are satisfied with the secureness, trim any excess yarn close to the fabric, leaving a small tail.
Using a tapestry needle provides a neat and tidy finish to your knitting project. It ensures that the yarn end is securely tied off and will not come undone with wear or washing. This technique is especially useful when you need to join yarn, change colors, or finish off the project.
Remember to always weave in the yarn end on the wrong side of the fabric to hide it from view. The tapestry needle makes this process easier and more efficient, allowing you to achieve a professional-looking finish.
Hide the Knots
When knitting, it’s important to hide any knots that you make while joining a new ball of yarn or changing colors. Here are some techniques you can use to hide the knots:
- Weaving in the Ends: One way to hide knots is to weave in the loose ends of the yarn into the stitches of your knitting. Start by leaving a long tail when joining a new yarn or changing colors. Use a yarn needle to weave the tail through the stitches on the back of your work, ensuring that the knot is hidden and the tail is secure.
- Slip Stitch Method: Another technique to hide knots is the slip stitch method. To use this method, start by making a slip knot with the new yarn. Insert your knitting needle into the first stitch with the old yarn, and then pass the slip knot over the stitch. Continue knitting with the new yarn, ensuring that the knot is hidden inside the stitch.
- Joining Yarn Mid-Row: If you need to join a new yarn in the middle of a row, you can use the join-as-you-go method. Start by leaving a long tail of the old yarn and a long tail of the new yarn. When you reach the point where the new yarn needs to be joined, drop the old yarn and start knitting with the new yarn. Weave in the loose ends later.
Remember, the goal is to hide the knots and create a seamless look in your knitting. Practice these techniques to master the art of hiding knots and enhance the overall appearance of your knitted projects.
Finishing Touches
Once you have tied off your knitting project, there are a few finishing touches you can add to make it look even more professional.
- Weaving in the ends: Take a yarn needle and weave the loose ends of the yarn back into the project. This will help secure them and prevent them from unraveling.
- Blocking: If your project requires blocking, now is the time to do it. Soak your project in warm water, gently squeeze out the excess water, and then lay it flat to dry, shaping it as needed.
- Seaming: If your project consists of multiple pieces that need to be joined together, use a yarn needle to seam them. This can be done using a mattress stitch for a seamless finish.
- Add buttons, zippers, or other closures: If your project requires closures, sew on buttons, attach a zipper, or add any other closure method you prefer.
- Embroidery or applique: Get creative and add extra embellishments to your project using embroidery or applique techniques.
- Trimming: Consider adding a decorative trim to your project, such as crocheted edging or ribbon.
By taking the time to complete these finishing touches, you can elevate your knitting project and give it a polished, professional look.
FAQ:
What is the purpose of tying off in knitting?
The purpose of tying off in knitting is to secure the stitches at the end of a project, preventing them from unraveling.
What is the best method for tying off in knitting?
The best method for tying off in knitting depends on the project and personal preference. Some common methods include using a yarn needle to weave the end of the yarn through the stitches, making a knot, or using a slipknot. It’s important to choose a method that will secure the stitches without creating too much bulk or distorting the knitting.
What are some common mistakes to avoid when tying off in knitting?
When tying off in knitting, it’s important to avoid making the knot too tight, as this can create tension and distort the knitting. It’s also important to make sure the yarn is secure and won’t easily come undone. Additionally, be mindful of where you trim the excess yarn to avoid accidentally cutting any stitches.
Are there any alternative methods for tying off in knitting?
Yes, there are several alternative methods for tying off in knitting. Some knitters prefer to make a slipknot at the end of the project, while others prefer to weave the end of the yarn through the stitches using a yarn needle. Some knitters also like to use a crochet hook to pull the tail of the yarn through the stitches. The key is to find a method that works best for you and ensures the stitches are secure.


