Are you looking for a new craft project to try? Finger knitting is a fun and easy way to create beautiful pieces without needing any special tools or equipment. All you need is some yarn and your fingers, making it a great option for beginners or anyone looking for a portable and versatile craft. Whether you’re a seasoned knitter looking to try something different or a complete beginner, finger knitting is a great way to get creative and make unique, handmade items.
Finger knitting is a technique that uses your fingers to create loops of yarn, which can then be linked together to create a variety of projects. From scarves and headbands to blankets and jewelry, the possibilities are endless. The best part is that finger knitting is a quick process, and you can see the results of your work almost immediately. It’s a great activity for kids, too, as it helps improve fine motor skills and can be a fun way to bond with family members.
To start finger knitting, all you need is a skein of yarn and your fingers. Simply wrap the yarn around your fingers, create loops, and then link them together. You can use your fingers as knitting needles, and the process is similar to traditional knitting, but with a simpler and more portable approach. There are plenty of tutorials and resources available online to help you get started, with step-by-step instructions and helpful tips.
Once you’ve mastered the basics of finger knitting, you can start experimenting with different types of yarn, colors, and stitch patterns. You can also add embellishments like beads or buttons to make your projects even more unique. Finger knitting is a great way to create personalized gifts for friends and loved ones, or you can keep the items for yourself and show off your new crafting skills.
In conclusion, finger knitting is a versatile and enjoyable craft that anyone can learn. It’s a great way to relax and unwind, and you can create beautiful projects that you can be proud of. So why not give finger knitting a try and see what you can create?
What is finger knitting?
Finger knitting is a simple, portable knitting technique that utilizes just your fingers and yarn. Instead of using knitting needles, you create stitches by working the yarn between your fingers to create a fabric. It’s a great option for anyone who wants to try knitting but doesn’t have access to traditional knitting supplies or wants a more hands-on approach.
Finger knitting is a versatile technique that can be used to create a variety of projects, from scarves and blankets to toys and accessories. It’s a popular craft for children and beginners because it’s easy to learn and doesn’t require any special tools or equipment. Plus, it’s a great way to relax and unwind while creating something beautiful with your own hands.
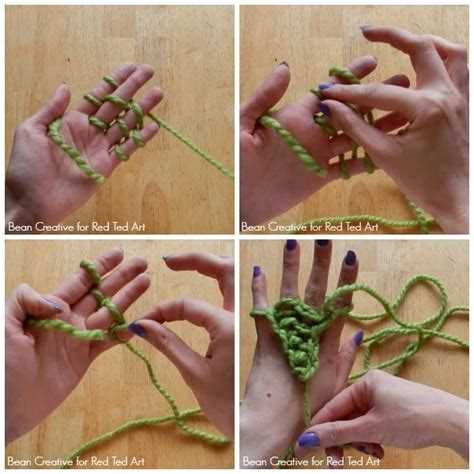
To finger knit, you simply hold the end of the yarn between your thumb and palm and weave it between your fingers to create loops. By carefully manipulating the yarn, you can create different stitch patterns, just like with traditional knitting. Once you’ve completed a row, you push the loops down your fingers and repeat the process until you’ve reached the desired length.
One of the benefits of finger knitting is that you can easily adjust the width of your fabric by adding or subtracting stitches. This makes it a flexible technique that can be customized to fit any project. Additionally, finger knitting is a great way to practice your coordination and dexterity, as you’ll need to coordinate the movements of both hands while working.
Finger knitting is an excellent introduction to the world of knitting and can be enjoyed by crafters of all ages and skill levels. Whether you’re a beginner looking to learn a new hobby or an experienced knitter looking for a quick and portable project, finger knitting is a fun and rewarding technique to try.
Benefits of finger knitting
Finger knitting is not only a fun and enjoyable activity, but it also offers a range of benefits for both kids and adults. Here are some of the key benefits of finger knitting:
- Improves fine motor skills: Finger knitting requires precise finger movements and coordination, which can help improve fine motor skills. This can be particularly beneficial for children who are still developing their hand-eye coordination.
- Relaxing and stress-relieving: Engaging in finger knitting can be a great way to relax and unwind. The repetitive nature of the finger knitting technique can help calm the mind and reduce stress.
- Enhances creativity: Finger knitting allows you to create unique and personalized projects. It encourages creativity and imagination as you experiment with different colors, textures, and patterns.
- Improves focus and attention span: Finger knitting requires concentration and focus, which can help improve attention span. This can be particularly beneficial for individuals who struggle with maintaining focus.
- Provides a sense of accomplishment: Completing a finger knitting project can give a sense of satisfaction and accomplishment. It can boost self-confidence and encourage perseverance.
- Portable and inexpensive: Finger knitting can be done anywhere, anytime, as it requires minimal materials. All you need is yarn and your fingers, making it a portable and affordable hobby.
- Social and community-building: Finger knitting can be a social activity that brings people together. It can be enjoyed with family or friends, fostering a sense of connection and camaraderie.
Whether you’re looking for a new hobby or a fun activity to do with your kids, finger knitting offers numerous benefits that make it worth trying. So grab your yarn and give finger knitting a go!
Getting started with finger knitting
Finger knitting is a simple and enjoyable craft that allows you to create beautiful projects using only your fingers. Whether you’re a beginner or an experienced knitter, finger knitting provides a fun and portable way to create unique accessories and even home decor items. Here’s how to get started with finger knitting.
1. Gather your materials
You’ll need a few basic materials to begin finger knitting. These include:
- Yarn of your choice
- Scissors
- Tape measure or ruler
2. Choose your yarn
There are many different types of yarn available, so choose one that suits your project. Thicker yarns create chunkier knits, while thinner yarns create more delicate and detailed knits. Experiment with different types of yarn to find the one you like best.
3. Start by making a slipknot
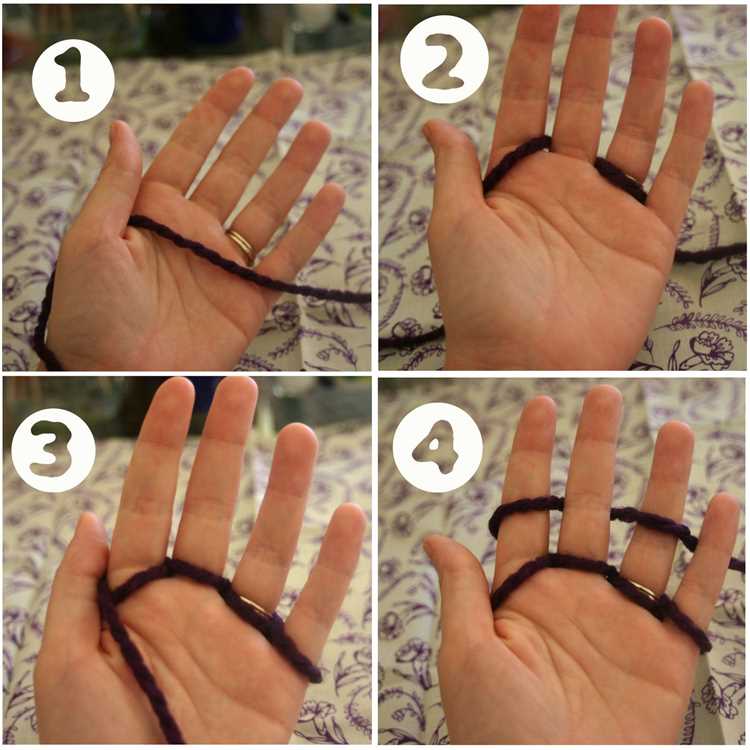
To begin finger knitting, make a slipknot by creating a loop with your yarn. Insert your fingers into the loop and pull the yarn through to create a tight knot. This will serve as the first stitch of your finger knitting project.
4. Begin knitting
Hold the slipknot in one hand and the tail of the yarn in the other. Insert your fingers into the slipknot and pull the yarn through, creating a new loop. Repeat this process until you have the desired number of stitches.
5. Create your project
Once you have a few rows of stitches, you can start creating different projects with your finger knitting. Some popular projects include scarves, headbands, bracelets, and even blankets. Get creative and experiment with different patterns and stitch variations.
6. Finishing your project
To finish your finger knitting project, cut the yarn leaving a long tail. Thread the tail through the last loop and pull tight to secure. Trim any excess yarn if necessary.
7. Practice and have fun
Like any new skill, finger knitting takes practice. Start with simple projects and gradually work your way up to more complex patterns. Don’t be afraid to make mistakes – they can lead to unique and unexpected designs. Most importantly, enjoy the process and have fun creating beautiful projects with your finger knitting skills.
Basic finger knitting techniques
Learning how to finger knit is a fun and easy way to create beautiful projects without the need for any knitting needles. With just your fingers and some yarn, you can create scarves, blankets, and more. Here are some basic finger knitting techniques to get you started:
- Make a slipknot: Start by making a slipknot at the end of your yarn. This will serve as the first stitch of your finger knitting project. Place the slipknot around your index finger and tighten it.
- Create the first row: To create the first row, take the yarn and wrap it around your pinky finger. Then, bring it up and over your ring finger, middle finger, and index finger in that order. The yarn should now be wrapped around all four fingers.
- Loop the yarn: Take the yarn and loop it around your index finger, going behind all the other fingers. Repeat this step for each finger, creating a looped yarn around all your fingers.
- Knit off the loops: Starting with your pinky finger, take the bottom loop and lift it over the top loop and off your finger. Repeat this step for each finger, until you are left with one loop on each finger.
- Create the next row: To create the next row, repeat steps 2-4. Wrap the yarn around your fingers, loop it around and knit off the loops. Repeat these steps until your finger knitting project reaches the desired length.
Keep in mind that finger knitting is a repetitive process, so practicing these techniques will help you develop speed and consistency in your finger knitting projects. With a little practice, you’ll be able to create beautiful finger-knit items in no time!
Tips for creating beautiful finger knitting projects
Here are some tips to help you create beautiful finger knitting projects:
- Choose the right yarn: Select a yarn that is suitable for finger knitting. Bulky or chunky weight yarns work best as they are easier to manipulate with your fingers.
- Use your fingers effectively: Make sure to use your fingers efficiently to create even tension in your stitches. Practice the finger knitting technique to develop a smooth and consistent knitting motion.
- Experiment with different stitches: Explore different stitch patterns to add variety and interest to your projects. Try combining different knitting techniques like garter stitch, stockinette stitch, or even cables to create unique textures.
- Add embellishments: Enhance your finger knitting projects by adding embellishments such as beads, buttons, or embroidery. These small details can make a big difference in the final look of your project.
- Choose complementary colors: Select colors that complement each other to create visually appealing projects. Experiment with color combinations and patterns to add depth and dimension to your finger knitting projects.
- Consider project size: Depending on your skill level and the time you have available, choose projects that can be completed within a reasonable timeframe. Starting with smaller projects can help you build confidence and gain experience.
- Take care of your projects: Properly care for your finger knitting projects by washing them according to the recommended instructions for the yarn used. This will help maintain their appearance and longevity.
Remember, practice makes perfect when it comes to finger knitting. Don’t be afraid to experiment and try new techniques. Enjoy the process and have fun creating beautiful projects with your finger knitting skills!
Popular finger knitting projects to try
If you’ve mastered the basics of finger knitting, you may be wondering what projects you can create. Here are some popular finger knitting projects to try:
- Chunky Scarf: Finger knitting is perfect for creating cozy, chunky scarves. Choose a thick, soft yarn and cast on a longer row of stitches to make a warm and stylish scarf. Experiment with different colors and yarn textures to create your own unique design.
- Blanket: Finger knitting a blanket can be a fun and rewarding project. Use a bulky or super bulky yarn to create a warm and snuggly blanket. You can also mix different colors and patterns to add visual interest to your blanket.
- Headband: Finger knit a headband to keep your ears warm in style. You can create a wide or narrow headband, depending on your preference. Add a decorative element like a bow or a flower for a personalized touch.
- Coasters: Finger knitting can be used to create unique coasters for your home. Use a sturdy yarn and knot it tightly to create a durable coaster. Experiment with different colors and stitch patterns to match your home decor.
- Keychain: Finger knit a small keychain to add a touch of handmade charm to your keys. Use a thin, durable yarn and add a small metal ring at the end to attach to your keys. You can personalize it by adding beads or charms.
- Plant Hanger: Finger knit a plant hanger to display your favorite houseplants. Use a strong, durable yarn and create a long loop to hold the plant pot. Hang it near a window or in a corner to add a touch of greenery to your space.
- Wrist Warmers: Finger knit wrist warmers are perfect for keeping your hands cozy while still allowing your fingers to move freely. Experiment with different yarn weights and stitch patterns to create a unique pair of wrist warmers.
- Market Bag: Finger knit a reusable market bag to carry your groceries in style. Use a sturdy cotton yarn and create a large, durable bag. Add handles for easy carrying and decorate it with a colorful tassel or pom-pom.
These are just a few examples of the many projects you can create with finger knitting. The possibilities are endless, so let your creativity shine and have fun exploring different ideas!
FAQ:
What is finger knitting?
Finger knitting is a simple and fun technique that allows you to knit using only your fingers, without the need for knitting needles. It is a great way to introduce children or beginners to the world of knitting.
What supplies do I need to start finger knitting?
To start finger knitting, you will need yarn in the color and weight of your choice. You will also need scissors to cut the yarn and your fingers, of course!
How do I start finger knitting?
To start finger knitting, first, make a slipknot by creating a loop with the yarn and pulling the end through it. Slide the slipknot onto your index finger and tighten it securely. Then, pass the yarn behind your index finger, over your middle finger, behind your ring finger, and over your pinky finger. Repeat this process until you have one loop on each finger.
What kind of projects can I make with finger knitting?
You can make a variety of projects using finger knitting, such as scarves, headbands, bracelets, coasters, and blankets. The possibilities are endless, and you can get creative with different colors and patterns.
Is finger knitting easy to learn?
Yes, finger knitting is very easy to learn, even for beginners or children. The technique is simple, and you can find many tutorials and videos online to help you get started. It’s a great way to relax and unwind while creating beautiful and unique pieces.


