Seaming is an essential skill for any knitter. Whether you are finishing a sweater, joining together pieces of a blanket, or adding a decorative touch to a project, knowing how to sew seams will elevate your knitting to the next level. In this step-by-step guide, we will walk you through the process of sewing seams in knitting like a pro.
Step 1: Preparation
Before you begin sewing your seams, it is important to prepare your knitting pieces. Make sure all ends are woven in and any blocking or pressing has been done. Lay out your pieces, right sides facing up, in the order they will be sewn together.
Step 2: Choose the Right Yarn
Choosing the right yarn for seaming is crucial. You want to use a yarn that matches or complements your project, but is also sturdy and durable. A yarn with some elasticity, like a wool or wool blend, works well for seaming.
Step 3: Start with a Mattress Stitch
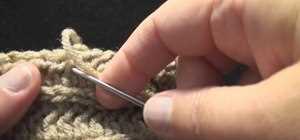
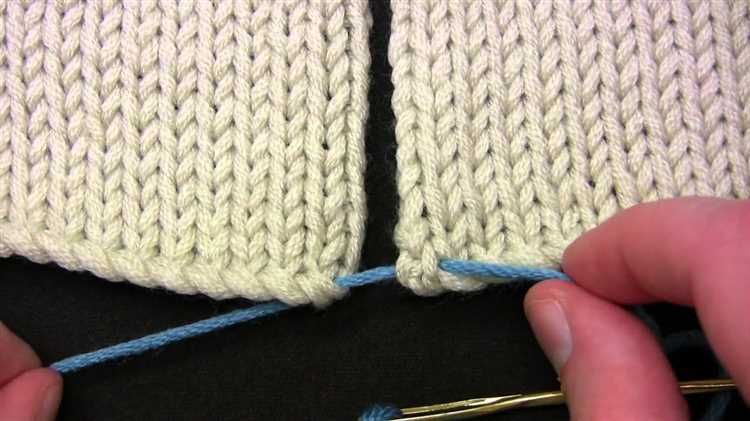
The mattress stitch is a common seaming technique for joining vertical seams. Thread your yarn needle and start from the bottom of the seam, catching the first bar of the edge stitches on one side, then the corresponding bar on the other side. Repeat this process, alternating sides, until the seam is complete.
Step 4: Seam Horizontal Edges
For seaming horizontal edges, such as sleeve seams or side seams, the backstitch is commonly used. Start by overlapping the edges you want to seam, then sew through both layers of fabric, moving forward and slightly to the side with each stitch. This creates a sturdy seam that lies flat.
Step 5: Finishing Touches
Once your seams are complete, weave in any remaining ends and give your project a final steam or press. This will help to smooth out any wrinkles and give your seams a polished finish.
Remember, practice makes perfect when it comes to seaming. Take your time, be patient, and soon you’ll be sewing seams in knitting like a pro!
What is Knitting?
Knitting is a craft that involves creating fabric or textile by interlocking loops of yarn using knitting needles. It is a versatile and popular hobby that dates back centuries and is enjoyed by people of all ages.
There are two main types of knitting: hand knitting and machine knitting. Hand knitting is done by manipulating the needles with your hands, while machine knitting involves the use of a knitting machine to automate the process.
Knitting can be used to create a wide variety of items, from garments like sweaters, hats, and scarves, to household items like blankets and pillows. It can also be used to add decorative accents to existing clothing or accessories.
One of the key techniques in knitting is creating seams. Seams are used to join separate pieces of knitted fabric together, such as the front and back of a sweater or the sides of a scarf. Learning how to sew seams in knitting is an important skill that can help you achieve a professional finish and ensure that your knitted items fit and hold together properly.
There are several different methods for sewing seams in knitting, including mattress stitch, backstitch, and whipstitch. Each method has its own advantages and is suited to different types of seams and fabrics.
In this step-by-step guide, we will focus on the mattress stitch method, which is commonly used for joining knitted pieces together seamlessly. We will walk you through the process, providing detailed instructions and helpful tips along the way.
By mastering the art of sewing seams in knitting, you will be able to take your knitting projects to the next level and create beautiful, professional-looking items that you can be proud of.
Importance of Sewing Seams in Knitting
While knitting is a popular craft that allows you to create beautiful and cozy garments, sewing seams is an essential step that can greatly enhance the final product. Sewing seams in knitting not only helps to give your project a polished and professional look, but it also adds durability and structure to the finished piece.
Here are a few reasons why sewing seams in knitting is important:
- Strength: Seam stitches add strength and stability to your knitted projects. By securely joining separate pieces together, seams prevent your garments from unraveling or coming apart at the seams.
- Structure: Sewing seams creates structure and shape in your knitted items. It helps to define the edges, give clean lines, and maintain the intended silhouette of the garment.
- Finishing Touches: Seams allow you to neatly finish the edges of your knitting. They provide a clean and professional appearance, giving your project a polished look that is pleasing to the eye.
When it comes to sewing seams in knitting, there are several techniques you can use depending on the desired look and the type of project. Some common seam techniques include the mattress stitch, whip stitch, and backstitch. These techniques enable you to seamlessly join pieces together, creating invisible or decorative seams that blend seamlessly with the rest of the knitting.
Remember, taking the time to sew seams properly is an investment in the overall quality and longevity of your knitted projects. It ensures that your hard work and creativity result in garments that not only look great but also stand the test of time.
Tools Needed for Sewing Seams
When it comes to sewing seams in knitting, having the right tools is essential to achieve professional-looking results. Here are some tools that you will need:
- Tapestry needle: A tapestry needle is a large needle with a blunt tip, perfect for weaving in ends and sewing seams in knitting. Choose a needle that is the appropriate size for your yarn weight.
- Scissors: A good pair of scissors is necessary for cutting yarn and trimming excess thread. Make sure to keep them sharp to prevent fraying of the yarn.
- Pins: Pins can be helpful for holding pieces of your knitting together before sewing the seams. Use stainless steel or rustproof pins to avoid leaving any stains on your fabric.
- Measuring tape: A measuring tape will come in handy for ensuring that your seams are sewn with accuracy. Use it to measure the length of the seam before you start sewing.
- Stitch markers: Stitch markers can be used to mark important points on your knitting, such as shoulder lines or armholes. They will help you sew the seams in the right places.
- Blocking mat: A blocking mat is useful for blocking your knitted pieces before sewing the seams. It provides a flat surface and helps to shape your knitting and ensure that the seams line up correctly.
Having these tools on hand will make the process of sewing seams in knitting much easier and more efficient. With practice and the right tools, you’ll be able to achieve seamless and professional results every time you sew your knitting pieces together.
Step 1: Preparing Your Knitted Pieces
Before you begin sewing your knitted pieces together, it’s important to prepare them properly. Follow these steps to ensure that your seam is neat and professional:
- Block your pieces: Blocking refers to the process of gently reshaping your knitted pieces to their correct size and dimensions. This step is especially crucial if you’ve just finished knitting your project or if your pieces have been sitting for a while. Soak your knitted pieces in lukewarm water and gently squeeze out the excess. Lay them flat on a blocking board or towel and use pins to stretch and shape them to the desired measurements. Leave them to dry completely.
- Trim any loose threads: Carefully inspect your knitted pieces for any loose threads or ends and trim them using a pair of sharp scissors. This will ensure that your finished seam looks clean and professional.
- Arrange your pieces: Lay out your knitted pieces according to the pattern instructions or your desired arrangement. Make sure that the right sides are facing out and that any stitch patterns line up correctly.
- Secure your pieces: To keep your knitted pieces in place while sewing, you can use stitch markers or safety pins to secure them together. This will prevent them from shifting or moving as you sew the seam.
Step 2: Choosing the Right Seam
Choosing the right seam for your knitting project is important as it can affect the overall look and durability of your finished piece. There are several common seams that you can choose from, each with its own advantages and disadvantages.
1. Mattress Stitch: This is a popular seam for joining two pieces of knitting together. It creates an almost invisible seam on the right side of the work and has a smooth finish. Mattress stitch is suitable for joining side seams, sleeve seams, and shoulder seams.
2. Whipstitch: Whipstitch is a simple and quick method for joining two pieces of knitting. It creates a visible seam on the right side of the work, which can be used as a decorative element. Whipstitch is suitable for joining seams where a visible seam is desired, such as on the edges of a garment.
3. Backstitch: Backstitch is a sturdy seam that is commonly used for joining pieces of knitting together. It creates a visible seam on the right side of the work and is suitable for joining seams that require extra strength, such as the bottom seam of a bag or the underarm seam of a sweater.
4. Slip Stitch: Slip stitch is a decorative seam that can be used to join pieces of knitting together. It creates a visible seam on the right side of the work and has a ribbed appearance. Slip stitch is suitable for joining seams where a decorative element is desired, such as on the edges of a scarf or shawl.
Before choosing a seam, consider the type of fabric you are working with, the desired finished look, and the intended use of the finished piece. Some seams may be more suitable for certain types of knitting projects than others. Experimenting with different seams can help you find the one that works best for your project.
Step 3: Sewing the Seam
Once you have prepared your knitting pieces and measured the correct length, it’s time to sew the seam. Sewing the seam is an essential step in finishing your knitting project and ensuring that it looks professional.
Here is a step-by-step guide on how to sew the seam:
- Match the edges: Begin by placing your knitting pieces with the right sides together. Make sure that the edges align perfectly, matching stitch for stitch.
- Secure the ends: Use a knitting needle or a safety pin to secure the ends of your knitting pieces together. This will prevent them from shifting while you sew the seam.
- Choose a sewing method: There are several sewing methods you can choose from, depending on the desired outcome and the type of stitch you used in your knitting. Some common methods include mattress stitch, backstitch, and whipstitch.
- Thread your needle: Select a matching or contrasting thread, depending on the look you want to achieve. Thread your needle and tie a knot at the end.
- Begin sewing: Starting at one end of the seam, insert your needle under the first stitch on each side of the seam. Pull the thread through, leaving a small tail.
- Sew stitch by stitch: Continue sewing stitch by stitch, making sure to sew through both sides of the seam evenly. Take care to avoid sewing too tightly or leaving gaps between stitches.
- Secure the seam: Once you reach the end of the seam, sew a few stitches in place to secure the thread. Cut the thread, leaving a small tail, and weave it into the knitting to hide it.
- Block the seam: To ensure that your seam lies flat and even, block the seam by wetting the finished piece and gently shaping it to the desired dimensions. Allow it to dry completely before wearing or using your project.
Remember, practice makes perfect, so don’t be discouraged if your first few seams aren’t flawless. With time and experience, you’ll become more confident and skilled in sewing seams like a pro.
FAQ:
Why is it important to sew seams in knitting?
Sewing seams in knitting is important because it helps to join knitted pieces together and give structure and stability to the finished garment. It also ensures that the seams are secure and prevent the knitted fabric from unraveling.
What are some tips for sewing seams in knitting?
Some tips for sewing seams in knitting include using a yarn needle that is large enough to easily pass through the stitches, ensuring that the tension of the seam matches the tension of the knitting, and using the same type of yarn as the project to sew the seams. It is also important to block the knitted pieces before seaming to ensure that they are the correct shape and size.
Is there a specific technique for sewing seams in knitting?
Yes, there are several techniques for sewing seams in knitting. The most common technique is called mattress stitch, which involves sewing the seams together using a series of vertical stitches that mimic the appearance of the knitted stitches. Another technique is called whip stitch, which involves sewing the seams together with a series of diagonal stitches. Both techniques are effective for joining knitted pieces.
Can you sew seams in knitting by machine?
Yes, it is possible to sew seams in knitting using a sewing machine. However, it is important to use a machine with a zigzag stitch or stretch stitch setting to accommodate the stretchiness of the knitted fabric. It is also important to sew slowly and carefully to ensure that the seams are secure and that the fabric is not stretched or distorted during the sewing process.
What should I do if my seams are not laying flat?
If your seams are not laying flat, you can try blocking the seams again to reshape them. You can also try adding a small amount of steam from an iron to help set the seams. If the seams still do not lay flat, you may need to redo the sewing with a different tension or technique.
Can I sew seams in knitting with a different color yarn?
Yes, you can sew seams in knitting with a different color yarn if you want a decorative contrast. However, it is important to choose a yarn that is the same weight and fiber content as the project yarn to ensure that the seams are secure and do not affect the fit or structure of the garment.


