Knitting is a beloved craft that allows you to create beautiful handmade items. Whether you’re a beginner or an experienced knitter, knowing how to sew a flat seam is an essential skill. A flat seam creates a clean and professional finish, and it’s perfect for joining pieces of a knitted garment or sewing up the sides of a blanket or scarf.
Before you start sewing, you’ll need a few tools: a tapestry needle, scissors, and the yarn you used to knit your project. It’s important to use the same yarn to sew up your seams to ensure a seamless look. Additionally, make sure you have a clean and flat surface to work on, such as a table or a large cutting mat.
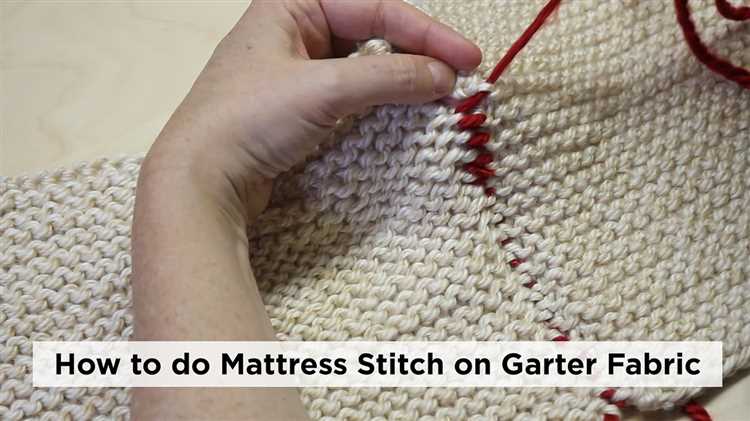
To sew a flat seam, start by aligning the edges of your knitting, making sure they are evenly matched. Use a tapestry needle to pick up the first stitch on the front piece and the first stitch on the back piece. Pull the yarn through, leaving a short tail. This will be woven in later.
Next, insert the needle into the next stitch on the front piece from right to left, and then into the corresponding stitch on the back piece from left to right. Continue this alternating motion, always going from right to left on the front piece and left to right on the back piece. This creates a neat and strong seam that lies flat.
After you’ve sewn all the way to the end of the seam, secure the yarn by passing the needle through the last loop on the back piece. Gently pull the yarn to tighten the seam, but be careful not to pull too tightly and distort the knitting. Finally, weave in the ends of the yarn by stitching through a few stitches on the wrong side of the project.
Sewing a flat seam in knitting is a simple technique that can elevate the look of your finished projects. With practice, you’ll be able to achieve seamless and professional results, ensuring that your knitted pieces have that polished, handmade touch.
What is a Flat Seam in Knitting?
When knitting a garment or accessory, it’s essential to know how to sew the pieces together seamlessly. A flat seam in knitting refers to a method of joining two knitted pieces with a flat and smooth finish. This technique creates an almost invisible seam that blends in with the rest of the stitches, giving the finished project a professional and polished look.
To achieve a flat seam, you typically use a tapestry needle and the same yarn you used for your knitting project. The goal is to sew the pieces together in a way that mimics the knitted stitches while minimizing bulkiness and creating a seamless appearance. This technique is especially useful when joining pieces of a sweater, hat, or scarf, as it ensures a neat and cohesive finished product.
There are various methods for sewing a flat seam in knitting, including the mattress stitch, the slip stitch seam, and the backstitch seam. Each method has its own benefits and may be more suitable for certain projects or stitch patterns. Before you start sewing, it’s important to understand the requirements of your specific project and choose the appropriate method for achieving a flat seam.
By mastering the technique of sewing a flat seam in knitting, you can take your projects to the next level and ensure they have a professional finish. With practice and attention to detail, you’ll be able to seamlessly join knitted pieces together while maintaining the overall aesthetic and integrity of your work. So, grab your tapestry needle, some yarn, and get ready to create beautiful and seamless knitted projects!
Benefits of Using a Flat Seam
When it comes to knitting, using a flat seam technique has several benefits:
- Smooth and Invisible Finish: One of the main benefits of using a flat seam is that it creates a smooth and invisible finish. The seam lies flat against the fabric, making it virtually undetectable.
- Comfortable to Wear: Flat seams are comfortable to wear since they do not create bulk or irritate the skin. This makes them ideal for garments that come into direct contact with the body, such as sweaters, hats, or scarves.
- Professional-Grade Look: With a flat seam, your knitting projects will have a professional-grade look. The even and seamless appearance enhances the overall aesthetic of the garment and gives it a polished finish.
- Strength and Durability: Flat seams provide strength and durability to your knitted items. This is especially important for garments that will undergo frequent use and washing.
- Versatility: The flat seam technique can be used on a variety of knitting projects, including garments, accessories, and home decor items. It is a versatile technique that can be adapted to different types of stitches and patterns.
- Easy to Learn and Execute: Learning how to sew a flat seam is relatively easy, even for beginners. With practice, you will be able to execute the technique with precision and speed.
Materials Needed
- Yarn
- Knitting needles
- Tape measure
- Tapestry needle
- Scissors
- Stitch markers (optional)
- Row counter (optional)
Step 1: Setting Up Your Knitting Project
Before you start sewing a flat seam in knitting, you need to set up your knitting project properly. Follow these steps to ensure a successful seam:
- Prepare your knitting: Make sure that you have knitted all of the necessary pieces for your project, such as the front and back panels of a sweater or the two sides of a scarf. Lay out all of the pieces flat on a clean surface.
- Arrange the pieces: Take one of the pieces and place it right-side up. Then, place the second piece on top of it, right-side down. Ensure that the edges you want to seam together are aligned properly.
- Secure the pieces: Use stitch markers or safety pins to hold the pieces together along the edges that will be seamed. This will prevent them from shifting or moving while you sew.
- Prepare your sewing materials: Gather the necessary tools for sewing, such as a yarn needle, scissors, and sewing thread that matches the yarn. Thread the yarn needle with a long enough length of yarn to sew the entire seam without needing to rethread.
- Practice on a swatch: If you’re new to sewing seams in knitting, it’s a good idea to practice on a swatch first. This will allow you to get familiar with the techniques and ensure that you are happy with the finished result before sewing the actual project.
Once you have set up your knitting project and gathered your materials, you are ready to proceed to the next step: sewing the flat seam.
Step 2: Preparing the Yarn
Before you start working on the flat seam in knitting, it’s important to prepare the yarn to ensure smooth and even stitching. Here are a few steps to help you prepare your yarn:
- Choose the appropriate yarn: Select a yarn that matches the color and weight of your knitting project. It’s important to use a yarn that is similar to the yarn you used for knitting to ensure a cohesive look.
- Measure and cut the yarn: Measure the length of yarn you’ll need for the flat seam, making sure to leave enough extra yarn for weaving in the ends. Cut the yarn, leaving a tail of about 6-8 inches.
- Secure the ends: To prevent unraveling, you can secure the cut ends of the yarn by tying them in a knot or using a yarn needle to weave them into the stitches of your knitting project.
- Separate the plies (if necessary): If your yarn has multiple plies, separate them to create a thinner strand of yarn. This will make it easier to work with and create a neater flat seam.
- Make a yarn butterfly (optional): If you’re working with a larger amount of yarn, you can make a yarn butterfly to keep it organized. To make a yarn butterfly, wrap the yarn around your hand, leaving a small loop at the end. Slide the loop through the middle of the wrapped yarn and pull tight. This will create a butterfly shape that can be easily pulled apart as you need more yarn.
By following these steps to prepare your yarn, you’ll be ready to start working on the flat seam in knitting.
Step 3: Casting On
Before you can start knitting, you need to cast on your stitches onto the knitting needle. Casting on is the process of creating a row of loops on your needle to begin your project.
Here are a few different methods of casting on that you can choose from:
- Long Tail Cast On: This is a common method that creates a tidy, elastic edge. It can be a bit tricky to learn at first, but with practice, it becomes easier.
- Knitted Cast On: This method is similar to the knit stitch and creates a slightly less stretchy edge.
- Cable Cast On: This cast on is firm and sturdy, making it great for edges that need to be more stable.
- Backward Loop Cast On: This is the simplest casting on method, but it can create a loose edge that is less secure.
Choose the method that you feel most comfortable with and that suits your project. Each method has its own advantages and disadvantages, so it’s good to experiment and find the one that works best for you.
Once you have cast on your desired number of stitches, you are ready to start knitting!
Step 4: Knitting the Flat Seam
After you have prepared the knitting needles and yarn for the flat seam, you are ready to start knitting the seam together. Here is a step-by-step guide on how to do it:
- Hold the knitting needles parallel to each other with the right sides of the knitting facing outwards.
- Insert the tapestry needle into the first stitch on the front needle, as if to purl.
- Insert the tapestry needle into the first stitch on the back needle, as if to knit.
- Bring the tapestry needle over the needles and pull the yarn through to create a stitch.
- Repeat steps 2-4 for each stitch, making sure to keep the tension consistent.
- Continue knitting the stitches together in this manner until you reach the end of the seam.
Once you have finished knitting the flat seam, you can secure the end of the yarn by weaving it through the stitches and cutting off any excess. This will ensure that your seam is secure and won’t unravel.
Step 5: Finishing the Flat Seam
After you have joined the two pieces of knitting together with the flat seam, it is time to finish the seam and secure it in place. Follow these steps to complete the finishing process:
- Trim the excess yarn: Use a pair of scissors to carefully trim any excess yarn from the flat seam. Make sure to leave a small tail at the beginning and end of the seam to prevent it from unraveling.
- Weave in the ends: Take the yarn needle and thread it with one of the yarn tails. Insert the needle under a few strands of the knitting, then bring it back out a few inches away. Repeat this process, weaving the yarn in and out of the knitting until the tail is secure.
- Repeat for the other yarn tail: Thread the second yarn tail onto the needle and repeat the weaving process to secure the other end of the seam.
- Check for any loose stitches: Carefully inspect the flat seam and make sure all stitches are secure. If you spot any loose stitches, use the yarn needle to tighten them up and secure them.
- Press the seam if desired: If you want to create a flatter and neater seam, you can use a steam iron or a damp cloth to press the seam. Be careful not to apply too much heat or pressure, as this can damage the yarn or distort the knitting.
Congratulations! You have successfully finished the flat seam and completed your knitting project. Your joined pieces should now be secure and ready for use or display.
FAQ:
Why is it important to know how to sew a flat seam in knitting?
Knowing how to sew a flat seam in knitting is important because it allows you to create seamless and professional-looking finished projects. Flat seams provide a smooth and neat appearance, ensuring that your knitting looks polished and well-made.
What materials do I need to sew a flat seam in knitting?
To sew a flat seam in knitting, you will need a tapestry needle, scissors, and the yarn that you used for your knitting project. The tapestry needle should have a large eye and a blunt tip, making it easy to weave the yarn through the stitches.
Can I sew a flat seam in knitting using a sewing machine?
No, sewing a flat seam in knitting requires hand sewing with a tapestry needle. Using a sewing machine could potentially break the knitted stitches and result in a messy and uneven seam. Hand sewing allows you to carefully control the tension and ensures that the seam lays flat and looks seamless.
Are there any tips to make sewing a flat seam in knitting easier?
Yes, there are a few tips to make sewing a flat seam in knitting easier. First, make sure to block your knitting project before sewing to ensure that the pieces are the correct size and shape. It is also helpful to use locking stitch markers or pins to hold the pieces in place while sewing. Finally, take your time and sew slowly to ensure accuracy and a clean finish.


