Knitting is a popular hobby that allows you to create beautiful and practical items, such as scarves, sweaters, and blankets. One of the first steps in knitting is learning how to do a slipknot, which is used to start your project and create a secure anchor for your yarn.
A slipknot is a simple loop that can easily be adjusted to tighten or loosen your yarn. It is an essential knot to know in knitting, as it will be the foundation for all your stitches. Once you master the slipknot, you’ll be ready to start your knitting journey.
To create a slipknot, follow these step-by-step instructions:
- Step 1: Hold the end of your yarn in your right hand, leaving a short tail.
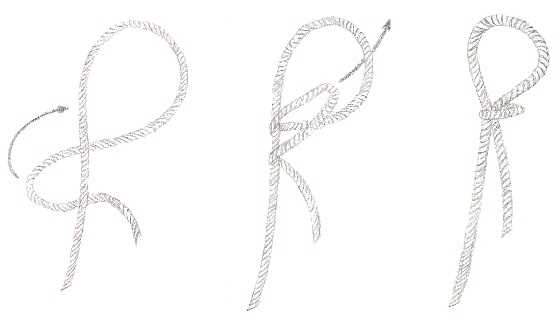
- Step 2: Form a loop by crossing the end of your yarn over the main strand, creating a small opening.
- Step 3: Take the end of the yarn and slip it through the loop, from back to front.
- Step 4: Pull the end of the yarn to tighten the loop, creating a secure knot.
Once you have created a slipknot, you can adjust the size of the loop by pulling the short tail. This will allow you to make it bigger or smaller, depending on your project and knitting needs.
Pro tip: It’s important to not make your slipknot too tight, as it can make it difficult to work with the yarn and create tension issues in your knitting. Aim for a snug but adjustable loop.
Now that you know how to do a slipknot, you’re ready to start your knitting project. Whether you’re a beginner or an experienced knitter, mastering this basic knot will set you on the path to knitting success. Happy knitting!
Materials Needed
To do a slipknot for knitting, you will need the following materials:
- Yarn: Choose a yarn of your desired color and thickness for your knitting project.
- Knitting Needles: Select knitting needles that are appropriate for the thickness of your yarn.
- Scissors: You will need scissors to cut the yarn at the end of your project or when changing colors.
- Measuring Tape: A measuring tape will come in handy for taking measurements or checking gauge.
- Darning Needle: A darning needle is useful for weaving in the loose yarn ends when finishing your project.
These are the basic materials you will need to get started with knitting and create a slipknot. Make sure to have them on hand before you begin learning the technique.
Step 1: Make a Loop
To start the slipknot, you will need to make a loop with your yarn. This loop will serve as the foundation for the slipknot and will allow you to easily secure it on your knitting needle.
Follow these steps to make a loop:
- Hold the end of your yarn in one hand, leaving a tail of about 6 inches.
- With your other hand, create a loop by crossing the yarn over itself.
- Take the end of the yarn and pass it through the loop, creating a second loop.
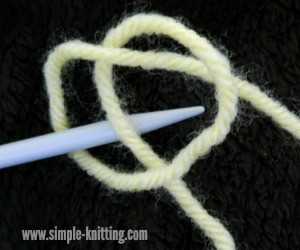
Your loop should be loose enough to easily fit a knitting needle through, but not too loose that it falls apart.
|
|
Once you have successfully made the loop, you are ready to move on to the next step of creating the slipknot.
Step 2: Cross the Loop
Once you have made a loop with your yarn, it’s time to cross it over and secure it in place.
Follow these steps to cross the loop:
- Hold the working end of the yarn (the end connected to the rest of your skein or ball) in your left hand.
- Take the loop that you made in step 1 and bring it across the working end of the yarn, creating an “X” shape.
- Hold the loop in place with your left hand, securing it against your palm or the base of your thumb.
This crossed loop is a crucial step in creating a slipknot, as it provides the structure and foundation for the knot itself.
Continue to the next step to complete the slipknot.
Step 3: Create a Second Loop
Once you have created the initial slipknot on your knitting needle, you will need to create a second loop.
- Hold the knitting needle with the slipknot in your right hand.
- Take the working yarn in your left hand and bring it over the top of the knitting needle, creating a loop.
- Insert the knitting needle into the loop from the front to the back.
- Tighten the loop by pulling on the working yarn gently.
- You now have a second loop on your knitting needle, which is ready for the next step in your knitting project.
Creating the second loop is an important step in the slipknot technique, as it sets the foundation for your knitting project. Make sure to take your time and practice until you feel comfortable with this step.
Step 4: Tuck the Second Loop Through the First
Take the second loop, which is sitting on the back of your left hand, and tuck it through the first loop on your right hand. This will create a new loop.
Make sure that the new loop is not too tight or too loose. It should be snug enough to hold the first loop in place, but not too tight that it becomes difficult to work with.
You now have two loops on your right hand, with the second loop tucked through the first. This is called a slipknot.
Step 5: Tighten the Slipknot
Once you have created the slipknot, it is important to tighten it properly. This will ensure that it stays securely on your needle and will not loosen while you are knitting. Follow these steps to tighten the slipknot:
- Hold the loose end of the yarn with one hand and the slipknot with the other hand.
- Gently pull on the loose end of the yarn to tighten the slipknot.
- Make sure to pull enough to make the slipknot snug, but be careful not to pull it too tight, as you still need to be able to slide it along the needle.
By tightening the slipknot correctly, you will be ready to start your knitting project with a secure and well-formed foundation loop.
FAQ:
What is a slipknot in knitting?
A slipknot is a basic knot that is used to start a knitting project. It creates a loop that can be easily adjusted and tightened on the knitting needle.
How do I make a slipknot in knitting?
To make a slipknot, start by making a loop with the yarn. Then, bring the end of the yarn through the loop to create a second loop. Finally, pull on both ends of the yarn to tighten the knot.
Why is a slipknot important in knitting?
A slipknot is important in knitting because it creates the first loop that goes on the knitting needle. It allows you to easily control the tension of your yarn and ensures that your stitches are secure.
Can a slipknot be easily undone?
Yes, a slipknot can be easily undone by simply pulling on the end of the yarn. This is particularly useful if you make a mistake and need to start over.
Is a slipknot used in all knitting projects?
A slipknot is commonly used in knitting projects, especially when casting on stitches. However, some knitters prefer to use a different method to start their projects, such as the long-tail cast-on.


