Do you love adding a fun and playful touch to your knitting projects? Making a pom pom is a simple and enjoyable way to do just that! Whether you want to add a cute embellishment to a hat, scarf, or even a pair of socks, creating a pom pom is a quick and easy process that can be done in just a few steps.
In this knitting pom pom tutorial, we will guide you through the simple steps to create a fluffy and eye-catching pom pom. All you need is some yarn, a pair of scissors, and a pom pom maker or a simple cardboard template. So, gather your materials and let’s get started!
Step 1: Begin by choosing the yarn you want to use for your pom pom. You can use a single color or mix different colors to create a unique and vibrant pom pom. Once you have chosen your yarn, cut a long piece and set it aside for later.
Step 2: If you are using a pom pom maker, follow the instructions provided to open the two sides of the maker. If you are using a cardboard template, cut a donut shape with two small holes in the middle. The size of the template will determine the size of your pom pom, so adjust accordingly.
Step 3: Hold one side of the pom pom maker or the template and start wrapping the yarn around it. Continue wrapping until you achieve your desired level of fullness. The more yarn you use, the denser your pom pom will be.
Step 4: Once you have finished wrapping the yarn, cut the end and tuck it under the wrapped yarn to secure it. If you are using a pom pom maker, close the two sides to hold the yarn in place.
Step 5: Take your small piece of yarn that you set aside earlier and thread it through the middle of the pom pom maker or the holes of the cardboard template. Tie a tight knot and make sure it is securely fastened.
Step 6: Carefully remove the pom pom maker or the cardboard template by opening it or cutting it. This will reveal your fluffy pom pom.
Step 7: Give your pom pom a shake to fluff it up and trim any uneven strands to shape it into a round and neat pom pom.
And there you have it! You have successfully made a pom pom in knitting. Now, all that’s left is to attach it to your knitting project and enjoy the playful and whimsical touch it adds. Have fun experimenting with different yarn colors and sizes to create a variety of pom poms for all your knitting projects!
Remember, making pom poms is a creative and versatile process, so feel free to explore different techniques and materials to achieve unique and stunning results!
Choosing the Right Yarn
When it comes to making a pom pom in knitting, choosing the right yarn is essential. The type, texture, and weight of the yarn will determine the overall look and feel of the finished pom pom. Here are some key factors to consider when selecting yarn for your project.
- Type of Yarn: There are various types of yarn available, including acrylic, wool, cotton, and blends. Each type has its own unique characteristics, such as warmth, softness, and durability. Consider the qualities you desire for your pom pom and choose a yarn type accordingly.
- Texture: Yarn can come in a variety of textures, ranging from smooth and silky to fuzzy and textured. The texture of the yarn will affect how the pom pom looks and feels. For a fluffy and soft pom pom, opt for a yarn with a fuzzy texture.
- Weight: Yarn is categorized into different weights, such as lace, fingering, sport, worsted, and bulky. The weight will affect the size and density of the pom pom. Lighter weight yarns will create a smaller and less dense pom pom, while bulky weight yarns will result in a larger and more plush pom pom.
- Color: Choose a yarn color that complements your knitting project. Whether you want a vibrant and colorful pom pom or a subtle and neutral one, picking the right color is essential. Consider the overall color scheme and style of your knitting project when selecting yarn.
It’s important to keep in mind that the yarn you choose will ultimately affect the final outcome of your pom pom. Take the time to experiment with different yarns to achieve the desired look and feel for your knitting project.
Selecting the Proper Tools
Before you begin making a pom pom in knitting, it is important to gather the right tools. Having the right tools will make the process much easier and more enjoyable. Here are the essential tools you will need:
- Yarn: Choose a yarn in your desired color. The thickness of the yarn will determine the size of your pom pom.
- Knitting Needles: You will need a set of knitting needles in a suitable size for your chosen yarn.
- Pom Pom Maker: There are various pom pom makers available, ranging from plastic to metal. Choose one that fits your preferences and is compatible with your yarn thickness.
- Thread: You will need a strong thread in a matching or coordinating color to secure the pom pom.
- Scissors: A pair of sharp scissors will be needed to cut the yarn.
Once you have gathered these tools, you will be ready to make a pom pom in knitting. Make sure to read the instructions carefully and follow each step precisely for the best results.
Creating a Basic Knit Stitch
A basic knit stitch is one of the fundamental knitting stitches that every knitter should learn. It forms the basis for many knitting patterns and projects.
To create a basic knit stitch, follow these easy steps:
- Hold the knitting needles in your hands, with the yarn attached to the back needle.
- Insert the right needle into the first stitch on the left needle, from left to right.
- Wrap the yarn around the right needle, moving from back to front.
- Bring the right needle back through the stitch on the left needle, pulling the yarn with it.
- Slip the stitch off the left needle and onto the right needle.
Repeat these steps for each stitch in your knitting project, always working from left to right. Remember to keep your tension even and your stitches tight but not too tight.
A basic knit stitch creates a smooth V-shaped pattern on the right side of the fabric, while the wrong side shows a series of bumps.
Once you have mastered the basic knit stitch, you can use it to create a wide variety of knitting patterns and textures. Practice regularly to improve your knitting skills and explore new knitting techniques.
Making the Pom Pom Base
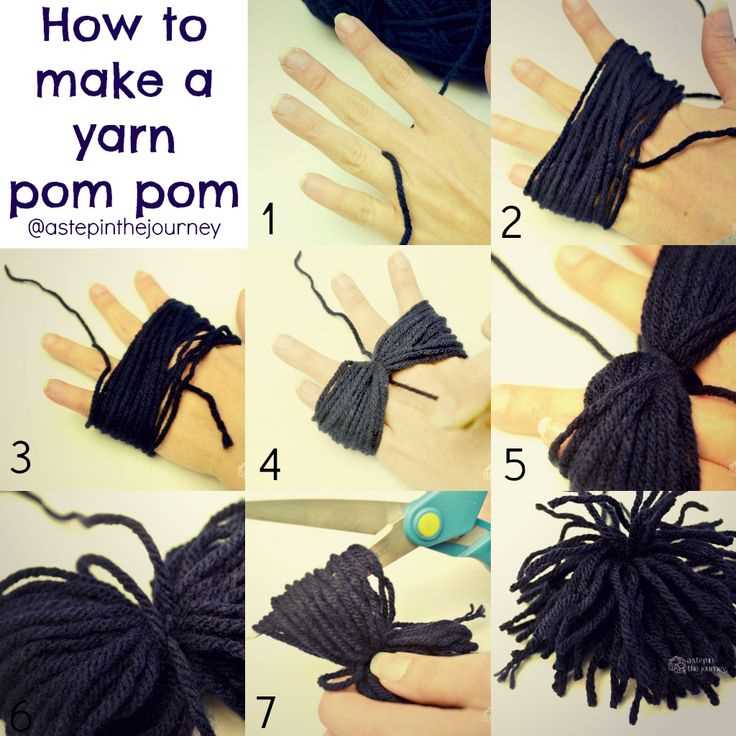
The base of the pom pom is made by wrapping yarn around your fingers. Follow these steps to create the base:
- Choose your yarn: Select a yarn of your choice in the color, weight, and texture you prefer.
- Prepare your materials: You will need your chosen yarn, a pair of scissors, and your fingers.
- Wrap the yarn:
- Hold the end of the yarn between your fingers.
- With your other hand, wrap the yarn around your fingers, starting with your index finger and moving towards your pinky finger.
- Continue wrapping the yarn around your fingers until you achieve the desired thickness for your pom pom.
- Be careful not to wrap the yarn too tightly; you want to be able to slide the yarn off your fingers easily in the next step.
- Secure and remove the yarn:
- Once you have wrapped enough yarn, carefully slide the wrapped yarn off your fingers, keeping the loops intact.
- Take a separate piece of yarn and tie it tightly around the middle of the loops. This will secure the base of the pom pom.
- Leave the ends of the securing yarn long; you will use them later to attach the pom pom to your knitted item.
- Trim any excess yarn hanging from the securing knot.
- Fluff and shape the pom pom:
- Once the base of the pom pom is secure, use your fingers to fluff and shape the loops of yarn.
- Tug gently on the loops to separate and spread them out, creating a round shape.
- Continue shaping and fluffing the pom pom until you achieve your desired look.
Now that you have created the base of your pom pom, you are ready to move on to attaching it to your knitted item!
Attaching the Pom Pom to the Knitted Item
Once you have made your pom pom using the easy steps outlined in the previous tutorial, you’re ready to attach it to your knitted item. Follow these simple instructions to securely attach the pom pom:
- Thread a Yarn Needle: Choose a yarn that matches the color of your knitted item. Thread the yarn through a yarn needle, leaving a tail that is long enough to tie a knot.
- Position the Pom Pom: Decide where you would like the pom pom to be placed on your knitted item. Hold the pom pom against the fabric to determine the best location.
- Make the First Stitch: Insert the yarn needle through the center of the pom pom, making sure to go through the knitted fabric as well. Pull the yarn through, leaving a small tail on the inside of the fabric to secure the pom pom.
- Secure with Additional Stitches: Continue attaching the pom pom by stitching through the center and into the fabric multiple times. This will help ensure that the pom pom stays securely attached.
- Tie a Knot: Once you are satisfied with the attachment, tie a knot with the yarn tail on the inside of the knitted item. Make sure the knot is tight and secure to prevent the pom pom from coming loose.
- Trim Excess Yarn: Use scissors to trim any excess yarn, both from the tail on the inside of the knitted item and from the pom pom itself. Be careful not to cut any of the knitted fabric or pom pom strands.
Congratulations! You have successfully attached your pom pom to your knitted item. Enjoy the added flair and playfulness that the pom pom brings to your project.
Cutting and Fluffing the Pom Pom
Once you have finished wrapping the yarn around the pom pom maker and securing it tightly, you can proceed to get your scissors and cut the yarn.
Hold the wrapped yarn securely and insert the scissors into the groove on one side of the pom pom maker. Start cutting the yarn all the way around.
Make sure to hold the cut ends of the yarn securely so they don’t unravel. Once all the yarn has been cut, give the pom pom a little shake to fluff it up and spread the yarn evenly.
After fluffing, you can use your fingers to gently separate and arrange the yarn strands to create a more full and fluffy pom pom. You can also trim any stray or longer strands of yarn to create a more uniform shape.
Take your time when fluffing and arranging the yarn to achieve the desired look for your pom pom. The more you separate and arrange the strands, the fuller and fluffier the pom pom will be.
Once you are satisfied with the fluffiness and shape of your pom pom, you can use it to embellish your knitting project as desired. Simply attach it using the yarn tails that were left when securing the pom pom maker.
Adding Embellishments (optional)
If you want to add some extra flair to your pom pom, you can use various embellishments to make it even more unique and decorative. Here are a few ideas to get you started:
- Glitter: Sprinkle some glitter onto the wet yarn before wrapping it around the pom pom maker. This will give your pom pom a sparkling finish.
- Sequins: Sew sequins onto the finished pom pom using a needle and thread. You can create patterns or simply scatter them randomly.
- Beads: String beads onto the yarn before wrapping it around the pom pom maker. Make sure to space them out evenly for a more balanced look.
- Ribbons: Tie ribbons around the middle of the finished pom pom, leaving long tails for added decoration.
These are just a few examples, but feel free to get creative and experiment with different materials and techniques. Adding embellishments to your pom pom is a great way to personalize it and make it stand out.
Finalizing and Securing the Pom Pom
Once you have finished making the pom pom, the final step is to secure it so that it doesn’t come apart. There are a few different methods you can use to achieve this:
- Tying a knot: Take a piece of yarn and thread it through the loops at the center of the pom pom. Pull the ends of the yarn tightly to form a knot and secure the pom pom. You can trim the excess yarn if desired.
- Using a needle and thread: Thread a needle with a piece of yarn and insert it through the loops at the center of the pom pom. Make several stitches to secure the yarn in place, and then tie a knot to secure it further. Cut off the excess yarn.
- Using a hot glue gun: Put a small amount of hot glue on the center of the pom pom and press the loops together. Hold it in place until the glue dries completely. Be careful not to burn yourself with the hot glue!
Whichever method you choose, make sure that the pom pom is tightly secured so that it doesn’t unravel. Once it is secured, you can trim any excess yarn to create a more even and balanced pom pom.
FAQ:
What materials do I need to make a pom pom in knitting?
To make a pom pom in knitting, you will need yarn, scissors, a pom pom maker or a cardboard template, and a needle or thread.
Can I make a pom pom without a pom pom maker?
Yes, you can make a pom pom without a pom pom maker by using a cardboard template. Simply cut out two identical circles from cardboard, cut a smaller circle in the center of each, place the templates together, and wrap yarn around them. Follow the rest of the steps to create your pom pom.
How do I attach the pom pom to my knitting project?
To attach the pom pom to your knitting project, thread a needle with the same yarn used to make the pom pom. Insert the needle through the center of the pom pom, then insert it into the knitting where you want the pom pom to be. Make sure to secure it tightly by weaving the needle through the stitches multiple times, and then knotting the yarn at the back of the knitting.
Are pom poms easy to make?
Yes, making pom poms is relatively easy. With a pom pom maker or a cardboard template, you can create beautiful and fluffy pom poms in just a few steps. It may take a bit of practice to perfect the technique, but once you get the hang of it, you’ll be able to make pom poms effortlessly.


