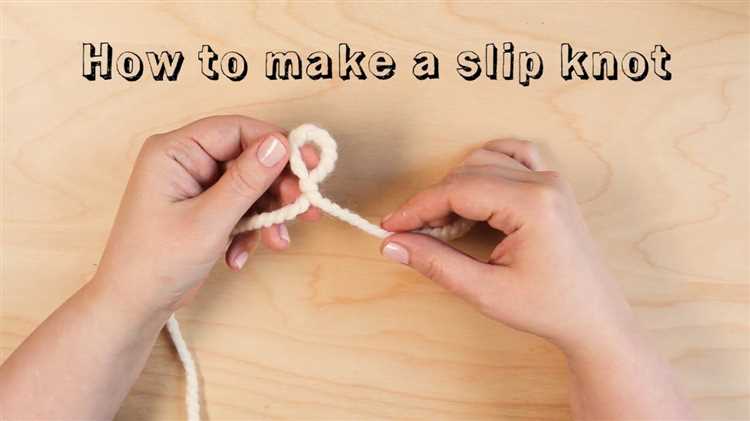
Knitting is a beloved pastime for many, and one of the first things you need to know before you can start knitting is how to make a slip knot. A slip knot is used to anchor your yarn to your knitting needles, providing a starting point for your knitting project. This simple yet essential technique will allow you to begin your knitting with confidence.
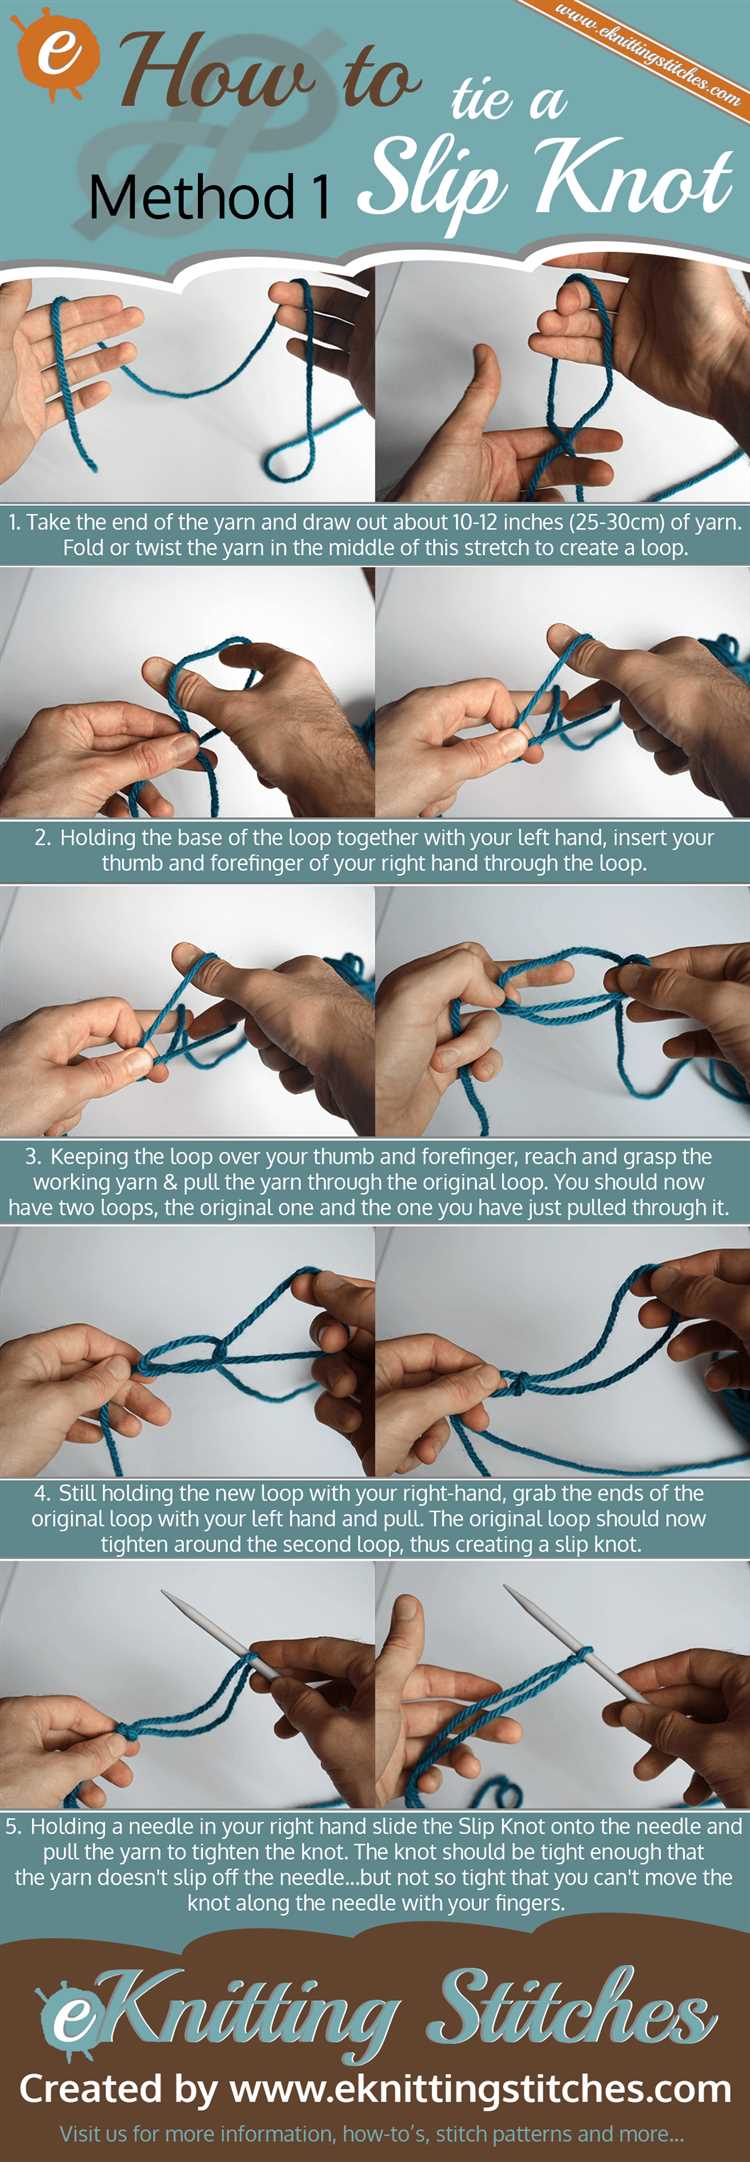
To make a slip knot, you will need a length of yarn and your knitting needles. Start by holding the yarn in your dominant hand, with the end of the yarn hanging down. Create a loop by placing the yarn over your thumb, crossing it over the top of the thumb, and then bringing it under the thumb.
Next, take the end of the yarn and bring it through the loop you just created, from the bottom towards the top. Pull the end of the yarn gently to tighten the loop around your thumb. This creates a slip knot, which can be easily adjusted by pulling on the working end of the yarn.
Once you have made your slip knot, you can place it onto one of your knitting needles. Simply slip the knitting needle through the loop of the slip knot, pulling gently to tighten it onto the needle. Congratulations! You have just made a knitting slip knot and are ready to start your knitting project.
Remember, practice makes perfect, and mastering the slip knot is an important skill for any knitter. With these step-by-step instructions, you’ll be well on your way to creating beautiful and intricate knitted projects with ease.
Gather the necessary materials
To make a knitting slip knot, you will need:
- Yarn: Choose a yarn color and thickness that you like. Make sure the yarn is suitable for knitting.
- Knitting needles: Select the appropriate knitting needle size based on the yarn thickness you are using.
- Scissors: You will need scissors to cut the yarn.
Before you begin, gather all the necessary materials to ensure a smooth knitting process.
Start with a yarn tail
Before you can make a slip knot for knitting, you need to start with a yarn tail. The yarn tail is the loose end of your yarn that you will be working with to create your slip knot and continue knitting.
To start with a yarn tail, follow these steps:
- Begin by unraveling your yarn from the skein or ball. Make sure you have enough yarn for your project.
- Locate the end of the yarn that is loose and not attached to anything.
- Hold onto the loose end of the yarn with one hand, making sure it doesn’t slip out of your grasp.
- With your other hand, gently pull the yarn away from the skein or ball to create a tail.
Once you have created a yarn tail, you are ready to move on to making a slip knot. The slip knot is the first step in starting your knitting project and will hold your first stitch in place.
Now that you have your yarn tail ready, continue following the step-by-step guide on how to make a knitting slip knot.
Create a loop
To start making a knitting slip knot, you need to create a loop with the yarn. Follow these steps:
- Hold the yarn: Hold the end of the yarn in your right hand and let the rest of the yarn loop over your left hand.
- Create a loop: Take the end of the yarn and pass it over the yarn that is looping around your left hand.
- Insert the end: Insert the end of the yarn through the loop you just created.
- Tighten the loop: Pull the end of the yarn to tighten the loop, creating a slip knot.
Now you have successfully created a slip knot and are ready to start your knitting project!
Slip the end through the loop
Once you have created the initial loop in the previous step, take the end of the yarn or string and slip it through the loop. This will create a second loop, with the end of the yarn or string now going through it.
To do this, hold the loop with one hand to keep it secure. With your other hand, take the end of the yarn or string and insert it through the loop from the top.
Make sure that the end goes through the loop completely, leaving a small tail of yarn or string on the other side. This tail will be used later on to adjust the tension of the slip knot.
|
Step-by-step instructions:
|
Tips:
|
Once you have successfully slipped the end of the yarn or string through the loop, you have created a slip knot. Congratulations! You can now move on to the next step in your knitting project.
Pull the ends in opposite directions
With the slip knot securely on your knitting needle, you can now start tightening the loop. Hold the yarn end that is connected to the ball of yarn in your left hand and the other end in your right hand.
Begin by pulling both ends of the yarn in opposite directions. As you do this, you will see the loop of the slip knot start to tighten. Keep pulling until the loop is snug around the knitting needle, but not too tight.
It’s important to make sure the slip knot is secure, but not overly tight. You want to be able to easily slide the loop along the needle as you begin your knitting project.
If the slip knot is too loose, it may come undone while you are knitting. If it’s too tight, it may be difficult to work with and may affect the tension of your stitches.
Once you have pulled the ends in opposite directions and the slip knot is the right level of tightness, you are ready to move on to the next step in your knitting project!
Adjust the knot
After creating the slip knot, you may need to adjust it to ensure that it fits your hand comfortably.
Follow these steps to adjust the knot:
- Hold the slip knot with one hand.
- Gently tug on the tail end of the yarn with your other hand to tighten the loop around your fingers.
- Slide the loop up or down your fingers to make it looser or tighter, respectively.
- Continue adjusting until the slip knot is at a comfortable size for your hand.
Remember that everyone’s hand size is different, so it may take a few tries to find the perfect fit. The slip knot should be snug enough to stay in place while knitting, but not so tight that it constricts your circulation.
Once you have adjusted the slip knot, you are ready to begin knitting!
Test the slip knot
After you have made the slip knot, it is important to test it to make sure it is secure and adjusted properly.
To test the slip knot:
- Hold the slip knot in your hand.
- Gently pull on the working yarn to tighten the slip knot.
- Release your hold on the slip knot and see if it stays in place.
- If the slip knot comes undone, try tightening it again until it holds securely.
It is important for the slip knot to be secure, but not too tight. If it is too tight, it may be difficult to work with the yarn.
Once you have tested the slip knot and it is secure, you are ready to continue with your knitting project!
Begin your knitting project
Before you can start knitting, there are a few things you’ll need to gather:
- A pair of knitting needles
- A ball of yarn
- Scissors
- A tape measure
- A knitting pattern (if you have one)
Once you have all your supplies ready, it’s time to get started!
Step 1: Choose your yarn and needles
First, you’ll need to choose the appropriate yarn and needles for your project. Check the label on your yarn for the recommended needle size. This will ensure that your stitches are the correct size and tension.
Step 2: Create a slip knot
Begin by creating a slip knot at the end of your yarn. This will be the first stitch on your needle.
Step 3: Cast on stitches
To begin your knitting project, you’ll need to cast on stitches. The number of stitches you cast on will depend on your pattern or desired project size. You can use a simple cast on method, such as the long-tail cast on, or a method that is more suited to your project.
Step 4: Start knitting
Once you have cast on your stitches, you’re ready to start knitting! Insert one needle into the first stitch on your left needle and bring the yarn over the right needle. Pull the right needle through the stitch to create a new stitch on the right needle.
Step 5: Follow your pattern
If you have a knitting pattern, follow the instructions provided to create the desired stitch pattern and shape. Pay attention to any changes in stitch pattern, such as increases or decreases, and follow the pattern closely to ensure your project turns out correctly.
Step 6: Measure your progress
Periodically measure your project using a tape measure to ensure you are achieving the correct size and tension. This is particularly important for garments that need to fit properly.
Step 7: Bind off
Once you have completed your project, it’s time to bind off. This will secure your stitches and prevent them from unraveling. There are several bind off methods you can use, depending on the desired finish of your project.
Congratulations! You are now ready to begin your knitting project. Enjoy the process and have fun creating something beautiful with your own two hands!
FAQ:
What materials do I need to make a knitting slip knot?
To make a knitting slip knot, you will need a ball of yarn and a pair of knitting needles.
Can I use any type of yarn to make a slip knot?
Yes, you can use any type of yarn to make a slip knot. However, it is important to choose a yarn that is appropriate for the project you are working on.
How do I make a slip knot?
To make a slip knot, start by making a loop with the yarn. Then, insert one end of the loop through the other end, creating a knot. Pull the ends of the loop to tighten the knot.
What is the purpose of a slip knot in knitting?
A slip knot is used to start a knitting project. It creates a secure loop on one end of the yarn, which can be easily adjusted and tightened as needed.
Is it difficult to make a slip knot?
No, making a slip knot is a basic knitting technique that is easy to learn. With a little practice, you will master it in no time.
Are there any alternative methods for making a slip knot?
Yes, there are alternative methods for making a slip knot. Some knitters prefer to make a slip knot by making a loop with their fingers, while others use a crochet hook to create the knot.


