Knitting is an ancient craft that allows you to create beautiful and functional garments using just a few simple tools. One of the most basic and versatile stitches in knitting is the stockinette stitch. Whether you’re a beginner or an experienced knitter looking to refine your skills, learning how to knit stockinette stitch is essential.
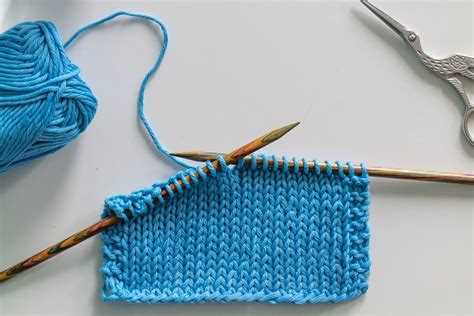
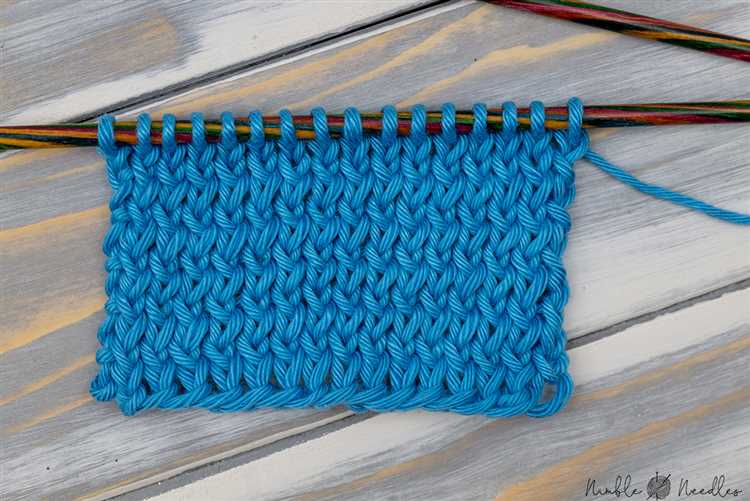
The stockinette stitch, also known as the stocking stitch, creates a smooth and flat fabric with a distinct right side and wrong side. It is often used for creating garments such as sweaters, scarves, and hats, as well as for decorative elements in knitted accessories. It consists of alternating rows of knit stitches and purl stitches, creating a pattern that resembles “V” shapes on the right side of the fabric.
In this step-by-step tutorial, we will walk you through the process of knitting the stockinette stitch. We’ll cover everything from casting on and knitting the first row to switching between knit and purl stitches and binding off. By the end of this tutorial, you’ll have all the knowledge necessary to confidently knit beautiful stockinette stitch projects.
So grab your knitting needles, choose your favorite yarn, and join us as we dive into the art of knitting the stockinette stitch. Whether you’re a beginner or an experienced knitter, this tutorial will guide you through the process and help you master this essential knitting technique.
What is stockinette stitch?
Stockinette stitch is one of the basic stitches used in knitting. It is also known as stocking stitch and is commonly used to create smooth and flat fabric. Stockinette stitch is characterized by rows of V-shaped knit stitches on the right side of the fabric and rows of purl stitches on the wrong side of the fabric.
To create stockinette stitch, you alternate between knitting a row and purling a row. On the right side, you knit all stitches, and on the wrong side, you purl all stitches. This creates the distinctive texture of stockinette stitch.
Stockinette stitch is often used as a foundation stitch for many knitting projects, such as sweaters, scarves, and blankets. It creates a fabric that is smooth and stretchy, and it is great for showcasing yarn colors, textures, and stitch patterns.
However, it is important to note that stockinette stitch tends to curl at the edges due to the difference in tension between knitted and purled stitches. To prevent this curling, it is common to add a border of ribbing or garter stitch to stabilize the edges.
Overall, stockinette stitch is a versatile and widely used stitch in knitting. With its simple yet elegant appearance, it is suitable for both beginner and experienced knitters and can be incorporated into a wide range of projects.
Tools and Materials
Before you can start knitting the stockinette stitch, you will need to gather a few essential tools and materials. Here is a list of what you will need:
- Knitting Needles: You will need a pair of knitting needles. The size will depend on the yarn weight and the desired tension or gauge. You can refer to the yarn label for recommendations on needle size.
- Yarn: Choose a yarn of your choice in the color and weight you prefer. For beginners, it is recommended to use a medium-weight yarn that is easy to work with.
- Tape Measure: A tape measure will be handy to measure the length and size of your knitted fabric.
- Scissors: You will need a pair of sharp scissors to cut the yarn when necessary.
- Yarn Needle: A yarn needle or tapestry needle will be needed to weave in the loose yarn ends when you finish your project.
- Stitch Markers: Stitch markers are optional but they can help you keep track of specific stitches or sections in your knitting.
Once you have gathered all the necessary tools and materials, you will be ready to start learning how to knit the stockinette stitch. Make sure to have a comfortable and well-lit space to work in.
Getting started
Before you begin knitting the stockinette stitch, there are a few things you’ll need to gather and prepare:
- Knitting needles: Choose a pair of knitting needles that are appropriate for the yarn you’ll be using. The size of the needles will depend on the thickness of the yarn and the desired gauge.
- Yarn: Select a yarn that is suitable for the project you have in mind. The weight and fiber content of the yarn can affect the final result, so choose accordingly.
- Knitting gauge: Check the recommended gauge for your project and make sure your needles and yarn match the requirements. To check your gauge, knit a small swatch and measure the stitches and rows per inch.
- Knitting tools: Gather any necessary knitting tools, such as stitch markers, a tapestry needle for weaving in ends, and scissors.
Once you have all the necessary supplies, you’re ready to begin knitting the stockinette stitch. Follow the step-by-step instructions below to learn how to knit this classic stitch pattern.
Knitting the first row
Before you can start knitting the stockinette stitch, you need to cast on the desired number of stitches on your needle. Once you have your stitches cast on, you are ready to begin knitting the first row.
1. Hold the knitting needle with the cast on stitches in your right hand, and the empty needle in your left hand.
2. Insert the empty needle into the first stitch on the right needle, from left to right.
3. With the yarn held in your right hand, bring it over the left needle, making sure it crosses behind the right needle.
4. Use the right needle to pull the yarn through the stitch on the left needle, creating a new stitch on the right needle.
- Repeat steps 2-4 until you have worked across all the stitches on the left needle.
5. Once you have finished knitting the first row, you should have all the stitches on your right needle.
6. Turn your work so that the side with the knitted stitches is facing you.
Now you are ready to knit the second row, which will be the purl row in the stockinette stitch pattern.
Tips:
- Make sure to keep your tension relaxed and even as you knit to ensure your stitches are consistent.
- Take your time and practice the motions of knitting until you feel comfortable with the technique.
- If you make a mistake, don’t worry! Knitting is a forgiving craft and mistakes can be easily fixed.
Purling the second row
To create the stockinette stitch, you will alternate between knitting and purling rows. After you have completed the first row in the stockinette stitch by knitting every stitch, it’s time to purl the second row.
- Start by holding your knitting needles with the knitted row facing you.
- Insert the right needle into the first stitch from right to left, just as you would for knitting.
- Instead of wrapping the yarn around the needle and pulling it through the stitch, bring the yarn to the front of your work.
- With the yarn in front, insert the right needle from right to left into the next stitch on the left needle.
- Without twisting the needle, bring the yarn over the right needle and towards the back of your work.
- Using the right needle, pull the yarn through the stitch, creating a new stitch on the right needle.
- Slide the old stitch off the left needle, and you have successfully purled the second stitch.
- Repeat steps 3 to 7 for each stitch until you have purled all the stitches on the row.
Remember to maintain a consistent tension and keep your stitches even as you purl each stitch. As you practice and gain experience, purling will become easier and more natural.
Continuing the pattern
Once you have completed the first row of the stockinette stitch pattern, you are ready to continue knitting the remaining rows.
To continue the pattern:
- Turn your work so that the opposite side is facing you.
- For the second row, you will alternate between knitting and purling stitches. If the stitch on your left needle is a knit stitch, purl it. If the stitch on your left needle is a purl stitch, knit it.
- Continue knitting and purling the stitches in this alternating pattern until you reach the end of the row.
- Repeat steps 2 and 3 for each subsequent row until you have achieved the desired length for your project.
Remember to always keep the yarn at the back of your work when knitting and bring it to the front when purling.
Continue following this pattern to create the smooth and textured appearance of the stockinette stitch.
It’s important to note that the edges of your work may curl in when working in stockinette stitch. To prevent this, you can add a border or use a different edge stitch.
Once you have mastered the stockinette stitch, you can explore different variations such as adding ribbing or incorporating other stitch patterns into your projects.
Finishing and blocking
Once you have completed knitting the stockinette stitch, it’s important to finish and block your project to ensure that it looks its best and maintains its shape. Here are some steps to follow:
- Weave in the ends: Use a yarn needle to weave in any loose yarn ends on the wrong side of your work. This will help secure them and prevent them from unraveling.
- Block your project: Blocking is the process of gently shaping and stretching your knitted fabric to even out the stitches and improve drape. To block your project, you can follow these steps:
- Fill a sink or basin with lukewarm water and add a few drops of mild detergent.
- Place your knitted piece in the water, gently pressing it down to fully submerge it. Let it soak for about 15-20 minutes.
- Remove the piece from the water and gently squeeze out the excess moisture, being careful not to wring or twist it.
- Lay a clean towel on a flat surface and place your knitted piece on top of it. Gently reshape it, stretching it slightly if needed.
- Allow your project to dry flat on the towel. You can use pins to help maintain its shape, if desired.
- Finishing touches: Once your project is dry, you can add any desired finishing touches, such as sewing on buttons or attaching edgings. These details can enhance the overall look of your knitted piece.
By following these steps, you can ensure that your stockinette stitch project looks professional and polished. Remember to take your time and enjoy the process of finishing your knitting!
FAQ:
What is stockinette stitch?
Stockinette stitch is a basic knitting stitch that creates a smooth, V-shaped pattern on one side of the fabric and a bumpy texture on the other side. It is also known as stocking stitch.
Can you explain the step-by-step process of knitting stockinette stitch?
Sure! To knit stockinette stitch, you first need to cast on the desired number of stitches. Then, for the right side rows, you knit all stitches, and for the wrong side rows, you purl all stitches. Repeat these two rows until you achieve the desired length. Finally, bind off the stitches.
What materials do I need to knit stockinette stitch?
To knit stockinette stitch, you will need knitting needles in the appropriate size for your chosen yarn, yarn of your choice, a pair of scissors, and a yarn needle for weaving in the ends.
Are there any tips for knitting stockinette stitch?
Yes! Here are a few tips for knitting stockinette stitch: make sure to keep an even tension throughout your knitting, use stitch markers to easily identify the beginning of each row, and always check your gauge before starting your project to ensure the correct size.
What can I make using stockinette stitch?
You can use stockinette stitch to create a variety of knitted items, such as scarves, hats, sweaters, blankets, and more. It is a versatile stitch pattern that works well with many different projects.
Is stockinette stitch suitable for beginners?
Yes, stockinette stitch is a great stitch pattern for beginners. It only requires basic knit and purl stitches, and it provides an opportunity to practice knitting in rows and working with different textures.


