If you’re new to knitting and want to learn the basics, one of the first things you’ll need to know is how to create a slip knot. A slip knot is the foundation for most knitting projects, as it creates a loop on the needle that allows you to begin your stitches. In this easy knitting tutorial, we’ll guide you through the step-by-step process of creating a slip knot.
Step 1: Prepare your yarn
Before you begin creating your slip knot, make sure you have your yarn ready. Find the end of the yarn and hold it in your left hand, allowing the rest of the yarn to fall naturally towards the ball. It’s important to have enough yarn to create your desired length, but not so much that it becomes difficult to work with.
Step 2: Create a loop
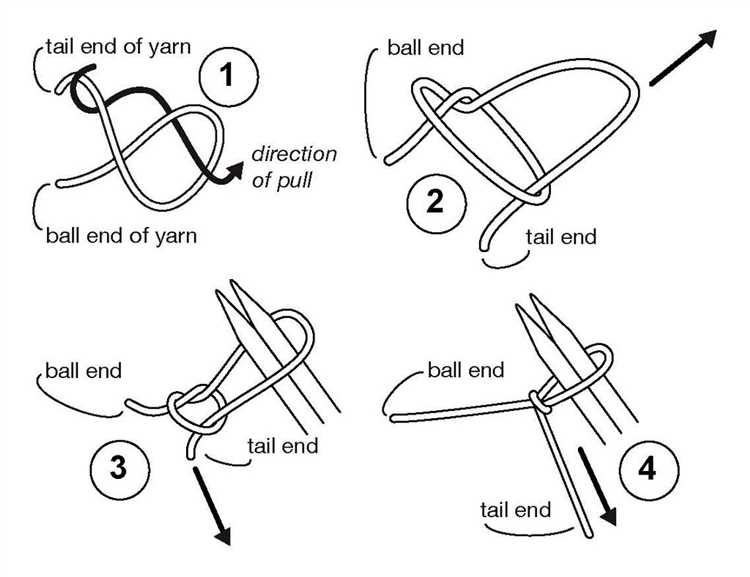
To create a slip knot, take the end of the yarn in your right hand and cross it over the yarn in your left hand to form a loop. Make sure the end of the yarn is on top of the loop, with a short tail of yarn extending outwards.
Step 3: Insert the needle
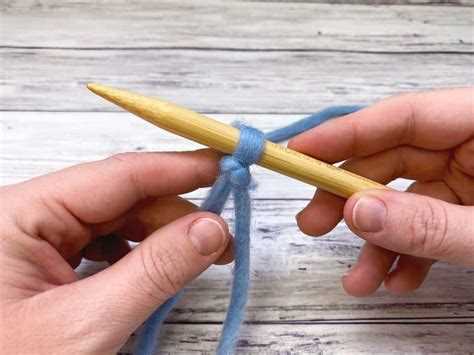
Now, take your knitting needle and insert it through the loop from front to back. Be sure to position the needle so that it’s underneath the short tail of yarn, with the tail extending towards you. Hold onto the needle with your left hand, keeping your thumb and index finger on both sides of the loop.
In knitting, the slip knot is like the foundation stone of your project. By mastering this simple technique, you’ll be well on your way to creating beautiful knitted creations!
Step 4: Pull the yarn through
With your right hand, pull the end of the yarn that’s sticking out through the loop. This will create a new loop on the knitting needle, while the original loop remains intact. Make sure to gently tighten the yarn, but not too much, as you’ll need to be able to slide the stitches along the needle later on.
Step 5: Adjust the size
Once you’ve pulled the yarn through, you can adjust the size of the loop by gently tugging on the short tail of yarn. This will tighten or loosen the loop to your desired size. Keep in mind that the loop should be loose enough to easily slide along the needle, but tight enough to securely hold your stitches.
Now that you’ve successfully created a slip knot, you’re ready to begin your knitting journey! Practice this technique until you feel confident, as it will be the starting point of many knitting projects to come.
The Importance of a Slip Knot in Knitting
In the art of knitting, a slip knot is a fundamental and essential technique. It is used to start knitting projects by creating the first loop on the knitting needle. The slip knot allows you to easily control the tension of your yarn and ensures that your stitches are secure.
There are several reasons why a slip knot is important in knitting:
- Starting Point: A slip knot provides a starting point for your knitting project. It creates a loop that can be easily adjusted to control the size and tightness of your stitches.
- Tension Control: The slip knot allows you to control the tension of your yarn. By adjusting the tightness of the initial loop, you can ensure that your stitches are even and consistent throughout your project.
- Security: When you create a slip knot, it tightly secures the end of your yarn to the knitting needle. This prevents your stitches from unraveling and ensures that your work stays intact.
- Flexibility: The slip knot provides flexibility in your knitting. It allows you to easily adjust and manipulate your stitches, enabling you to create various patterns, textures, and designs.
- Foundation for Techniques: Many knitting techniques and stitches rely on the slip knot as a starting point. Whether you’re learning new stitches, shaping your work, or joining yarn colors, the slip knot is often the first step in executing these techniques.
Overall, the slip knot is a crucial element in knitting. It sets the foundation for your project, controls tension, provides security, allows for flexibility, and serves as a starting point for various knitting techniques. Understanding and mastering the slip knot is essential for every knitter, regardless of skill level.
What is a Slip Knot?
A slip knot is a basic knitting technique used to start a project. It is a loop that can be easily adjusted and tightened or loosened depending on the project requirements. The slip knot is the first stitch in most knitting projects and serves as the foundation for subsequent stitches.
To create a slip knot, you only need a single strand of yarn. The slip knot is made by twisting the yarn into a loop and pulling one end through to secure it. This creates a loop that can be easily adjustable and can be used to start knitting.
Slip knots are versatile and can be used for various purposes in knitting. They can be used to join new yarn, cast on stitches, or even create decorative elements in a project. Additionally, slip knots can be easily undone and adjusted, making them useful when trying to achieve the perfect tension.
It is important to note that slip knots are temporary and are often removed once the initial stitches have been cast on. However, in some cases, slip knots may be kept in place as part of the design or for functional purposes.
A slip knot is an essential skill for any knitter to master, as it forms the basis for most knitting projects. By understanding how to create a slip knot, you can confidently start your knitting projects and explore the endless possibilities of this versatile technique.
Supplies Needed for Knitting a Slip Knot
To knit a slip knot, you’ll need the following supplies:
- Yarn: Choose a yarn of your choice in the desired color and weight. Make sure it is suitable for knitting.
- Knitting needles: Select the appropriate size of knitting needles for your yarn. The size will typically be listed on the yarn label.
- Scissors: You’ll need a pair of scissors to cut the yarn.
- Tape measure: A tape measure will help you ensure your slip knot is the right size.
Optional supplies:
- Yarn needle: A yarn needle is useful for weaving in loose ends or sewing knitted pieces together.
- Stitch markers: Stitch markers can be helpful for marking specific stitches or sections of your knitting.
- Row counter: A row counter is an excellent tool for keeping track of rows or pattern repeats.
Once you have gathered all the necessary supplies, you’ll be ready to start knitting your slip knot!
Step 1: Making a Slip Knot Loop
In this step-by-step guide, you will learn how to make a slip knot loop, which is the first step in knitting. The slip knot is used to create a secure loop on your knitting needle, allowing you to start your project.
Here’s how to make a slip knot:
- Start by taking the yarn end in your dominant hand and leaving a 6-inch tail.
- Hold the yarn between your thumb and index finger, keeping the tail end on top.
- Cross the yarn over the tail, forming a small loop.
- Bring the yarn end up and through the loop.
- Hold the loop with your non-dominant hand and tighten the knot by pulling the yarn end.
- Adjust the size of the loop by pulling on the tail end or the yarn end.
Once the slip knot is made, you can insert your knitting needle into the loop, ensuring it is not too tight or too loose. Now you’re ready to start knitting!
| Materials Needed | Instructions |
|---|---|
| Yarn | 1. Take the yarn end in your dominant hand. |
| Knitting needle | 2. Hold the yarn between your thumb and index finger, keeping the tail end on top. |
| Scissors | 3. Cross the yarn over the tail, forming a small loop. |
Note: This is just the first step in knitting. Make sure to follow the remaining steps in the full tutorial to complete your knitting project successfully.
Step 2: Securing the Slip Knot
Once you have successfully formed the slip knot on your knitting needle in Step 1, it is important to secure it properly to ensure that it will not unravel while you are working on your knitting project.
To secure the slip knot, follow these steps:
- Hold the knitting needle with the slip knot in your right hand.
- With your left hand, grab the working yarn, which is the yarn attached to the skein, and hold it between your thumb and index finger.
- With your right hand, bring the knitting needle towards you, creating a loop with the working yarn.
- Take the loop of the working yarn and bring it over the knitting needle from the front to the back, so that the loop is now behind the needle.
- Pull the working yarn gently to tighten the loop around the knitting needle.
By following these steps, you have securely secured the slip knot and are now ready to move on to the next step in your knitting project. It is important to make sure that the slip knot is not too tight or too loose to allow for easy knitting.
Step 3: Adjusting the Slip Knot’s Size
Once you have formed the slip knot, it’s time to adjust its size to fit your needs. Follow these steps to make sure your slip knot is not too tight or too loose:
- Hold the slip knot with your thumb and index finger to keep it secure.
- Gently pull on the two strands of yarn that extend from the slip knot. This will tighten the loop.
- Check the size of the loop by sliding it onto a knitting needle or any other object you are using for knitting. It should be loose enough to slide easily but tight enough to hold its shape.
- If the loop is too tight, carefully loosen it by pulling on the strands of yarn until you achieve the desired size.
- On the other hand, if the loop is too loose, tighten it by pulling on the strands of yarn in opposite directions until it fits snugly on the knitting needle or object.
- Repeat this process until you are satisfied with the size of the slip knot.
Remember, the slip knot is the foundation of your knitting project, so it’s important to get the size just right. A slip knot that is too tight can make it difficult to work with the yarn, while a slip knot that is too loose can cause stitches to unravel.
Step 4: Testing the Slip Knot’s Tightness
After completing the previous steps to create a slip knot, it’s important to check the tightness of the knot before proceeding. This will ensure that your knitting project starts off with a secure and even tension.
To test the tightness of the slip knot, gently tug on the working yarn. The slip knot should be snug but still allow for movement without easily coming undone. If the slip knot feels too loose, you can easily adjust the tightness by pulling the working yarn through the loop or by pulling on the tail end of the slip knot.
By testing and adjusting the tightness of the slip knot, you’ll be able to confidently continue with your knitting project, knowing that the foundation is secure and the tension is even. It may take some practice to find the perfect balance of tightness, but once you’ve mastered it, you’ll be ready to move on to the next step in your knitting journey.
Common Mistakes to Avoid while Making a Slip Knot
Making a slip knot is one of the first steps in knitting, and it may seem simple, but there are common mistakes that beginners often make. Avoiding these mistakes will help you create a strong and secure slip knot. Here are some common mistakes to watch out for:
- Using the wrong type of yarn: Different yarns have different textures and thicknesses, and using the wrong type can result in a slip knot that is too loose or too tight. Make sure to choose a yarn that is suitable for the project you are working on.
- Tying the slip knot too tightly: It’s important to create a slip knot that is secure but still allows you to easily pull the working yarn through. Tying the slip knot too tightly can make it difficult to move the yarn through the loop.
- Making the loop too large or too small: The size of the loop in a slip knot is crucial for achieving the desired tension in your knitting. If the loop is too large, the stitches may be too loose, and if it’s too small, the stitches may be too tight. Practice creating slip knots of various sizes to find the right balance.
- Not leaving a long enough tail: The tail of the slip knot is used to secure it and create tension in the first row of knitting. Leaving a tail that is too short can result in the slip knot loosening or unraveling.
- Forgetting to twist the loop: When making a slip knot, it’s important to twist the loop before pulling the working yarn through. This creates a more secure knot that won’t easily come undone.
Avoiding these common mistakes will help you create a slip knot that is strong and secure, providing a solid foundation for your knitting project.
Summary
In this step-by-step guide, we will learn how to knit a slip knot. This easy knitting tutorial is perfect for beginners who are just starting out with knitting. The slip knot is the first step in casting on stitches for knitting projects. By following the simple instructions outlined in this tutorial, you will be able to create a slip knot in no time.
To begin, you will need a ball of yarn and a pair of knitting needles. Once you have gathered your supplies, follow these steps:
- Start by making a loop with the end of the yarn, ensuring that the working end is on top.
- Take the working end of the yarn and pass it through the loop, creating another loop.
- Gently pull on both ends of the yarn to tighten the knot.
- Your slip knot is now ready for use in casting on stitches for your knitting project.
By practicing this technique, you will become more comfortable with knitting and be able to move on to more advanced projects. The slip knot is an essential skill in knitting and will serve as a foundation for many other stitches and techniques. With this easy knitting tutorial, you’ll be able to confidently start your knitting projects with a slip knot.
FAQ:
What is a slip knot in knitting?
A slip knot is a basic knitting technique that creates a loop in your yarn to start your knitting project.
How do I make a slip knot for knitting?
To make a slip knot for knitting, you need to first create a loop with your yarn. Then, insert the end of the loop through the middle of the loop and tighten it by pulling both ends of the loop.
What is the purpose of a slip knot in knitting?
The purpose of a slip knot in knitting is to create a secure and adjustable loop in the yarn that can be easily adjusted to fit your knitting needle.
How tight should a slip knot be in knitting?
A slip knot in knitting should be tight enough to secure the yarn, but loose enough to easily slide along the knitting needle.
Can you use a slip knot in crochet?
Yes, a slip knot can be used in crochet as well. It is commonly used to start a crochet project and create a loop on your hook to begin the stitches.
What type of yarn is best for making a slip knot in knitting?
Any type of knitting yarn can be used to make a slip knot, but a smooth and easy-to-work-with yarn is usually recommended for beginners.
Can I use a slip knot for other crafts besides knitting and crochet?
Yes, a slip knot can be used for various other crafts like macrame, jewelry making, and even sewing. It is a versatile technique that creates a secure loop in the material.


