Knitting is a popular and relaxing hobby that allows you to create beautiful and functional items. If you’re ready to take your knitting skills to the next level, why not try knitting your own gloves? Knitting gloves may seem like a daunting task, but with the right guidance and a little practice, you’ll be able to create a cozy and stylish pair of gloves in no time.
In this step-by-step guide, we’ll walk you through the process of knitting gloves from start to finish. We’ll cover everything from selecting the right yarn and needles, to casting on, making the thumb gusset, and finally, shaping the fingers. Whether you’re a beginner or an experienced knitter, this guide is designed to help you successfully knit a glove that fits perfectly and keeps your hands warm.
Throughout the guide, we’ll provide clear instructions and helpful tips to make the process as smooth as possible. We’ll also include detailed photographs to visually guide you through each step. By the end of this guide, you’ll have the skills and confidence to tackle more complex knitting projects.
So grab your knitting needles and a ball of yarn, and let’s get started on knitting your very own glove. Get ready to impress your friends and family with your knitting prowess and enjoy the satisfaction of wearing a glove you made with your own two hands.
What You Need to Get Started
- A pair of knitting needles: It’s best to choose a pair of needles that are the appropriate size for the yarn you plan to use. This information is usually found on the yarn label.
- Yarn: Select a yarn that is suitable for glove knitting. Consider the yarn’s weight, fiber content, and color.
- Tape measure: This will be useful for taking measurements of your hand to ensure you choose the right size for your glove.
- Scissors: You’ll need scissors to cut the yarn when you’re finished knitting or need to change colors.
- Tapestry needle: A tapestry needle is used for weaving in loose ends and finishing touches on your glove.
- Stitch markers: These will come in handy for marking specific points in your knitting, such as the beginning of a round or thumb placement.
- Stitch holder or scrap yarn: To hold stitches when needed, you can use a stitch holder or scrap yarn.
- Pattern: Find a pattern for knitting gloves that matches the style you want and includes instructions for your chosen yarn weight.
Having these basic supplies will ensure you have everything you need to get started on your glove-knitting journey. Once you have gathered all of these items, you’ll be ready to move on to the next steps of the process.
Choosing the Right Yarn and Needles
When it comes to knitting gloves, choosing the right yarn and needles is essential for achieving the desired result. Here are some factors to consider when making your selection:
- Yarn Weight: The weight of the yarn determines the thickness and warmth of the final gloves. For a lightweight and breathable pair of gloves, choose a fingering or sport weight yarn. For a warmer pair, opt for a worsted or bulky weight yarn.
- Fiber Content: Different fibers have different properties, so it’s important to consider the intended use of the gloves. For a cozy and warm pair of gloves, opt for wool or alpaca yarn. For gloves that are lightweight and moisture-wicking, consider using a blend of synthetic fibers like acrylic or nylon.
- Needle Size: The needle size you choose will largely depend on the yarn weight you’ve selected. Thinner yarns will require smaller needles, while thicker yarns will require larger needles. Check the yarn label or pattern instructions for recommended needle sizes.
- Gauge: Gauge refers to the number of stitches and rows per inch of knitted fabric. Achieving the correct gauge is important for ensuring the proper fit of the gloves. Before starting your project, make a gauge swatch with your chosen yarn and needles to ensure that you are knitting to the correct specifications.
- Color and Pattern: Consider the color and pattern of the yarn to add visual interest to your gloves. You may want to choose a solid color for a classic look, or experiment with variegated or self-striping yarns for a more unique design.
By considering these factors and making informed choices, you can ensure that you have the right yarn and needles for knitting your perfect pair of gloves.
Creating a Gauge Swatch
Before you start knitting your glove, it’s important to create a gauge swatch. A gauge swatch is a small piece of knitting that you’ll use to determine the correct number of stitches and rows per inch in your pattern. This will ensure that your finished glove fits properly.
To create a gauge swatch, you’ll need to gather the following materials:
- Yarn – Use the same yarn that you plan to use for your glove to ensure accurate results.
- Knitting needles – Choose needles that are recommended for the yarn you’re using.
- Tape measure – You’ll need this to measure your gauge swatch.
Once you have your materials ready, follow these steps to create a gauge swatch:
- Cast on a few stitches. For example, you can cast on 20 stitches.
- Knit a few rows in the stitch pattern you plan to use for your glove.
- Continue knitting rows until your swatch measures at least 4 inches in length.
- Bind off your stitches to finish the swatch.
After you’ve created your gauge swatch, it’s time to measure it. Lay your swatch flat on a table and use your tape measure to count the number of stitches and rows within a 1-inch square. Write down your measurements.
Compare your measurements to the gauge specified in your pattern. If your gauge swatch matches the specified gauge, then you’re ready to start knitting your glove. However, if your gauge doesn’t match, you’ll need to adjust your needle size. If your swatch has too few stitches or rows per inch, try using smaller needles, and if it has too many stitches or rows per inch, try using larger needles.
Creating a gauge swatch may seem like an extra step, but it’s essential for ensuring a well-fitting glove. Taking the time to create and measure your gauge swatch will help you achieve the desired size and fit for your glove project.
Casting on and Knitting the Ribbing
Before you begin knitting the glove, you’ll need to cast on the required number of stitches. The ribbing at the cuff of the glove will provide stretch and a snug fit. Follow these steps to start knitting the ribbing:
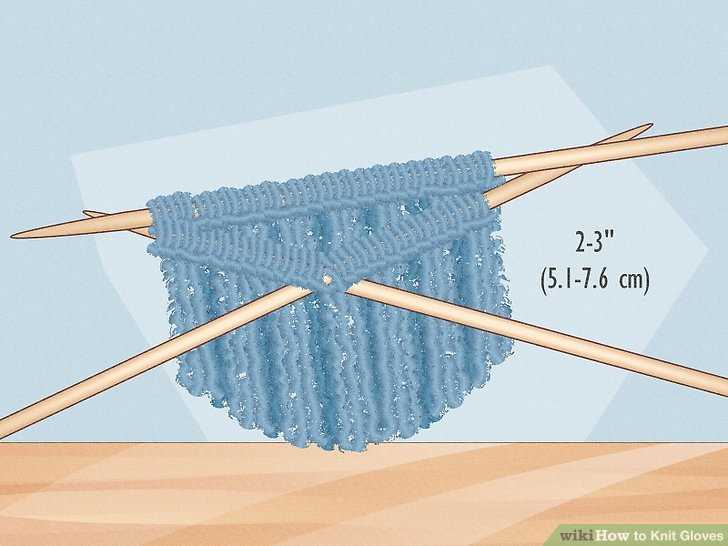
- Hold one double-pointed needle (dpn) in your right hand and the second dpn in your left hand.
- Tie a slipknot near the end of the yarn, leaving a long tail for weaving in later.
- With your right hand, hold the slipknot on the first dpn and slide the other dpn through the center of the slipknot.
- With your right hand, hold the slipknot on the first dpn and slide the other dpn through the center of the slipknot.
- Using the right dpn, knit the first stitch by inserting the needle from left to right through the stitch on the left dpn.
- Wrap the yarn around the right dpn counterclockwise, pulling the loop through the stitch on the left dpn.
- Slide the stitch off the left dpn and onto the right dpn. One stitch has been cast on.
- Repeat steps 5-7 until you have cast on the required number of stitches. The exact number will depend on the size of the glove and the desired fit.
- Once you have cast on all the stitches, divide them evenly onto three dpns. The stitches should be distributed as evenly as possible.
- Arrange the three dpns in a triangle shape, with the yarn tail hanging from the bottom center of the triangle. This will be the starting point of your rounds.
The ribbing pattern for the glove is typically a 1×1 rib, which means knitting one stitch and purling one stitch. Repeat this pattern for the desired length of the ribbing, usually around 1-2 inches.
Continue knitting in the round following the pattern instructions for the main body of the glove once the ribbing is complete. Happy knitting!
Knitting the Body of the Glove
Once you have successfully completed the cuff of the glove, you are ready to start knitting the body section. This is where you will work on shaping the glove to fit your hand.
To begin, you will need to have the correct amount of stitches on your needles. Follow the pattern instructions to determine the number of stitches you need for the body section. Make sure to distribute the stitches evenly across the needles if you are using double-pointed needles.
Next, you will start knitting in the round, using the chosen stitch pattern. Depending on the pattern, you may need to alternate between knit and purl stitches or use a specific stitch pattern to create the desired texture.
Continue knitting in the round until the body section reaches the desired length. This will typically be measured from the bottom of the cuff to the base of your fingers, so the glove covers your hand properly.
During the body section, you may need to make some shaping adjustments to ensure a snug fit. This can include decreasing or increasing stitches to accommodate the shape of your hand. Follow the pattern instructions for any shaping adjustments.
Once the body section is complete, you may need to transfer the stitches onto a single needle or use stitch holders to hold the stitches while you work on other sections of the glove.
At this point, you can also try on the glove to check the fit and make any necessary adjustments. If the glove feels too tight or loose, you can easily make modifications by adding or removing stitches.
Once you are satisfied with the body section and fit of the glove, you can proceed to the next steps to complete the fingers or thumb sections, depending on the glove design.
Shaping the Thumb Hole
Once you have completed the main body of the glove and have reached the point where the thumb hole should be, it is time to shape the opening for the thumb.
Follow these steps to shape the thumb hole:
- On the side of the glove where the thumb will be, identify the center stitch of the thumb opening. This stitch will be the centerpiece of the thumb hole.
- Place a stitch marker or safety pin around this center stitch to mark its location.
- Working in the established pattern, continue knitting the rest of the row until you reach the stitch marker.
- Once you reach the stitch marker, slip the center stitch onto a holder or spare piece of yarn to keep it separate from the rest of the glove.
- On the next row, knit or purl the stitches up to the stitch marker, being careful to maintain the established pattern.
- When you reach the stitch marker, slip the center stitch onto the working needle.
- Next, cast on a specified number of stitches directly above the center stitch. This will form the base of the thumb hole.
- Resume working in the established pattern for the rest of the row.
- Continue knitting the glove, shaping the thumb hole as indicated in the pattern instructions.
- Once you have completed the thumb hole, continue knitting the glove until you reach the desired length for the fingers.
Shaping the thumb hole is an important step in knitting gloves as it creates a comfortable and functional opening for the thumb. By following these steps and carefully shaping the thumb hole, you will be able to create a professional-looking glove that fits well.
Finishing the Glove
Once you have completed knitting your glove, it’s time to finish it off and make it ready to wear. Follow these steps to complete your glove:
- Weave in the loose ends: Use a yarn needle to weave in the loose ends of your yarn. Thread the needle with the end of the yarn and carefully weave it into the knitted fabric. Trim any excess yarn.
- Block your glove: Wet blocking can help relax and shape your glove. Fill a sink or basin with cool water and submerge your glove. Gently squeeze out any excess water. Lay a towel on a flat surface and place the glove on top. Reshape the glove to your desired size and flatten any wrinkles. Allow it to air dry completely.
- Finish the edges: If desired, you can add a decorative edge to your glove. A simple picot or ribbed edge can add a nice finishing touch. Pick up stitches along the edge of your glove and work the desired edge pattern.
- Attach any additional elements: If you want to add buttons, ribbons, or other embellishments to your glove, now is the time to do so. Use a yarn needle and matching yarn to securely attach the desired elements to your glove.
- Try on your finished glove: Once all the finishing touches are done, try on the glove to ensure it fits properly. Adjust as needed.
- Repeat for the second glove: If you want a pair of gloves, repeat the entire process to knit the second glove.
Congratulations! You have now successfully finished knitting your glove. Enjoy wearing your cozy and stylish creation!
FAQ:
What materials do I need to knit a glove?
To knit a glove, you will need a set of double-pointed knitting needles, a skein of yarn, a yarn needle, stitch markers, and a measuring tape.
Is knitting a glove difficult for beginners?
Knitting a glove can be challenging for beginners, but with practice and following the step-by-step guide, even beginners can learn how to knit gloves.
How long does it typically take to knit a glove?
The time it takes to knit a glove can vary depending on your knitting speed and experience level. On average, it may take a few hours to a few days to complete a glove.
Can I use any type of yarn to knit a glove?
While you can use various types of yarn to knit gloves, it is recommended to use a yarn that is durable and has some stretch to it, such as yarn specifically made for knitting gloves or sock yarn.
What size should the glove be?
The size of the glove will depend on the measurements of your hand. It is important to accurately measure your hand to ensure a proper fit. The step-by-step guide will provide instructions on how to measure your hand and adjust the size of the glove accordingly.
Can I knit gloves using circular needles?
While it is possible to knit gloves using circular needles, it is easier and more commonly done using double-pointed needles. Circular needles are often used for larger projects, but for the smaller circumference of a glove, double-pointed needles are recommended.
Can I customize the design of the gloves?
Yes, you can customize the design of the gloves by choosing different stitch patterns, adding embellishments, or using different colors of yarn. The step-by-step guide will provide the basic pattern, but you can get creative and make the gloves unique to your style.


