Knitting is a relaxing and rewarding hobby that allows you to create beautiful and unique pieces. One of the most classic knitting techniques is the cable stitch. Cable knitting creates a raised pattern that resembles interlocking cables, adding depth and texture to your projects. Whether you’re a beginner or an experienced knitter, learning how to knit a cable stitch is a valuable skill to have in your repertoire.
In this step-by-step guide, we will take you through the process of knitting a cable stitch. We will start with the basics, such as choosing the right yarn and needles, and mastering the basic knit and purl stitches. Then, we will move on to the more advanced technique of crossing stitches to create the cable pattern.
Knitting a cable stitch may seem daunting at first, but with practice and patience, you will soon be able to create intricate and beautiful cable patterns. Along the way, we will provide you with helpful tips and tricks to ensure your success. So, grab your knitting needles and let’s get started on this exciting knitting journey!
What is Cable Stitch?
Cable stitch is a knitting technique that creates a pattern resembling interlocking braided ropes or cables. It is a popular decorative stitch used in a variety of knitting projects, including sweaters, scarves, blankets, and hats.
The cable stitch is created by crossing a set of stitches over or under another set of stitches, creating the illusion of twisted cables. This gives the knitted fabric texture and depth, making it visually appealing and adding an extra touch of sophistication to your knitting projects.
To create cable stitches, you will need a cable needle, which is a short, double-pointed needle designed to hold stitches temporarily while you work on other stitches. The cable needle is used to manipulate the stitches, crossing them over or under each other.
There are various types of cable stitches, ranging from simple two-stitch cables to more complex designs with multiple stitches and twists. The cables can be worked over different numbers of rows and combined with other stitches to create intricate patterns.
Knitting cable stitches requires a bit of concentration and practice, especially when working with multiple cables and twists. However, once you get the hang of it, cables become an enjoyable and rewarding knitting technique.
Whether you are a beginner or an experienced knitter, learning how to knit cable stitches opens up a whole new world of knitting possibilities. It allows you to add beautiful and intricate designs to your projects, elevating them from ordinary to extraordinary.
Materials You Will Need
Before you begin learning how to knit a cable stitch, you will need to gather the following materials:
- Knitting needles: Choose a pair of knitting needles that are appropriate for the weight of yarn you will be using. The size of the needles will depend on the thickness of your yarn.
- Yarn: Select a yarn that is suitable for the project you have in mind. Different yarn weights will create different effects and textures in your cable stitch.
- Cable needle: This special needle is used to hold stitches out of the way while you complete the cable twist. It can be straight or curved, depending on your preference.
- Tapestry needle: This needle is used for weaving in loose ends and finishing your knitting project.
Optional materials:
- Stitch markers: These can be helpful for marking the beginning or end of a cable section.
- Row counter: If you have trouble keeping track of your rows, a row counter can help you stay organized.
- Knitting gauge: A knitting gauge can help you ensure that your stitches are the correct size and that your finished project will turn out as expected.
Once you have all the necessary materials, you will be ready to start learning how to knit the cable stitch.
Step-By-Step Guide to Knitting a Cable Stitch
Knitting a cable stitch adds beautiful texture and depth to your knitting projects. Follow this step-by-step guide to learn how to knit a cable stitch:
- Start by casting on the desired number of stitches for your project.
- Knit a few rows in your chosen stitch pattern (such as garter stitch or stockinette stitch) to create a base for your cable.
- Identify the stitches that will be involved in the cable. These will typically be a group of stitches that will cross over each other.
- Place a stitch marker to mark the beginning of the cable section.
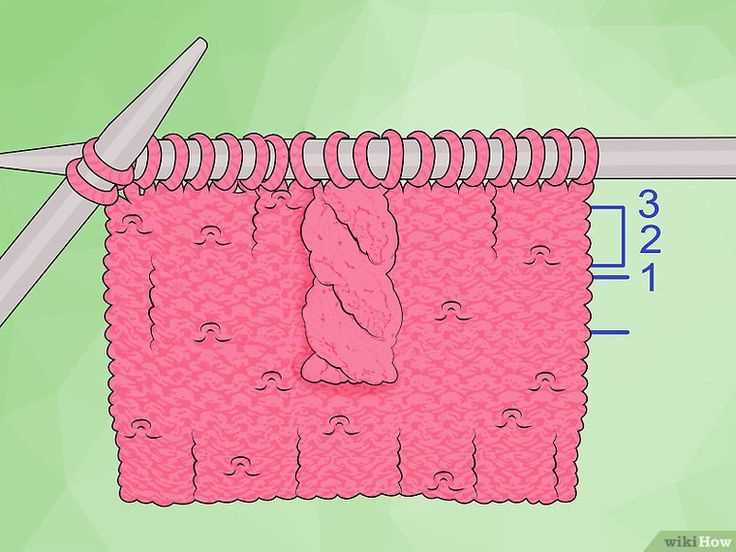
- Take a cable needle or a double-pointed needle and slip the first set of stitches onto it, holding it at the front or back of your work depending on the desired cable direction.
- Next, knit the next set of stitches in your pattern.
- Take the stitches on the cable needle and knit them.
- Continue knitting the remaining stitches in your pattern.
- If you want to create a twisted cable, hold the cable needle behind the work for a left-leaning cable or in front of the work for a right-leaning cable.
- Repeat these steps for each cable section, making sure to place stitch markers to keep track of the different sections if necessary.
- After completing the cable sections, continue knitting in your chosen stitch pattern until you reach the desired length.
- Bind off the stitches to finish your project.
Remember to practice and be patient when learning how to knit a cable stitch. With time and experience, you’ll become more comfortable and confident with this technique. Happy knitting!
Tips for Knitting Cable Stitch
Knitting a cable stitch can be a fun and rewarding project. Here are some tips to help you master this technique:
- Choose the right yarn and needles: For cable knitting, it’s best to use a yarn that has good stitch definition, such as wool or a wool blend. Choose a needle size that complements your yarn weight for a balanced fabric.
- Read the pattern: Before you start knitting, thoroughly read the pattern instructions for the cable stitch you are working on. Pay attention to any special instructions or abbreviations that may be used.
- Use stitch markers: To keep track of your cable pattern, use stitch markers to mark the beginning and end of each cable section. This will help you keep your stitches organized and prevent mistakes.
- Practice with a cable needle: Cable stitches require the use of a cable needle. Practice holding the cable needle in your non-dominant hand and slipping stitches onto it smoothly. This will help you work the cable pattern more efficiently.
- Don’t be afraid to tink: If you make a mistake in your cable stitch, don’t be afraid to tink (undo) your stitches and fix the mistake. It’s better to fix it as you go rather than end up with a wonky cable pattern.
- Block your finished project: After you’ve completed your cable project, block it to help even out the stitches and bring out the beauty of the cables. Wet blocking is usually recommended for wool and wool blend yarns.
- Experiment with different cable patterns: Once you’ve mastered the basic cable stitch, don’t be afraid to experiment with different cable patterns. There are numerous cable stitch designs out there that can add interest and texture to your projects.
- Have patience: Knitting cable stitches can be challenging at first, but with practice and patience, you’ll become more comfortable with the technique. Don’t get discouraged if it doesn’t look perfect right away – keep practicing and you’ll get there!
Remember, knitting is a creative and enjoyable hobby. Have fun with your cable stitch projects and let your imagination soar!
Common Mistakes to Avoid
Learning to knit a cable stitch can be challenging, especially for beginners. To help you master this technique, here are some common mistakes to avoid:
- Not using a cable needle: One of the biggest mistakes is attempting to knit cables without a cable needle. While it may be tempting to skip this step, using a cable needle ensures that your stitches stay in place and prevents mistakes.
- Twisting the cables in the wrong direction: When crossing stitches over each other, it’s crucial to follow the pattern’s instructions for the direction of the cable twist. Twisting in the wrong direction can lead to a messy and unattractive cable design.
- Tight tension: Knitting with a tight tension can make it difficult to move the stitches on the cable needle. It’s important to maintain a relaxed tension to ensure smooth and even stitches.
- Miscounting stitches: Cable stitches require specific stitch counts, and miscounting can result in uneven or misaligned cables. Always double-check your stitch count before starting each cable row.
- Ignoring gauge: Gauge is crucial for achieving the desired size and fit of your finished project. Ignoring gauge can result in cables that are too tight or too loose. Always make a gauge swatch and adjust your needle size if necessary.
- Not reading the pattern carefully: Cable stitch patterns can be complex, so it’s essential to read the pattern carefully and understand each instruction before proceeding. Skipping or misinterpreting a step can lead to mistakes in the cable design.
Avoiding these common mistakes will help you become more confident and skilled in knitting cable stitches. Remember to take your time, practice, and don’t be afraid to ask for help if needed. Happy knitting!
Advanced Tips and Techniques
Once you have mastered the basic cable stitch, you can explore a variety of advanced tips and techniques to take your knitting to the next level. Here are some ideas to enhance your cable knitting skills:
- Experiment with Different Cable Patterns: Once you feel comfortable with the basic cable stitch, try experimenting with different cable patterns. There are countless designs and variations available, ranging from simple to complex. You can find patterns in knitting books, online resources, or create your own.
- Use a Cable Needle: While it is possible to cable without a cable needle, using one can make the process much easier. A cable needle is a short needle designed specifically for cabling. It helps hold the stitches in place while you cross them over each other. Experiment with different types of cable needles to find one that works best for you.
- Try Different Cable Sizes: Cable stitches can vary in size, ranging from small delicate cables to larger, more pronounced cables. Experiment with different cable sizes to create different effects in your knitting. Larger cables tend to stand out more, while smaller cables can create a more subtle textured look.
- Combine Cables with Other Stitch Patterns: Get creative and combine cable stitches with other stitch patterns to add even more visual interest to your knitting. You could incorporate lace stitches, ribbing, or even colorwork to create unique and intricate designs.
- Charts and Written Instructions: As you work on more complex cable patterns, you may come across charts or written instructions. Charts are visual representations of the stitches and their movements, while written instructions describe the actions required. Practice reading and understanding both types of instructions to broaden your knitting repertoire.
- Blocking: Blocking is the process of shaping and stretching your knitted piece to give it a more professional finish. It can help even out tension and open up the cable stitches. Follow the blocking instructions provided in your pattern or search for general blocking guidelines to ensure a polished final result.
- Join a Knitting Group or Take a Class: Connecting with other knitters can be a great way to learn and share tips and techniques. Consider joining a knitting group or taking a class where you can receive guidance from experienced knitters and expand your knowledge of cable knitting.
Remember, practice makes perfect! The more you work on cable knitting, the more confident and skilled you will become. Don’t be afraid to take on new challenges and push yourself to try new techniques. Happy knitting!
FAQ:
What is a cable stitch?
A cable stitch is a textured knitting pattern that creates a twisted design resembling a traditional cable. It is made by crossing stitches over one another to create the cable effect.
Is cable knitting difficult?
Cable knitting may seem intimidating at first, but with practice and patience, it can be mastered. It involves crossing stitches and manipulating the working yarn, but once you understand the basic technique, it becomes easier.
What materials do I need for cable knitting?
To knit a cable stitch, you will need knitting needles, a cable needle (a smaller double-pointed or straight needle), and yarn. The needle size and yarn weight will depend on your project and personal preference.
Can I learn cable knitting without a cable needle?
Yes, it is possible to knit cables without a cable needle. This technique is called “cabling without a cable needle” or “cabling without a third needle.” It involves carefully manipulating the stitches without the need for an additional needle.
Can I incorporate cable stitches into different knitting projects?
Absolutely! Cable stitches can be incorporated into various knitting projects such as sweaters, scarves, hats, and blankets. They add dimension and visual interest to any knitting project.
Where can I find cable stitch patterns?
There are many sources for cable stitch patterns. You can find them in knitting books, online knitting communities, and through various knitting websites and blogs. Additionally, some knitting patterns might include cable stitches as part of their design.


