Knitting is a craft that has been enjoyed for centuries, producing beautiful garments and accessories with simple tools and a single strand of yarn. One of the first steps in any knitting project is casting on, which is the process of creating the first stitches on your needles.
In this step-by-step guide, you will learn how to cast on in knitting. Whether you are a beginner or looking to refresh your skills, this guide will provide you with the necessary information to get started.
Casting on is the foundation of your knitting project, and there are many different methods to choose from. In this guide, we will cover the long-tail cast on, which is a versatile and widely used technique. You will also learn about the materials you will need, how to estimate the amount of yarn required, and how to properly hold your needles and yarn.
By the end of this guide, you will have the knowledge and confidence to cast on in knitting and begin your first project. So grab your knitting needles and yarn, and let’s get started!
Why Learning to Cast On is Important for Knitting
Learning to cast on is one of the first steps in knitting and is considered an essential skill for any knitter. It is the process of creating the first row of stitches on the knitting needle, which is necessary for starting any knitting project. Here are some reasons why learning to cast on is important:
- Foundation: Casting on is the foundation of any knitting project. Without casting on, there would be no stitches to work with, and you wouldn’t be able to start knitting.
- Versatility: There are various ways to cast on in knitting, such as the long-tail cast on, the cable cast on, or the provisional cast on. Learning different cast on methods allows you to choose the one that best suits your project and desired outcome.
- Starting a New Project: When starting a new knitting project, you need to cast on the required number of stitches. The correct tension and number of stitches are crucial for the finished piece to turn out as intended.
- Adding Stitches: Casting on is also necessary when you need to add stitches to your work. This could be for shaping, increasing the size of the project, or adding a new color.
- Fixing Mistakes: Sometimes, mistakes happen while knitting, and you may need to unravel or pick up stitches later in your project. Knowing how to cast on ensures that you can easily restart or add stitches back onto your needle.
- Creative Freedom: By mastering different cast on techniques, you open up a world of possibilities for your knitting projects. Different cast on methods can create different edges, textures, and stretchiness, allowing you to customize your knitting to your liking.
Overall, learning to cast on is an essential skill that sets the foundation for any knitting project. It gives you the ability to start new projects, add stitches, fix mistakes, and explore various techniques. Whether you’re a beginner or an experienced knitter, understanding different cast on methods will enhance your knitting skills and expand your creativity.
The Basics of Casting On in Knitting
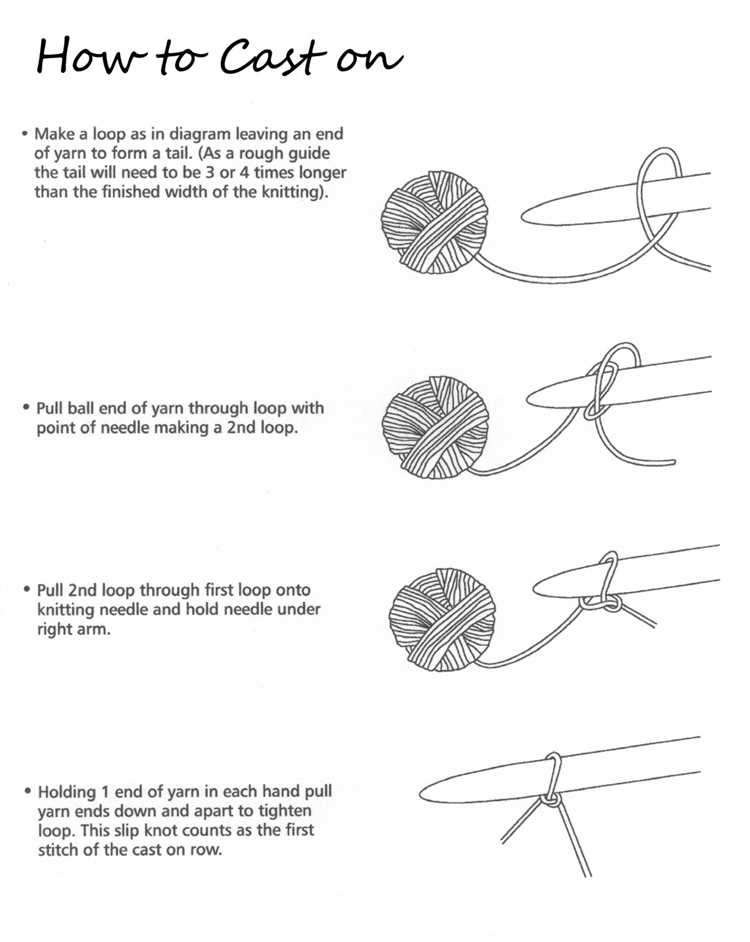
Casting on is the first step in starting any knitting project. It creates the first row of stitches on your needles and sets the foundation for your work.
Here are the basic steps for casting on in knitting:
- Hold the knitting needle with your dominant hand and the yarn in your non-dominant hand.
- Make a slipknot by forming a loop with the yarn and pulling the end through.
- Slide the slipknot onto the knitting needle and tighten it.
- Hold the knitting needle with the slipknot in your dominant hand.
- With your non-dominant hand, bring the yarn between the knitting needle tips from back to front.
- Insert the tip of the right-hand needle into the slipknot and under the left-hand needle.
- Bring the yarn over the right-hand needle from back to front.
- Catch the yarn with the right-hand needle and draw it through the slipknot, creating a new loop on the right-hand needle.
- Place the new loop onto the left-hand needle.
- Repeat steps 5-9 to cast on the desired number of stitches.
By following these steps, you will have successfully cast on the stitches for your knitting project. It is important to practice and master this technique as it is the basis for many knitting patterns.
Tip: For a long-tail cast on, estimate the length of yarn you will need by using the guideline of one inch of yarn per stitch. Leave a tail that is approximately three times the width of your knitting project.
Choosing the Right Casting On Technique for Your Project
When starting a knitting project, one of the most important decisions you’ll make is choosing the right casting on technique. The casting on technique you choose will determine the edge of your project and can affect its stretchiness, durability, and overall appearance. Here are a few casting on techniques to consider:
- Long Tail Cast On: This is a versatile and commonly used casting on technique. It creates a neat, slightly stretchy edge and works well for a variety of projects. It involves using two strands of yarn to create a foundation row of stitches on the needle.
- Knitted Cast On: This is an easy and quick casting on technique. It creates a firm edge and is great for projects that require stability, such as scarves or blankets. It involves creating new stitches by knitting them onto the needle.
- Cable Cast On: This casting on technique is often used for projects that require a neat, sturdy edge. It creates a row of stitches that resemble a cable pattern and works well for projects such as sweaters or hats. It involves creating new stitches by knitting into the previous stitches.
- Thumb Method: This is a simple and quick casting on technique that creates a stretchy edge. It is commonly used for projects that require a lot of stretch, such as socks or gloves. It involves wrapping the yarn around your thumb to create the initial stitches.
When choosing a casting on technique, consider the specific requirements of your project. For example, if you’re knitting a garment that needs a lot of stretch, the Thumb Method might be the best choice. If you want a firm and stable edge, the Knitted Cast On might be more suitable.
It’s also worth experimenting with different casting on techniques to see which ones you prefer and which ones work best for your knitting style. Remember, practice makes perfect, so don’t be afraid to try out different techniques and see what works for you!
Gather the Necessary Knitting Supplies
Before you can start casting on in knitting, you’ll need to gather a few essential supplies. Here’s a list of the basic items you’ll need:
- Yarn: Choose a yarn that is appropriate for your project. Consider the weight, fiber content, and color.
- Knitting needles: Select the appropriate size and type of knitting needles for your yarn. Common types include straight, circular, and double-pointed needles.
- Tape measure: A tape measure will help you check the gauge and measure your finished project.
- Scissors: You’ll need scissors to cut the yarn and trim any excess.
- Darning needle: A darning needle, also known as a yarn needle or tapestry needle, is used for seaming and weaving in loose ends.
- Stitch markers: These small plastic or metal rings can be used to mark specific stitches or sections of your knitting.
- Row counter: A row counter can help you keep track of your rows, especially in larger projects.
Having these supplies ready and easily accessible will make the casting on process much smoother. You can find these items at most craft stores or online knitting retailers. Now that you have your supplies gathered, you’re ready to learn how to cast on!
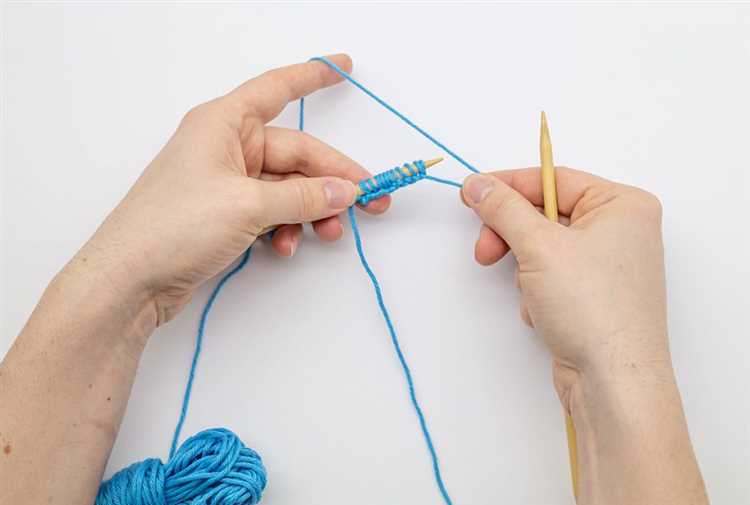
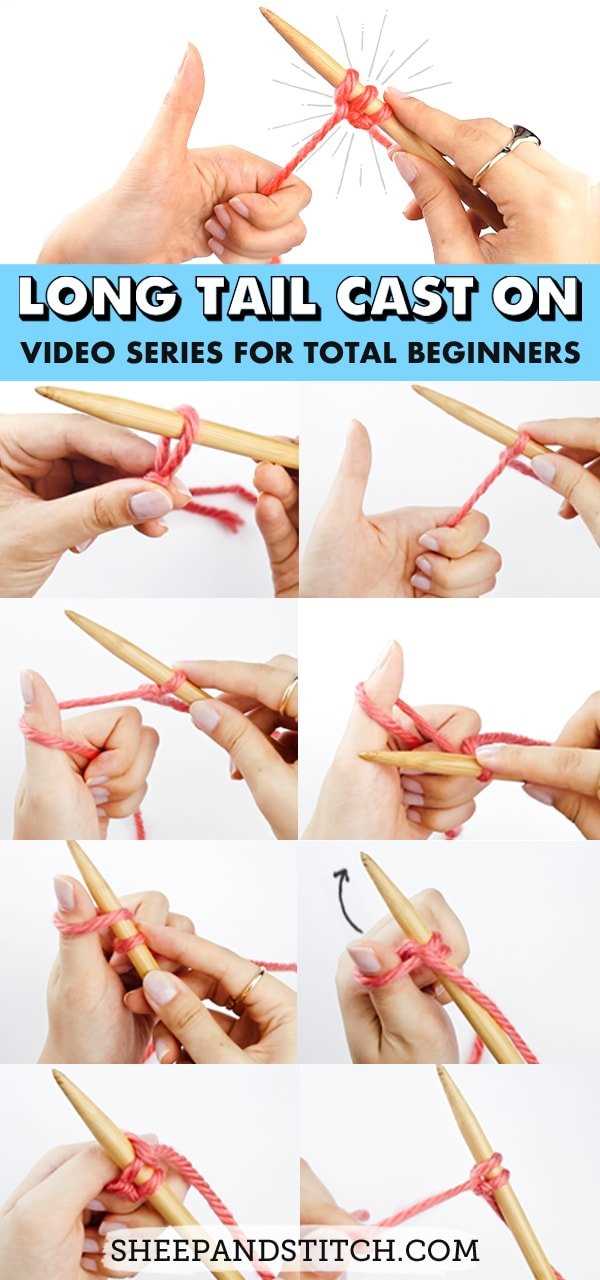
Step-By-Step Guide for the Long-Tail Cast-On Method
The long-tail cast-on method is a versatile and commonly used technique for starting a knitting project. It creates a neat and flexible edge that is ideal for most projects. Follow these steps to learn how to do the long-tail cast-on method.
- Preparation: Determine how much yarn you need for the cast-on stitches by leaving a long tail. The tail should be about three times the width of your finished project.
- Make the slipknot: Hold the yarn in your hand with the tail end in front and loop the working end over it to create a loop. Pull the working end through the loop to create a slipknot.
- Create the first stitch: Insert the needle into the slipknot from front to back, making sure the tail end is over your thumb and the working end is over your index finger.
- Wrap the yarn: Take the working end of the yarn around your thumb, then bring it over and behind the needle, crossing over the tail end.
- Create the second stitch: Insert the needle into the loop on your thumb from front to back, catching the working end of the yarn as you go.
- Secure the stitch: Pull the yarn tail and the working end simultaneously to tighten the stitch, but not too tight.
- Repeat steps 4-6: Continue wrapping the yarn around your thumb and creating stitches until you have the desired number of cast-on stitches.
- Finishing: When you have finished casting on, simply cut the yarn, leaving a moderate tail, and pull it through the last stitch to secure it.
- Ready to knit: Once you have completed the long-tail cast-on, you are ready to start knitting your project!
Remember to practice and take your time when learning the long-tail cast-on method. With practice, you will master this essential knitting technique.
Step-By-Step Guide for the Knitted Cast On Method
The knitted cast on method is a versatile technique that provides a neat and elastic edge for your knitting projects. Follow these steps to learn how to do the knitted cast on.
- Begin by making a slip knot. Take the working yarn and loop it over itself, creating a loop. Pull the end of the yarn through the loop to create a slip knot. Tighten the loop around the needle, but not too tightly.
- Hold the needle with the slip knot in your right hand. Insert the needle into the slip knot from front to back, placing the needle between the two strands of the loop.
- With your left hand, position the yarn so that it is coming from the back of the needle towards the front.
- Wrap the working yarn around the right-hand needle counterclockwise. This creates a new loop around the needle.
- Pull the new loop through the slip knot, bringing it up and over the needle. This creates a new stitch on the right-hand needle.
- Gently tighten the new stitch by pulling on the working yarn. The stitch should be snug, but not too tight.
- Repeat steps 4-6 until you have cast on the desired number of stitches. Remember to keep the tension consistent throughout the cast on process.
- After casting on the desired number of stitches, you can continue with your chosen knitting pattern.
The knitted cast on method is commonly used at the beginning of a project to create a neat and flexible edge. It is a great technique to master and can be used in a wide range of knitting projects.
Troubleshooting Common Mistakes when Casting On
While casting on is a fundamental skill in knitting, it can sometimes be tricky to get it just right. Here are some common mistakes that beginners make and how to troubleshoot them:
1. Uneven Tension
One of the most common mistakes when casting on is having uneven tension. This means that some stitches are tighter or looser than others, resulting in an uneven edge. To fix this, make sure to consistently pull the yarn tight after each stitch. Practice can also help you develop a more even tension over time.
2. Twisted Stitches
Another common mistake is accidentally twisting your stitches when casting on. Twisted stitches can lead to twisted or misshapen fabric in your knitting. To avoid this, make sure that each stitch lays flat on the needle and is not twisted before you move on to the next stitch.
3. Forgetting to Leave a Tail
Forgetting to leave a tail at the beginning of your cast on can be a frustrating mistake. Without a tail, it can be difficult to weave in the end and secure your cast on edge. To avoid this, make sure to leave a tail that is at least 6 inches long before starting your cast on.
4. Adding or Dropping Stitches
Adding or dropping stitches when casting on can lead to a miscount and throw off your entire project. If you notice that you have added or dropped stitches, carefully remove them and start the cast on again. Count each stitch as you go to ensure that you have the correct number for your pattern.
5. Difficulty Slipping Stitches onto Needles
Slipping stitches onto the needles smoothly can be a challenge, especially for beginners. If you find that your needles are snagging or the stitches are getting caught, try using a different type of needle or adjusting your tension. Practice and patience will also help improve your technique.
6. Confusion with Different Cast On Methods
There are many different cast on methods, each with its own unique instructions. If you are following a pattern that specifies a certain type of cast on and find yourself confused, refer to knitting tutorials or videos that demonstrate the specific method. Taking the time to learn and practice each method will help you become a more versatile knitter.
Remember, knitting is a skill that develops with practice. If you encounter any mistakes when casting on, don’t get discouraged. Take some time to troubleshoot the issue and keep practicing. With time and persistence, you’ll be casting on like a pro!
Practice and Perfect Your Casting On Technique
Learning how to cast on in knitting is an essential skill for any beginner. Once you have mastered the basic cast on, it’s time to practice and perfect your technique. By putting in the time to improve your casting on, you’ll be able to create more even and professional looking projects.
Here are some tips and exercises to help you practice and perfect your casting on technique:
- Start with the basics: Before you can improve your casting on, make sure you have a solid understanding of the basic cast on method. Review the steps and practice them until you can comfortably cast on without referring to instructions.
- Consistency is key: One of the most important aspects of a good cast on technique is consistency. Pay attention to your tension and make sure each stitch is the same size and snugness. This will help create an even and well-balanced cast on edge.
- Experiment with different yarns and needles: Different yarns and needles can have a big impact on your cast on technique. Try casting on with different types of yarns and different sizes of needles to see how it affects your stitches. This will help you understand how to adjust your tension and technique accordingly.
- Practice different cast on methods: There are many different ways to cast on in knitting, such as the long-tail cast on, the knit cast on, and the cable cast on. Practice each of these methods to expand your repertoire and improve your overall casting on skills.
- Use stitch markers: To keep track of your stitches and ensure they are even, use stitch markers. Place a marker after every 10 or 20 stitches and check to see if they are all the same size and tension. This will help you identify any inconsistencies and make adjustments.
- Seek feedback and guidance: If you’re struggling to improve your casting on technique, seek feedback from more experienced knitters. They can provide valuable advice and guidance to help you identify areas for improvement.
By practicing these tips and exercises, you’ll be able to perfect your casting on technique and create beautiful and professional looking knitted projects.
FAQ:
What is casting on in knitting?
Casting on in knitting is the process of creating the first row of stitches on the knitting needle. It is the foundation of any knitting project and allows you to start working on your desired pattern.
Are there different methods of casting on in knitting?
Yes, there are several different methods of casting on in knitting. Some common methods include the long tail cast on, the knit cast on, the cable cast on, and the backward loop cast on. Each method has its own advantages and is suitable for different types of projects and stitch patterns.
What is the best method of casting on for beginners?
For beginners, the long tail cast on is often recommended as it is relatively easy to learn and provides a neat and versatile edge. It is a great method to start with and can be used for a wide range of knitting projects.


