Knitting is a wonderful craft that allows you to create beautiful and functional items with just two needles and some yarn. One of the foundational techniques in knitting is casting on stitches, which is how you create the first row of loops on your needle. This step-by-step guide will walk you through the process of casting on stitches, whether you’re a complete beginner or just need a refresher.
To start, you’ll need a pair of knitting needles and some yarn. Choose a yarn that is suitable for your project, keeping in mind that different yarn weights and fiber contents will produce different results. You’ll also want to consider the size of your needles – smaller needles will create tighter stitches, while larger needles will create looser stitches.
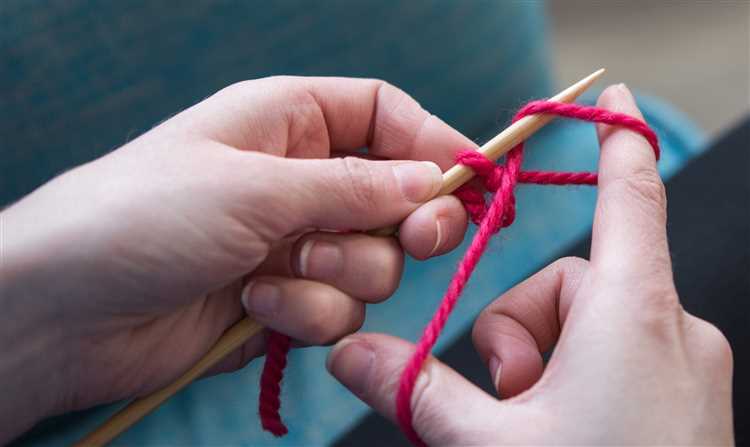
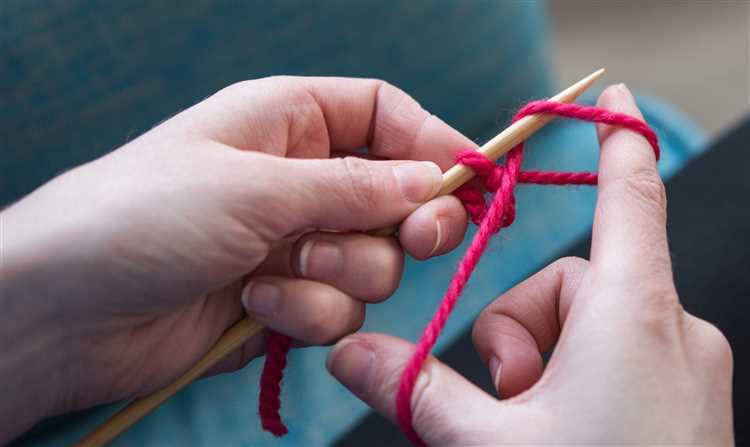
Once you have your materials ready, you’re ready to begin casting on. There are several methods you can use, but the most common one is called the long-tail cast on. To do this, start by leaving a tail of yarn that is about three times the width of the finished item you’re knitting. Hold the needle with the tail in your right hand, and use your left hand to make a slipknot in the yarn, leaving a loop big enough to fit your needle through.
With the slipknot secured on your needle, hold the needle in your right hand with the slipknot at the end. Now, you’ll start creating the first cast on stitch. Insert the tip of your left needle into the loop on your right needle, going from front to back. Then, bring your yarn over the top of the right needle, from back to front, creating a loop on your left needle. This loop is your first cast on stitch.
Learn How to Knit Cast On Stitches
Learning how to cast on stitches is an essential skill for any knitter. The cast on is the beginning of your knitting project and sets the foundation for your work. There are various methods to cast on stitches, but in this guide, we will cover a basic method called the long tail cast on.
- Step 1: Hold the yarn. Begin by leaving a long tail, approximately three times the width of the desired knitted piece. Hold the tail end of the yarn in your right hand and the working yarn in your left hand. The working yarn should be attached to the ball of yarn.
- Step 2: Create a slipknot. With your right hand, make a loop with the tail end of the yarn. Cross the tail over the working yarn, then bring it up and through the loop, creating a slipknot. Tighten the loop by pulling both ends of the yarn.
- Step 3: Hold the slipknot. With your left hand, insert your thumb and index finger through the slipknot. The working yarn should be in front of your thumb and the tail end should be behind your fingers.
- Step 4: Create a new loop. With your right hand, insert the needle into the loop from front to back, going under the part of the working yarn that leads to the ball of yarn. Use your thumb and index finger to hold the working yarn taut.
- Step 5: Repeat the process. Keeping the tension on the working yarn, create a new loop by wrapping the yarn around the needle from back to front. This creates a new stitch on the needle.
- Step 6: Continue the cast on. Repeat steps 4 and 5 until you have cast on the desired number of stitches. Each time you create a new stitch, gently slide it onto the left needle.
- Step 7: Secure the stitches. Once you have cast on all the stitches, you can gently tighten the stitches by carefully pulling on the tail end of the yarn. Make sure not to pull too tightly, as this can make it difficult to knit the first row.
Now you know how to knit cast on stitches using the long tail method. Practice this technique to improve your knitting skills and start creating beautiful projects!
Step 1: Gather the Necessary Supplies
Before you begin casting on stitches, it’s important to gather all the necessary supplies. Having everything ready will make the process smoother and more enjoyable. Here are the supplies you will need:
- Knitting Needles: Choose a pair of knitting needles in the appropriate size for your project. The size will depend on the yarn weight and the desired tightness of your stitches.
- Yarn: Select the yarn of your choice. Consider the fiber content, color, and thickness to match your project requirements.
- Tape Measure or Ruler: You’ll need a measuring tool to check your gauge and ensure your stitches are the correct size.
- Scissors: Keep a pair of scissors handy for cutting yarn and trimming any excess threads.
- Tapestry Needle: This needle is used for weaving in loose ends and finishing your knitting project.
- Stitch Markers: Stitch markers help you keep track of certain stitches or pattern changes within your knitting.
- Row Counter: A row counter can be used to keep track of the number of rows you’ve knitted, especially for larger projects.
- Knitting Pattern: If you’re following a specific pattern, make sure to have it accessible for reference.
By gathering all these supplies, you’ll be well-prepared to start casting on stitches and embark on your knitting project. Take a moment to organize your knitting area and ensure you have everything within reach. Once you’re ready, you can move on to the next step of casting on stitches!
Step 2: Choose the Right Yarn and Needles
To ensure a successful knitting project, it’s important to choose the right yarn and needles that are appropriate for your pattern and desired outcome.
Yarn:
- Consider the weight or thickness of the yarn. Different projects may require different weights of yarn, such as lace, fingering, sport, DK, worsted, or bulky.
- Think about the fiber content. Yarn can be made from various fibers such as wool, acrylic, cotton, silk, or a blend. Each fiber has its own characteristics, so consider factors like warmth, softness, durability, or ability to block.
- Choose a color that complements your project and suits your taste.
Needles:
- Consider the size of the needles. The size will depend on the yarn weight and the gauge required for your pattern. Check the pattern instructions or yarn label for the recommended needle size.
- Choose the needle material. Needles can be made from various materials such as metal, wood, or plastic. Each material has its own feel and may affect your knitting tension.
- Think about the needle type. There are straight needles, circular needles, and double-pointed needles. The type of needle you choose will depend on your project and personal preference.
It’s important to remember that experimenting with different yarns and needles can help you discover new textures and patterns. Don’t be afraid to try different combinations to achieve the desired effect in your knitting projects.
Step 3: Make a Slip Knot
Before you can begin casting on stitches for your knitting project, you need to create a slip knot. A slip knot is the first loop on your knitting needle that will serve as the base for your cast on stitches.
To make a slip knot, follow these steps:
- Start with the yarn end.
- Hold the yarn between your thumb and index finger, leaving a small tail.
- Take the working end of the yarn (the end connected to the ball) and place it over your thumb, forming a loop.
- Bring the working end of the yarn under and through the loop, creating a second loop around your thumb.
- Still holding the loop, remove your thumb from the loop.
- Adjust the size of the loop by pulling on the tail end of the yarn.
Your slip knot is now complete, and you can proceed to the next step of casting on stitches.
Step 4: Hold the Knitting Needles and Yarn
Once you have cast on your stitches, it’s time to hold the knitting needles and yarn in preparation for knitting. Properly holding the tools will make the knitting process smoother and more comfortable.
Here’s how to hold the knitting needles and yarn:
- Hold the knitting needles: Hold one knitting needle in each hand. Most knitters hold the right needle in their dominant hand and the left needle in their non-dominant hand.
- Position your hands: Rest the knitting needles against your palms, with the needle tips pointing away from you. Your hands should be relaxed and comfortable.
- Wrap the yarn: Take the end of the yarn and wrap it around the fingers of your non-dominant hand. Most knitters wrap the yarn around their pinky finger, then over the ring finger, under the middle finger, and over the index finger.
- Tension the yarn: Gently hold the yarn between your thumb and index finger to create tension. The tension should be firm enough to control the yarn, but loose enough to allow the stitches to slide easily.
Remember to maintain a relaxed grip on the knitting needles and yarn. Holding them too tightly can cause hand fatigue and make the knitting process more difficult.
Once you have mastered holding the knitting needles and yarn, you are ready to move on to the next step of knitting, which is actually knitting the stitches.
Step 5: Insert the Needle and Cast On
Now that you have created a slipknot and have the working yarn in your right hand, it’s time to insert the needle and cast on your stitches.
1. Hold the needle with the slipknot in your right hand and the other needle in your left hand.
2. Insert the tip of the right needle into the slipknot from front to back.
3. Place the working yarn over the tip of the right needle, wrapping it around from left to right.
4. Using your right index finger, guide the needle through the slipknot, pulling the working yarn tight to create the first cast on stitch.
Repeat steps 1-4 until you have cast on the desired number of stitches. Make sure to keep the tension consistent and not too tight or too loose.
Pro Tip: To keep track of the number of stitches you have cast on, you can use stitch markers or count aloud as you go.
Once you have cast on all your stitches, you are ready to start knitting! Take a moment to double-check that all your stitches are evenly spaced and that the tension is consistent. If everything looks good, you can begin working the next row of your knitting project.
Now you have learned how to cast on stitches and can move on to the next step in your knitting journey. Happy knitting!
Step 6: Repeat the Process
Once you have completed casting on your desired number of stitches, you can repeat the process to add more stitches to your knitting project. Simply follow the steps outlined in the previous sections:
- Hold the knitting needle with the cast-on stitches in your right hand.
- Insert the empty needle into the first stitch, from front to back.
- Wrap the working yarn around the needle clockwise.
- Pull the new loop through the old stitch, sliding the old stitch off the left needle. This creates a new stitch on the right needle.
- Repeat steps 2-4 until you have cast on all the necessary stitches for your project.
Remember to keep the tension of your stitches consistent throughout the casting on process. This will help ensure that your stitches are not too tight or too loose.
You can use a stitch marker to mark the beginning of your knitting project if desired. This can help you keep track of your progress and prevent any confusion.
Once you have completed casting on all your stitches, you are ready to continue with the next steps of your knitting pattern. Congratulations on successfully casting on your stitches!
Step 7: Practice and Perfect Your Technique
Now that you have learned how to cast on stitches, it’s time to put your new skills to practice. Practice is key to perfecting your knitting technique, so don’t be discouraged if your first few attempts don’t turn out quite right.
Here are some tips to help you practice and improve:
- Start with a small project: Choose a simple pattern or project that only requires a few stitches, such as a scarf or a dishcloth. This will allow you to focus on your technique without feeling overwhelmed.
- Knit regularly: Make time to knit on a regular basis. The more you practice, the more comfortable and confident you will become.
- Watch video tutorials: Supplement your practice by watching video tutorials online. Seeing the technique in action can be very helpful in understanding how it should be done.
- Join a knitting group: Consider joining a local knitting group or taking a knitting class. Being a part of a community of fellow knitters can provide support, guidance, and inspiration.
- Experiment with different yarns and needles: Try knitting with different types of yarns and needles to see how they affect your stitches. This can help you find the combination that works best for you.
Remember, knitting is a skill that takes time and practice to master. Don’t be too hard on yourself if you make mistakes or feel frustrated. With perseverance and a willingness to learn, you will soon become a confident knitter.
Step 8: Tips and Troubleshooting
Learning to cast on stitches can take some practice, so here are some tips and troubleshooting advice to help you along the way.
- Take Your Time: Casting on can be a bit tricky at first, so try to be patient with yourself. Take your time and go slowly to ensure that each stitch is correctly formed.
- Keep a Loose Grip: It’s important to keep a loose grip on your working yarn while casting on. This will make it easier to slide the stitches onto your needles and prevent them from being too tight.
- Count Your Stitches: Before you start knitting your first row, take a moment to count your cast on stitches. This will help you ensure that you have the correct number of stitches for your pattern.
- Use Stitch Markers: If you’re working on a pattern that requires a specific number of stitches, use stitch markers to help you keep track. Place a stitch marker after every set number of stitches to make counting easier.
- Avoid Twisted Stitches: When casting on, make sure that each stitch is not twisted on your needle. Twisted stitches can cause your finished project to look uneven or have a twisted appearance.
- Fixing Mistakes: If you make a mistake while casting on, don’t worry! Simply unravel your stitches back to the mistake and start again. The more you practice, the easier it will become to catch and fix mistakes.
Casting on stitches is an essential skill in knitting. With a bit of practice and these tips in mind, you’ll be casting on like a pro in no time!
FAQ:
What tools do I need to cast on stitches?
You will need knitting needles and yarn to cast on stitches. The specific size and type of needles depend on the project you are working on, and the yarn should be appropriate for the needles and desired finished result.
What are the different methods of casting on stitches?
There are several methods of casting on stitches, including the long tail cast on, the knit cast on, the cable cast on, and the provisional cast on. Each method has its own advantages and is suited for different types of projects.
How do I do the long tail cast on?
To do the long tail cast on, begin by making a slip knot on your left knitting needle. Then, hold the yarn in your right hand with the tail end over your thumb and the working end over your index finger. Insert the needle between the tail and working yarn, wrap it around the needle from back to front, and bring it through the loop on your thumb. Repeat this process for each stitch, making sure to maintain consistent tension.
What is the advantage of using the cable cast on method?
The cable cast on method is stretchy and creates a neat and firm edge, making it great for projects that require a bit of give, such as socks or mittens. It also allows you to add stitches to an already established row, which can be useful when increasing the width of your work.
Can I use any type of yarn to cast on stitches?
You can use a variety of yarns to cast on stitches, but it is important to consider the weight and fiber content of the yarn in relation to your project. Thicker yarns may require larger needles, while more delicate yarns may require smaller needles. Additionally, some fibers have more stretch than others, which can impact the overall appearance and fit of your finished project.


