If you love knitting and want to expand your skills to include circular knitting, this step-by-step guide is for you. Circular knitting is a technique that allows you to create seamless projects, such as hats, socks, and sweaters, without the need for seams. It’s a versatile and efficient method that can be used by knitters of all levels.
Before you start, you’ll need a set of circular knitting needles and some yarn. The size of the needles and the weight of the yarn will depend on the project you’re working on. For beginners, it’s best to choose a medium-weight yarn and a set of US size 8 circular needles.
To join circular knitting, start by casting on the desired number of stitches onto one of the needles. Make sure the stitches are not twisted and that the working yarn is at the back of the work.
Next, take the second needle and insert it into the first stitch from the left to the right. Hold both needles parallel to each other and make sure the working yarn is at the back of the work. Pull the working yarn through the stitch with the second needle, creating a new stitch on the second needle.
Choosing the Right Circular Knitting Needles
When it comes to circular knitting, choosing the right needles is essential for a successful project. Circular knitting needles come in various materials, lengths, and sizes. Here are some factors to consider when selecting the right needles for your project:
- Material: Circular knitting needles are available in different materials such as metal, wood, and plastic. Each material has its own advantages and characteristics. Metal needles are known for their smoothness and durability, while wooden needles provide warmth and a comfortable grip. Plastic needles are lightweight and affordable.
- Size: Circular knitting needles are sized based on their diameter. The size of the needles you choose will depend on the thickness of yarn you are using for your project. Be sure to check the yarn label for the recommended needle size.
- Length: Circular knitting needles come in various lengths, ranging from around 9 inches to 60 inches or longer. The length you choose will depend on the circumference of your project. For small circumference projects like hats or sleeves, shorter needles will be more suitable. For larger projects like sweaters or blankets, longer needles may be necessary.
- Join: Pay attention to the join between the needle tips and the cable. A smooth and secure join will make knitting easier and prevent stitches from catching. Look for needles with a smooth transition between the needle tips and the cable.
- Cable: The cable of circular knitting needles can be either flexible or rigid. Flexible cables are easier to work with and allow you to easily manipulate the project. Rigid cables are more suitable for projects that require stability and less movement.
Ultimately, the choice of circular knitting needles will depend on personal preference and the specific requirements of your project. It’s always a good idea to have a variety of needle sizes and materials on hand to accommodate different projects. Experiment with different needles to find the ones that you are most comfortable and confident using.
Gathering Your Materials
Before you start learning how to join circular knitting, it’s important to gather all the necessary materials. Here’s what you’ll need:
- A set of circular knitting needles – make sure to choose a size appropriate for your project
- Your chosen yarn – again, make sure it’s suitable for your project
- A stitch marker or a piece of contrasting yarn to mark the beginning of your round
- A yarn needle or a tapestry needle for weaving in the ends
- A pair of scissors for cutting the yarn
- A pattern or instructions for your knitting project
Note: If you’re new to circular knitting, you might also find it helpful to have a set of double-pointed needles (DPNs). They can be useful for certain techniques and smaller projects.
Once you have all your materials, make sure you have a comfortable and well-lit working area. It’s also a good idea to have a small notebook or piece of paper and a pen handy to take notes or make any necessary calculations.
Now that you have everything ready, you’re all set to start learning how to join circular knitting!
Starting with a Slip Knot
A slip knot is the first step in joining circular knitting. This knot will create a secure loop that you can use to start your project. Here is how to make a slip knot:
- Hold the end of your yarn in your right hand, leaving a tail of about 6 inches (15 cm).
- Loop the yarn over your left index finger to create a crossing point.
- Insert your right hand into the loop from below, grabbing the yarn that is coming from the ball.
- Pull the yarn through the loop, creating a slip knot.
Make sure the knot is not too tight or too loose. It should be snug, but still able to move along the yarn.
Once you have created the slip knot, you can place it on one of the circular knitting needles. Pull the yarn tail to tighten the knot onto the needle.
Congratulations! You have successfully made a slip knot and are now ready to start your circular knitting project.
Joining the Needles
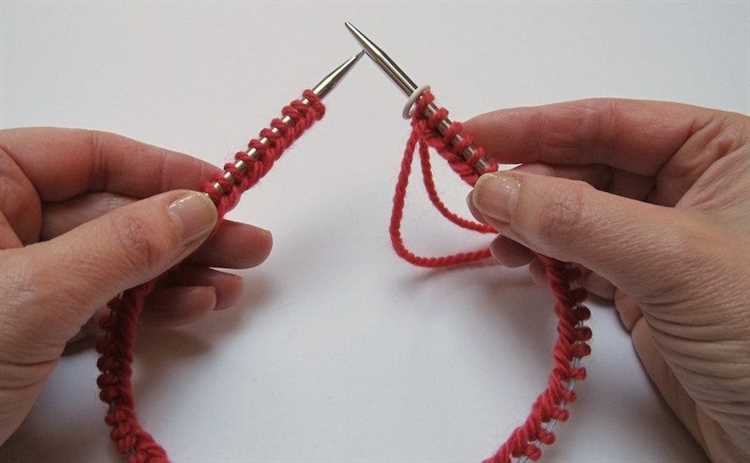
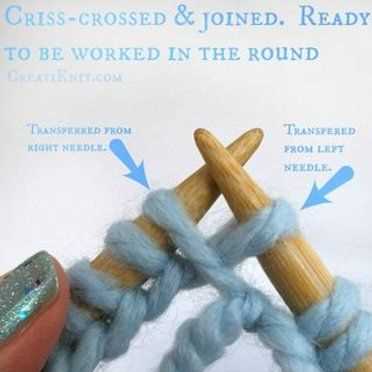
Before you can start knitting in the round with circular needles, you need to join the needles to create a continuous loop. Here’s how you can do it:
- Take the two ends of your circular needles and hold them together, aligning the tips.
- Make sure the stitches on both needles are facing the same direction.
- Insert the right needle tip into the first stitch on the left needle as if to knit.
- Wrap the yarn around the right needle tip and pull it through the stitch to create a new stitch on the right needle.
- Slide the new stitch onto the left needle to complete the join.
- Continue knitting your first round, making sure the stitches are not twisted.
If you’re having trouble securing the join, you can use a stitch marker to mark the beginning of the round.
Once you have successfully joined the needles, you can start working in the round by knitting or purling each stitch as you go around the circle.
Remember to always join your needles before starting to knit in the round. Happy knitting!
Working the First Round
Once you have joined the circular knitting, you are ready to start working the first round. Follow these steps:
- Position your needles: Hold the circular needles in your hands with the right needle in your right hand and the left needle in your left hand. Make sure the working yarn is coming from the back of the right needle.
- Start knitting: Insert the right needle into the first stitch on the left needle from left to right.
- Wrap the yarn: Take the working yarn with your right hand and wrap it counterclockwise around the right needle.
- Pull the loop through: Using the right needle, pull the wrapped yarn through the first stitch, creating a new stitch on the right needle.
- Slip the old stitch: Slip the old stitch from the left needle onto the right needle, allowing the new stitch to replace it.
- Repeat the process: Continue steps 2-5 until you have worked all the stitches on the left needle. The stitches will now be on the right needle.
Remember to maintain consistent tension as you work the first round. It’s normal for the first few stitches to feel a bit tight, but with practice, you will be able to achieve an even tension throughout.
If you are working in a pattern, make sure to follow the instructions provided for the first round. They may specify a different stitch or increase/decrease technique to be used.
Continuing in the Round
Once you have joined your circular knitting in the round, you can continue the pattern or stitch you are working on. Here are a few tips to help you continue knitting in the round:
- Use stitch markers: Place stitch markers at the beginning and end of each round to help you keep track of where you are in your knitting.
- Read the pattern: Make sure to carefully read the pattern instructions to understand any stitch or pattern changes that may occur when knitting in the round.
- Keep the tension consistent: Maintain an even tension as you continue knitting in the round to ensure that your stitches are uniform and the finished piece looks professional.
- Check your gauge: As you continue knitting in the round, periodically check your gauge to make sure your stitches haven’t become too loose or tight.
- Follow the pattern instructions: Continue following the pattern instructions for any shaping or stitch changes. If you are working in a simple stitch pattern, such as stockinette stitch, you can continue the same stitch pattern for each round.
Remember to take breaks and stretch your hands and fingers while knitting in the round to avoid any discomfort or strain. With practice, you’ll become more comfortable and confident in knitting in the round.
Working on Pattern Stitches
Once you have joined your circular knitting project, you can start working on the pattern stitches. Pattern stitches refer to any special stitch or design that you follow to create a decorative or textured effect in your knitting.
Here are some tips for working on pattern stitches:
- Read the Pattern: Before you begin working on pattern stitches, make sure to read and understand the instructions provided in the knitting pattern. The pattern will outline the specific stitches, techniques, and abbreviations you need to follow to create the desired effect.
- Use Stitch Markers: Stitch markers are small rings or clips that can be placed on the knitting needle to mark specific stitches or sections of the pattern. They can be very helpful in keeping track of where you are in the pattern and can prevent mistakes.
- Count Your Stitches: It’s important to count your stitches regularly to ensure that you haven’t accidentally added or dropped any stitches. This is especially important when working on complex pattern stitches with multiple repeats.
- Keep an Eye on Tension: Pattern stitches often require different tension or gauge than regular knitting. Make sure to check your tension regularly and adjust as necessary to maintain an even and consistent fabric.
- Take Your Time: Working on pattern stitches can be more complex and require additional attention compared to simple knitting stitches. Take your time, read the instructions carefully, and practice if necessary to ensure you understand the stitch before moving on.
Working on pattern stitches can add interest and variety to your circular knitting projects. With attention to detail and practice, you’ll be able to create beautiful and intricate designs in your knitting.
Finishing and Binding Off
Once you have completed your project, it’s time to finish it off and bind off your stitches. Follow these steps to complete your circular knitting project:
- Start by cutting your working yarn, leaving a tail that is long enough to weave in later.
- Take your knitting needle and insert it into the first stitch on your left-hand needle as if to knit.
- Knit the first stitch by wrapping the working yarn around the needle and pulling it through the stitch.
- Slip the second stitch from your left-hand needle onto your right-hand needle without knitting or purling it.
- Using your left-hand needle, lift the first stitch up and over the second stitch and off the needle.
- You have now bound off one stitch. Repeat steps 2-5 until you have one stitch remaining on your right-hand needle.
- Cut the working yarn, leaving a tail that is long enough to weave in later.
- Insert the tail of the yarn through the last stitch and pull tight to secure.
Once you have bound off all of your stitches, you can weave in the ends of your yarn using a tapestry needle to make sure they are secure and hidden within your project. Trim any excess yarn if needed.
Now that you have successfully finished and bound off your circular knitting project, you can enjoy your completed item or move on to the next step in your knitting journey!
FAQ:
What is circular knitting?
Circular knitting is a technique used to create seamless tubes of fabric by using circular or double-pointed needles. It is commonly used for knitting socks, hats, and sweaters.
What are the benefits of circular knitting?
Circular knitting has several benefits. It eliminates the need for seams, which makes the finished product more comfortable and aesthetically pleasing. It also allows for knitting in the round, which means there is no need to purl and all stitches are worked on the right side of the fabric. Additionally, circular knitting is great for creating larger projects as it can accommodate a large number of stitches.
What materials do I need for circular knitting?
To get started with circular knitting, you will need circular or double-pointed needles, yarn in your chosen color, stitch markers, a tapestry needle for weaving in ends, and a knitting pattern. Make sure to choose a needle size that is appropriate for the yarn you are using and that matches the gauge required by your pattern.
How do I cast on for circular knitting?
To cast on for circular knitting, start by creating a slipknot and placing it onto one of the needles. Then, make a loop with the yarn and bring the working yarn through the loop to create a new stitch. Repeat this process until you have the desired number of stitches on your needle. Make sure the stitches are not twisted before joining in the round.
How do I join in the round for circular knitting?
To join in the round for circular knitting, make sure the stitches are not twisted on the needle. Then, knit the first stitch from the left-hand needle onto the right-hand needle. This will connect your stitches in a circle. Place a stitch marker to mark the beginning of the round if your pattern requires it.
How do I knit in the round for circular knitting?
To knit in the round for circular knitting, simply continue knitting each stitch on the right side of the fabric. Do not turn your work like you would in traditional flat knitting. You can use either the knit stitch or the purl stitch, depending on the pattern, to create the desired fabric texture.
How do I finish off my circular knitting project?
To finish off your circular knitting project, work until the desired length or until your pattern instructs you to stop. Then, cut the yarn, leaving a tail of about 6 inches. Thread the tail onto a tapestry needle and slide the needle through the remaining stitches on the needle, removing them from the knitting. Pull the yarn tight to secure the stitches and weave in any loose ends.


