If you’re an avid knitter or just starting out, knowing how to join a round is an essential skill to have. Joining a round in knitting allows you to create continuous loops, which are perfect for making hats, socks, and other circular projects. Whether you’re using double-pointed needles or circular needles, mastering this technique will take your knitting to the next level.
Before joining a round, it’s important to have your stitches cast on and distributed evenly across your needles. This will ensure that your project doesn’t twist when you join the round. Once your stitches are ready, you’re ready to begin.
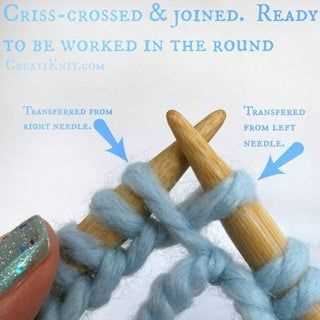
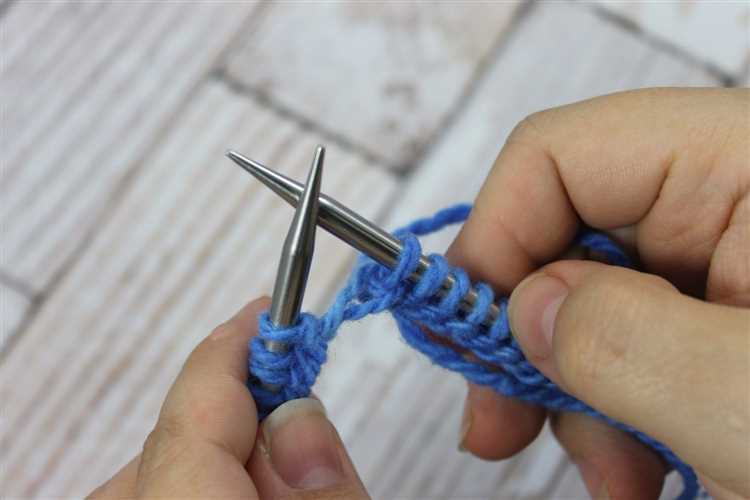
To join a round, hold your knitting needles parallel to each other, with the right sides of your work facing out. Take your working yarn and carefully thread it through the first stitch on your left-hand needle, as if you were making a regular knit stitch. However, instead of pulling the stitch off the left needle, leave it on the needle.
Next, take your right-hand needle and insert it into the first stitch on the left needle, going from left to right. Wrap the yarn around the right-hand needle, keeping it above the left-hand needle. Then, bring the right-hand needle back through the stitch, bringing the loop of yarn with it. This creates a new stitch on the right-hand needle.
Once you have completed these steps, you have successfully joined your round! You can now continue knitting in the round, adding as many stitches as needed for your project. Remember to always keep track of your rounds by placing a stitch marker at the beginning of the round, as this will help you keep your place and maintain the correct tension in your knitting.
Joining a round in knitting may take some practice, but with patience and determination, you’ll soon be joining rounds like a pro. So grab your needles and yarn and give it a try – you’ll be amazed at what you can create with this versatile technique!
Gather Your Materials
Before you can join a round in knitting, you’ll need to gather a few essential materials:
- Knitting Needles: Make sure you have a pair of circular or double-pointed knitting needles in the appropriate size for your project. Circular needles are typically used for larger projects, while double-pointed needles are used for smaller projects or when working in the round with a small circumference.
- Yarn: Choose a yarn that is suitable for your project and compatible with your knitting needles. The yarn weight and fiber content should match the desired look and feel of your finished item.
- Tape Measure: This will come in handy for measuring your gauge and checking the dimensions of your project as you go along.
- Stitch Markers: Stitch markers are useful for marking the beginning and end of rounds, as well as any other important points in your pattern.
- Scissors: You’ll need a good pair of scissors for cutting your yarn at various points in your project.
- Darning Needle: A darning needle is useful for weaving in loose ends and finishing your project.
- Pattern: Choose a pattern that includes instructions for joining a round and follow it closely to ensure a successful outcome.
Once you have all of these materials ready, you’ll be well-prepared to join a round in knitting like a pro!
Make a Slip Knot
Before you can start knitting, you’ll need to make a slip knot. This is the first step in getting your yarn ready to cast on. Follow the steps below to make a slip knot:
- Start by holding the end of the yarn in your left hand, with the ball of yarn in your right hand.
- Loop the yarn around your left index finger, crossing it over the back and then bringing it around to the front.
- Take the end of the yarn that is attached to the ball and pass it through the loop from front to back.
- Gently pull both ends of the yarn to tighten the knot.
- Slide the loop off your finger, making sure it stays intact.
Once you have made a slip knot, you can proceed to the next step of casting on your stitches. The slip knot will act as the first stitch on your knitting needle.
Cast On Stitches
Before you can begin knitting in the round, you’ll need to cast on your stitches. The cast on is the foundation of your work, and it’s important to create a sturdy and even edge.
Here’s a step-by-step guide on how to cast on stitches:
- Hold the yarn: Begin by holding the yarn with your non-dominant hand. The tail end of the yarn should be hanging down, and the working yarn should be wrapped around your fingers to create tension.
- Make a slipknot: Take the tail end of the yarn and form a loop. Insert your needle through the loop, then pull the tail end to tighten the loop around the needle. This is your slipknot.
- Cast on the first stitch: Insert the needle with the slipknot into your dominant hand. Hold the needle with your thumb and middle finger, allowing the slipknot to rest against your index finger.
- The working yarn should be coming from the back of your hand and resting over your index finger.
- Wrap the yarn: With your non-dominant hand, bring the working yarn over the top of the needle from front to back.
- Insert the needle: Using your dominant hand, insert the needle into the slipknot from front to back, going under the working yarn.
- Create the new stitch: With the needle inserted, bring the working yarn through the slipknot and pull it snugly to form a new stitch on the needle.
- Repeat the process: Continue steps 4-6 until you have cast on the desired number of stitches. Make sure to keep your stitches snug but not too tight.
- Count your stitches: Once you have finished casting on, count your stitches to ensure you have the correct number for your project.
Now you’re ready to start knitting in the round with your cast-on stitches. Remember to keep practicing and experimenting with different cast-on methods to find your favorite!
Arrange Stitches on Circular Needles
Before you can begin knitting in the round, you’ll need to arrange your stitches on circular needles. Here’s a step-by-step guide:
- Cast on: Start by casting on the desired number of stitches onto one of the circular needles.
- Divide stitches: Once you have cast on the necessary stitches, divide them evenly between the two circular needles. For example, if you cast on 80 stitches, you would place 40 stitches on each needle.
- Join in the round: Take care not to twist your stitches as you bring the ends of the circular needles together to join in the round. Make sure all your stitches are facing the same direction.
- Slide stitches: To slide your stitches onto the other circular needle, hold the needle with the stitches in your right hand and the empty needle in your left hand.
- Push through stitches: Insert the tip of the empty needle into the first stitch on the other needle, going from left to right.
- Slide stitches: Use your left hand to carefully slide the stitches off the other needle and onto the empty needle. Continue sliding all the stitches onto the empty needle.
- Repeat: Repeat steps 4-7 until all your stitches are transferred to the same circular needle.
Once your stitches are arranged on the circular needles, you’re ready to start knitting in the round!
Create a Joining Loop
Before you begin joining a round in knitting, you need to create a joining loop. This loop will connect the first and last stitches of your round, allowing you to knit in the round rather than working in rows.
To create a joining loop, follow these steps:
- After casting on the required number of stitches, hold your working needle with the cast-on stitches in your right hand.
- Slide the working needle into the first stitch as if to knit. Make sure the working yarn is behind the needle.
- With your left hand, hold the knitting needle with the last stitch from your cast-on in position, parallel to the working needle.
- Bring the working needle over and around the left needle, from right to left, to create a loop.
- Insert the working needle into the first stitch again, this time from left to right, underneath the left needle.
- Pull the loop through the stitch on the left needle, creating a new stitch on the working needle.
- Slide the new stitch from the left needle onto the working needle, leaving the original stitch on the left needle.
Repeat these steps for each additional stitch until you have created a joining loop and all your cast-on stitches are on the working needle.
Note: When joining in the round, make sure your stitches are not twisted around the needle. The cast-on edge should lie flat and form a circle.
Start Knitting in the Round
Knitting in the round allows you to create seamless projects such as hats, socks, and sweaters. It eliminates the need for seaming and creates a continuous spiral of stitches.
Before you begin, make sure you have the following supplies:
- Circular knitting needles or double-pointed needles (DPNs)
- Yarn of your choice
- Stitch markers
- Tapestry needle for weaving in ends
Follow these steps to start knitting in the round:
- Cast on the desired number of stitches onto your circular needles or DPNs.
- Join the round by bringing the first and last stitch together, being careful not to twist your stitches. Place a stitch marker to mark the beginning of the round.
- Begin knitting your first round, working all stitches in the round.
|
Tips:
|
Common Mistakes:
|
Once you have mastered the technique of starting knitting in the round, you can start working on more complex patterns and enjoy the benefits of seamless knitting!
Avoid Twisted Stitches
Twisted stitches can create uneven tension and distorted fabric in your knitting. To avoid twisted stitches, follow these steps:
- Check your yarn: Before starting each round, make sure the yarn is positioned correctly. The working yarn should be behind the needle, and you should be able to see the back of the stitch.
- Pay attention to your knitting: As you knit each stitch, make sure to insert the needle correctly through the loop. The needle should go into the front leg of the stitch, not the back.
- Keep your stitches aligned: As you knit each round, check that all your stitches are facing the same direction. Twisted stitches can occur if a stitch flips or twists as you work, so keeping them aligned will prevent this issue.
- Use stitch markers: If you’re working on a project with a large number of stitches or a complex pattern, using stitch markers can help you keep track of your rounds. Place a stitch marker at the beginning of each round to mark the starting point and ensure you’re not inadvertently twisting your stitches.
- Fixing twisted stitches: If you notice a twisted stitch in your knitting, it’s best to fix it as soon as possible. You can either drop the stitch down and re-knit it correctly, or use a crochet hook to fix the twist without unraveling your entire work.
By following these steps and paying attention to your knitting, you can avoid twisted stitches and create smooth, even fabric in your knitting projects.
Continue Knitting in the Round
Now that you have joined your knitting in the round, you can continue working on your project without the need to turn your work. Here are the steps to continue knitting in the round:
- Hold your knitting needles with the current row of stitches in your left hand and the empty needle in your right hand.
- Insert the empty needle into the first stitch on your left-hand needle as if to knit.
- Wrap the working yarn around the right-hand needle counterclockwise.
- Use the right-hand needle to pull the loop of yarn through the stitch on the left-hand needle, creating a new stitch on the right-hand needle.
- Repeat steps 2 to 4 for each stitch on the left-hand needle until all stitches have been transferred to the right-hand needle.
Continue knitting in this manner, working each round in the same direction, until your project reaches the desired length or you have completed the required number of rounds.
Keep in mind the following tips as you continue knitting in the round:
- Make sure the working yarn is pulled tight after each stitch to avoid any gaps or loose stitches.
- Use stitch markers to mark the beginning of each round, especially if you are working on a pattern with multiple rounds.
- Check your work regularly to ensure you are maintaining the correct stitch pattern and tension.
- If you are working on a large project, such as a sweater or blanket, consider using circular needles to accommodate a greater number of stitches.
Following these steps and tips will help you knit in the round like a pro and achieve professional-looking results in your projects.
FAQ:
What is joining in knitting?
Joining in knitting is the process of connecting the end of one round to the beginning of the next round to continue knitting in the round.
Why is it important to join rounds properly?
It is important to join rounds properly in knitting because if the rounds are not joined correctly, it can result in an uneven or twisted seam in the finished project.
What are the different methods for joining rounds in knitting?
There are several methods for joining rounds in knitting, including the slip stitch join, the invisible join, and the jogless join. Each method has its own advantages and is used in different situations.


