Knitting is a fantastic way to create beautiful clothing and accessories, but mastering different techniques can be a challenge. One important stitch every knitter should know is the slip stitch. Slip stitch knitting is a simple technique that is often used to create textured patterns, add decorative details, or join pieces together.
Slip stitching involves passing a stitch from the left-hand needle to the right-hand needle without knitting or purling it. This creates a smooth, elongated stitch and adds depth and dimension to your knitting. Slip stitching is a versatile technique that can be used in a variety of ways, such as creating slipped stitch edges, decorative borders, or even creating intricate colorwork patterns.
In this step-by-step guide, we will walk you through the process of slip stitch knitting. We will start with the basic slip stitch and gradually introduce more advanced techniques and patterns. Whether you are a beginner or an experienced knitter, mastering the slip stitch will open up a world of creative possibilities for your projects.
So grab your knitting needles and yarn, and let’s learn how to slip stitch!
What is Slip Stitch Knitting?
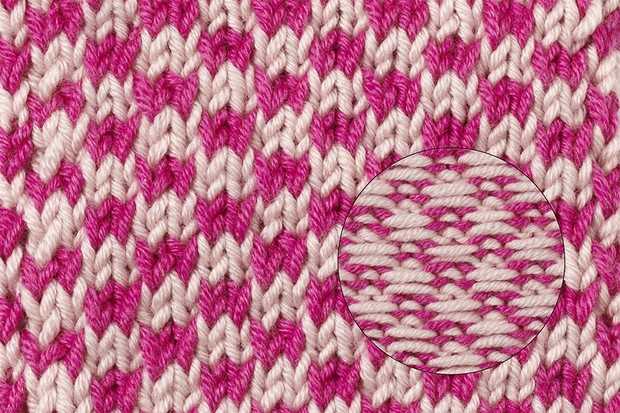
Slip stitch knitting is a technique commonly used in knitting to create various textures and patterns. It involves slipping stitches from the left-hand needle to the right-hand needle without knitting them. This technique is often used in colorwork, such as stranded knitting or mosaic knitting, to create intricate designs.
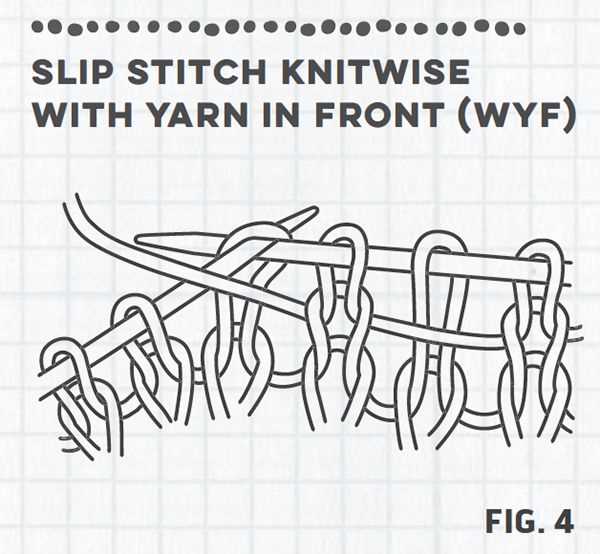
In slip stitch knitting, the slipped stitches can either be slipped with the yarn held in the back of the work (referred to as “slip as if to purl”) or with the yarn held in the front of the work (referred to as “slip as if to knit”). The slipped stitches can be combined with different types of knitting stitches, such as knit stitches or purl stitches, to create unique patterns and textures.
Slip stitch knitting is versatile and allows for many creative possibilities. It can be used to create patterns that resemble polka dots, stripes, or even more intricate motifs. The technique is relatively easy to learn and can be a great way for beginners to experiment with different stitch patterns.
Slip stitch knitting can be used in a variety of knitting projects, including scarves, hats, sweaters, and even home decor items like blankets or pillow covers. The technique can add visual interest and complexity to your knitting projects, making them stand out from basic stockinette or garter stitch patterns.
If you’re new to slip stitch knitting, it’s helpful to start with simple patterns and gradually experiment with more complex designs as you become more comfortable with the technique. With practice and creativity, slip stitch knitting can become a valuable skill in your knitting repertoire.
Materials Needed for Slip Stitch Knitting
In order to start slip stitch knitting, you will need a few basic materials. These include:
- Yarn: Choose a yarn that is suitable for slip stitch knitting. Opt for a medium weight yarn that is smooth and not too fuzzy, as this will make it easier to work with.
- Knitting Needles: Select a pair of knitting needles that are appropriate for the weight of your yarn. Slip stitch knitting can be done with straight or circular needles, depending on your personal preference.
- Tapestry Needle: A tapestry needle will be needed for weaving in ends and finishing off your slip stitch knitting project.
- Scissors: A pair of scissors will be handy for cutting your yarn and snipping any loose ends.
- Stitch Marker (optional): If you are working on a pattern that requires keeping track of stitches, a stitch marker can be helpful for marking your place.
With these basic materials, you will be ready to start slip stitch knitting and create beautiful textured patterns in your knitting projects. Gather your supplies and get ready to learn this versatile technique!
Step 1: Casting On
Before you can start slip stitching in knitting, you need to cast on your stitches. Casting on is the process of creating the foundation row of stitches that you will work with.
Here’s how you can cast on:
- Hold your knitting needle in your dominant hand and leave a long tail of yarn.
- Make a slipknot by crossing the loose end of the yarn over the long tail. Insert the end of the yarn through the loop and pull tight.
- Hold the slipknot between your thumb and index finger of your non-dominant hand.
- Insert the knitting needle through the slipknot from left to right, over the tail of the yarn.
- With your dominant hand, wrap the yarn counterclockwise around the needle, crossing over the tail.
- Use the needle to pull the loop of yarn through the slipknot, creating a new stitch on the needle.
- Repeat steps 5 and 6 until you have cast on the desired number of stitches.
Once you have cast on your stitches, you can proceed to the next step of slip stitching in knitting.
Step 2: Knitting the First Row
- Start by holding the knitting needles with the slip stitch in your left hand and the empty needle in your right hand. The slip stitch should be on the left needle.
- Insert the right needle into the first stitch on the left needle, from left to right, as if to knit.
- Bring the yarn from back to front between the needles.
- Wrap the yarn around the right needle, moving in a counterclockwise direction.
- Use the right needle to pull the wrapped yarn through the stitch on the left needle, creating a new stitch on the right needle. The old stitch can now be slipped off the left needle.
- Repeat steps 2-5 for each stitch on the left needle, knitting a new stitch onto the right needle and slipping the old stitch off the left needle.
- Continue until you have knitted all the stitches from the left needle to the right needle.
Congratulations! You have knitted the first row using the slip stitch technique. Now you are ready to continue with your knitting project.
Step 3: Slipping Stitches
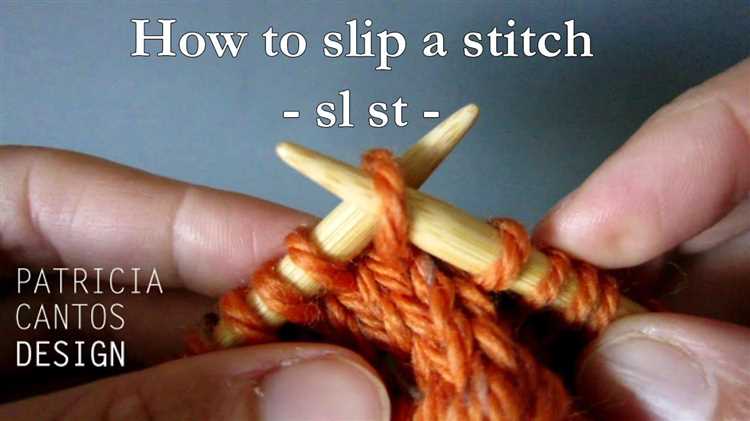
In knitting, slipping stitches refers to the act of moving a stitch from one needle to the other without working it. This technique is often used to create decorative effects or to easily transfer stitches between needles.
To slip a stitch, follow these steps:
- Hold the working yarn at the back of the work, as if you were going to knit.
- Insert the right needle into the next stitch on the left needle as if to knit.
- Instead of knitting the stitch, simply transfer it from the left needle to the right needle.
Slipping stitches can be done in different ways, depending on the desired effect:
- Slip stitch purlwise: Insert the right needle into the next stitch on the left needle as if to purl. Slip the stitch from the left needle to the right needle without purling it.
- Slip stitch knitwise: Insert the right needle into the next stitch on the left needle as if to knit. Slip the stitch from the left needle to the right needle without knitting it.
Slipping stitches can be used to create a variety of stitch patterns, such as slipped stitch ribbing or slip-stitch colorwork. It can also be used to easily move stitches between needles when working complex cable or lace patterns.
| Slipping Stitches: | Effect: |
|---|---|
| Slip 1 stitch purlwise, knit the next stitch, pass the slipped stitch over: | Creates a decrease stitch. |
| *Slip 1 stitch purlwise, knit 1 stitch; repeat from * to end of row: | Creates a slipped stitch ribbing pattern. |
| *Slip 1 stitch knitwise, knit 1 stitch; repeat from * to end of row: | Creates a slip-stitch colorwork pattern. |
By mastering the technique of slipping stitches, you can add depth and texture to your knitted projects and explore a wide range of stitch patterns beyond basic knitting techniques.
Step 4: Changing Colors
Once you have mastered the slip stitch, you can take your knitting to the next level by introducing different colors. Changing colors in your knitting adds visual interest and allows you to create beautiful designs.
Here is a step-by-step guide on how to change colors in your slip stitch knitting:
- Start by knitting with your first color.
- When you are ready to change colors, knit until the last stitch of your current row.
- With your new color, insert the right needle into the next stitch as if you were going to knit it.
- Instead of knitting the stitch with your new color, slip the stitch onto the right needle without knitting it.
- Continue knitting with your new color, following the pattern or design you want to create.
- When you want to switch back to your first color, simply repeat steps 2-4 with the new color.
- Continue knitting with your first color, following the pattern.
By changing colors in this way, you can create stripes, color blocks, or intricate designs in your knitting. Experiment with different color combinations and patterns to create unique projects.
Remember to always carry the unused yarn along the back of your work, catching it in the stitches to prevent long floats.
Now that you know how to change colors in slip stitch knitting, you can unleash your creativity and create stunning projects with beautiful color combinations! Happy knitting!
Step 5: Knitting the Last Row
After you have finished slipping stitches, it’s time to knit the last row of your project. This row will help secure your work and provide a neat edge.
To begin, insert your right needle into the first stitch on your left needle as if to knit.
Wrap your yarn around the right needle from back to front, creating a loop.
Use the right needle to pull the loop of yarn through the stitch, and slide the original stitch off the left needle.
Continue knitting each stitch in the same manner until you reach the end of the row.
Once you have knitted the last stitch, you can either cut your yarn, leaving a tail long enough for weaving in later, or continue knitting your project if you have more rows or rounds to complete.
Remember to keep your tension consistent as you knit to ensure an even and professional-looking finish.
Congratulations! You have successfully completed the slip stitch knitting technique. With practice, you will become more comfortable with this technique and be able to incorporate it into a variety of knitting projects.
Finishing and Blocking Your Slip Stitch Knitting Project
Once you have finished knitting your slip stitch project, there are a few steps you can take to give it a professional finish and ensure that it retains its shape and texture. Here are some tips for finishing and blocking your slip stitch knitting:
- Weave in the ends: Use a tapestry needle to weave in all the loose ends of yarn on the wrong side of your project. This will give it a clean and neat appearance.
- Block your project: Blocking is the process of shaping and stretching your finished knitting to the desired dimensions. To block your slip stitch project, you can follow these steps:
- Fill a basin with lukewarm water and add a few drops of gentle wool wash or mild detergent.
- Submerge your slip stitch project in the water and gently squeeze it to ensure that the water penetrates the fibers.
- Let the project soak in the water for about 10-15 minutes.
- Take the project out of the water and gently squeeze out the excess water without wringing or twisting it.
- Place a clean towel or blocking mat on a flat surface and lay your project on top, shaping it to the desired dimensions.
- Use rustproof T-pins or blocking wires to secure the edges of your project, making sure it retains its shape.
- Leave the project to dry completely, which may take a day or two depending on the yarn and climate.
- Once the project is dry, remove the pins or wires and you will notice that it has retained its shape and the stitch pattern is more defined.
- Finishing touches: Finally, give your slip stitch project a final touch by steam blocking it. Hold a steam iron about 2-3 inches away from the project and use the steam setting to gently steam the surface. Be careful not to touch the iron to avoid damaging the yarn. This will help the stitches to relax and settle into place.
By following these steps, you will be able to give your slip stitch knitting project a polished and professional finish. Blocking also helps to improve the drape and overall appearance of your finished piece. Take your time and enjoy the process of finishing your project, knowing that the end result will be worth it!
FAQ:
What is slip stitching in knitting?
Slip stitching in knitting is a technique used to move stitches from the left-hand needle to the right-hand needle without actually knitting them. This creates a decorative effect and is often used to join two pieces of knitting together or to create smooth edges.
How do I slip stitch in knitting?
To slip stitch in knitting, you insert your right-hand needle into the next stitch on your left-hand needle as if you were going to knit it, but instead of knitting it, you simply slide it onto the right-hand needle. This moves the stitch from the left-hand needle to the right-hand needle without knitting it.
What is the purpose of slip stitching?
The purpose of slip stitching in knitting can vary depending on the project. It is often used to create a neat edge or to join two pieces together. Slip stitching can also be used to create decorative effects in lace knitting or to create texture and pattern in certain stitch patterns.
Can slip stitching be used in different knitting projects?
Yes, slip stitching can be used in a variety of knitting projects. It is a versatile technique that can be used to create smooth edges, join pieces together, or add decorative elements to your knitting. Whether you are working on a scarf, a sweater, or a hat, slip stitching can be a useful skill to have.
Are there different methods of slip stitching?
Yes, there are different methods of slip stitching in knitting. The most common method is the slip slip knit (ssk) stitch, which is used to decrease stitches. There is also the slip slip purl (ssp) stitch, which is another type of decrease. Additionally, slip stitching can be done with different needles, such as double-pointed needles or circular needles, depending on the project.
Is slip stitching difficult to learn?
No, slip stitching in knitting is not difficult to learn. It is a basic technique that can be easily mastered with a little practice. The key is to understand the mechanics of how the stitches are moved from one needle to the other and to practice the technique until it becomes second nature.
Can slip stitching be used in both knitting and crochet?
No, slip stitching is a technique specific to knitting. In crochet, slip stitching refers to a different technique used to join stitches or create decorative effects. While there may be some similarities in the names, slip stitching in knitting and crochet are not interchangeable.


