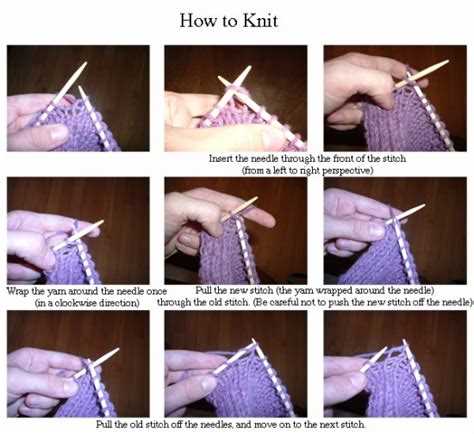
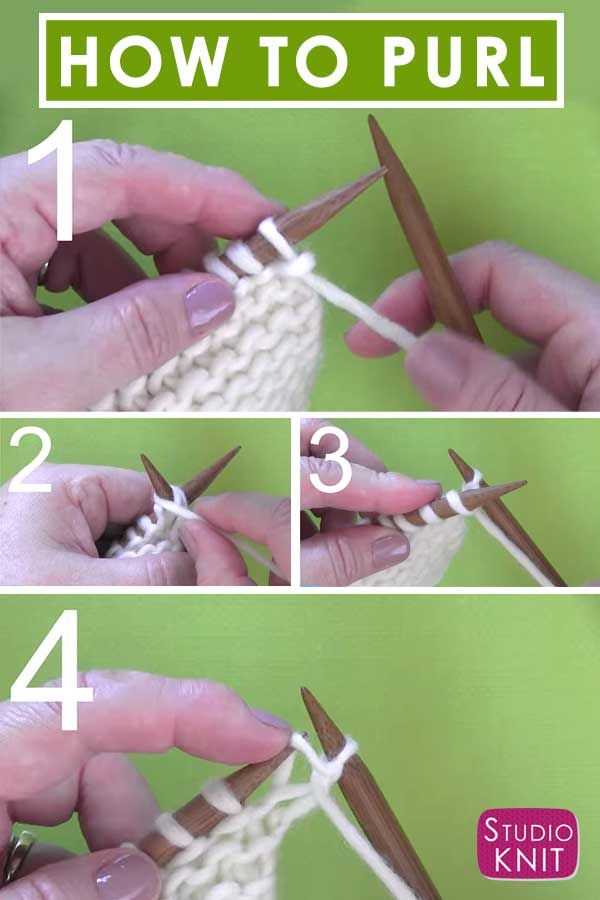
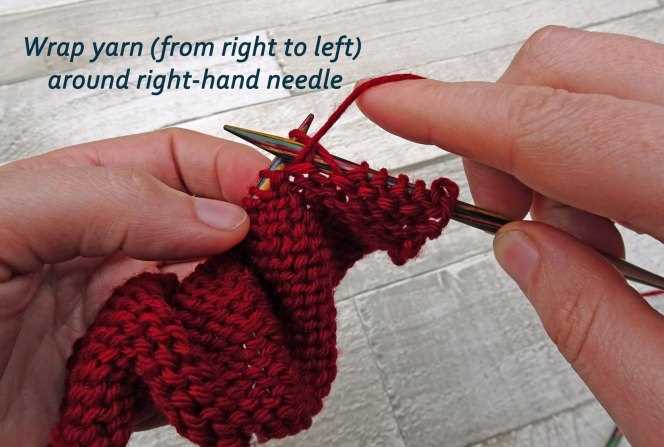
Knitting is a popular craft that allows you to create beautiful garments and accessories using yarn and needles. While many beginners start with simple knit stitches, learning how to purl is an essential skill that opens up a world of possibilities for creating different textures and patterns in your knitting projects. Whether you’re a beginner or an experienced knitter looking to expand your repertoire, this step-by-step guide will teach you everything you need to know about purling.
What is purling?
Purling is a knitting technique that creates a smooth and bumpy texture on the right side of the fabric. It is the reverse of the knit stitch, and it is used to create patterns such as ribbing, cables, and seed stitch. Unlike knitting, which creates ridges on the right side of the fabric, purling creates a smooth surface with the stitches appearing like bumps.
Step-by-step guide to purling:
- Hold the knitting needles parallel in your hands, with the yarn at the back of the work.
- Insert the right needle from right to left into the first stitch on the left needle, going behind the left needle.
- With your right thumb, bring the yarn under and over the right needle, creating a loop around the right needle.
- Use your right hand to pull the right needle with the loop through the stitch on the left needle, slipping the stitch off the left needle.
- Repeat steps 2-4 for each stitch on the left needle until you have completed the row.
Remember to practice and take your time when learning how to purl. With patience and persistence, you’ll soon be able to create a wide variety of textures and patterns in your knitting projects.
What is purling and why is it important in knitting?
When it comes to knitting, purling is an essential technique that creates a different texture and design on the fabric. It is the reverse of knitting and is characterized by a raised bump on the front side of the work.
Purling is important in knitting for several reasons:
- Creating a variety of stitch patterns: Purl stitches, when combined with knit stitches, allow knitters to create endless stitch patterns, from simple ribbing to intricate lacework.
- Adding texture to the fabric: Purl stitches can create a bumpy or raised texture on the fabric, providing visual interest and creating a unique design.
- Creating stockinette stitch: By alternating rows of knit and purl stitches, knitters can create the popular stockinette stitch, which is smooth on one side (the knit side) and bumpy on the other side (the purl side).
- Balancing tension: Purling allows knitters to balance the tension in their work. It helps create an even tension throughout the fabric when alternating with knit stitches.
- Working shaping techniques: Purl stitches are often used in shaping techniques such as decreases and increases, helping to create curves, darts, and other design elements.
In summary, purling is a fundamental knitting technique that adds versatility, texture, and balance to knitted projects. It allows knitters to create a wide range of stitch patterns and helps shape the fabric in various ways. Mastering the art of purling is crucial for any knitter looking to expand their skills and create beautiful, intricate designs.
Step 1: Preparing your knitting needles
Before you start purling in knitting, you need to make sure your knitting needles are ready for the task. Here are the steps to prepare your knitting needles:
- Choose the right size needles for your project. The needle size will depend on the yarn weight and the desired gauge.
- Hold the knitting needles in your dominant hand. The pointed ends should be facing the opposite direction.
- Make sure the needles are clean and free from any debris or residue. If necessary, gently wipe them with a soft cloth.
- Check the condition of your needles. Look for any signs of damage or wear, such as bent or rough edges. If you notice any issues, consider replacing the needles before starting.
- If your needles have stitch markers or other accessories attached, remove them to ensure smooth and uninterrupted knitting.
- Hold the knitting needles with a relaxed grip, making sure they are comfortable in your hand.
- Take a moment to feel the texture and weight of the needles. Familiarize yourself with their balance and how they feel in your hand. This will help you have better control and precision while purling.
Select the appropriate knitting needles for purling
When it comes to knitting, selecting the appropriate knitting needles is essential to achieve the desired stitch pattern and tension. The type and size of knitting needles you use for purling can make a significant difference in the outcome of your project.
There are different types of knitting needles available, including straight needles, circular needles, and double-pointed needles. Each type has its own advantages and is suitable for different knitting techniques.
For purling, you can use either straight needles or circular needles, depending on your preference. Straight needles are a traditional choice and are ideal for small projects or when working flat pieces. Circular needles, on the other hand, are versatile and can be used for both flat and circular knitting. They are particularly useful for large projects or when working in the round.
In addition to the type of needles, you also need to consider the size of the needles. Knitting needles come in different sizes, which are indicated by numbers or letters. The size of the needles determines the size of the stitches and the overall tension of your knitting.
When selecting the appropriate needle size for purling, you should refer to your knitting pattern or gauge swatch. The pattern will usually recommend a specific needle size to achieve the desired tension and stitch pattern. If you are not following a pattern, you can use a gauge swatch to determine the appropriate needle size. A gauge swatch is a small piece of knitting worked with the same yarn and needles you plan to use for your project. By measuring the stitch and row count on your gauge swatch, you can adjust your needle size as needed to achieve the desired tension.
Overall, selecting the appropriate knitting needles for purling is crucial for achieving the desired stitch pattern and tension in your knitting project. Whether you choose straight needles or circular needles, make sure to consider the type and size of the needles based on your project requirements and personal preferences.
Step 2: Holding the knitting needles
Once you have cast on the desired number of stitches, it’s time to hold the knitting needles. Follow these steps:
- Hold one knitting needle in your dominant hand.
- Hold the other knitting needle in your non-dominant hand.
- Place your stitches on the needle in your non-dominant hand.
- Hold the needle with the stitches parallel to the ground.
Here are some additional tips for holding the knitting needles:
- Make sure the needles are comfortable to hold and not too heavy or slippery.
- Hold the needles with a relaxed grip, allowing your hands to move freely.
- Position your hands so that you can easily manipulate the stitches on the needle.
By holding the knitting needles correctly, you’ll be able to move on to the next step in purling with ease.
Mastering the correct grip for purling
One of the key elements to successful purling in knitting is having the correct grip on your needles and yarn. The grip you use can affect your tension, speed, and overall comfort while knitting.
There are different grips that knitters use for purling, and it’s important to find one that works best for you. Here are a few popular options to consider:
- English/American style: Hold the working needle in your right hand like a pencil, with the point resting on your palm. Hold the yarn in your left hand and use your index finger to wrap the yarn around the working needle.
- Continental style: Hold the working needle in your left hand like a pencil, with the point resting on your palm. Hold the yarn in your right hand and use your index finger to wrap the yarn around the working needle.
- Combined style: Hold the working needle in your right hand like a pencil, with the point resting on your palm. Hold the yarn in your left hand, but instead of wrapping it with your index finger, use your thumb to wrap the yarn around the working needle.
It’s important to experiment with different grip styles to find the one that feels most natural and comfortable to you. Keep in mind that the grip you choose may also be influenced by the type of project you’re working on and your personal knitting preferences.
Once you’ve found your preferred grip for purling, practice it regularly to improve your skill and speed. With time and practice, you’ll be able to purl effortlessly and create beautiful knitted pieces.
Step 3: Inserting the needle
Once you have your working yarn in front of your work, it’s time to insert the right-hand needle into the first stitch on the left-hand needle. Here’s how to do it:
- Hold the right-hand needle in your right hand and the left-hand needle in your left hand.
- Insert the right-hand needle from left to right through the front loop of the first stitch on the left-hand needle.
- Make sure the needle goes under the working yarn so that the yarn is between the two needles.
Note: The direction you insert the needle and the position of the working yarn may vary depending on the knitting pattern you are following. Always refer to your specific pattern instructions for guidance.
Once the right-hand needle is inserted through the first stitch, you are ready to move on to the next step: performing the actual purl stitch.
Guide on how to insert the needle through the stitch
Inserting the needle through the stitch is a fundamental step in knitting. This step is crucial for creating the purl stitch, and it allows you to build the foundation of your knitted project. Follow these steps to learn how to insert the needle through the stitch:
- Hold the knitting needle with the stitches in your left hand and the empty needle in your right hand. Make sure the working yarn is at the back of the work.
- Insert the right needle into the first stitch on the left needle from left to right, going behind the left needle.
- Ensure that the right needle is positioned correctly and that the left needle’s tip is resting against the right needle’s shaft. This will help you slide the right needle into the stitch smoothly.
- Hold the working yarn in your right hand and wrap it counterclockwise around the right needle while keeping the tension firm but not too tight.
- Once the yarn is wrapped, use the right needle to pull it through the stitch on the left needle, creating a new loop on the right needle.
- As you pull the yarn through the stitch, the right needle should pass behind the left needle, moving the stitch from the left needle to the right needle. This completes the purl stitch.
- Repeat steps 2 to 6 for each stitch on the left needle until all stitches have been transferred to the right needle.
- Continue knitting or follow the pattern instructions to complete your project.
Remember to practice this technique to improve your skills and create even and consistent purl stitches.
Step 4: Wrapping the yarn
Before you start purling, you need to position your yarn correctly.
1. Hold your knitting needles in your right hand, with the working needle (the one with the stitches) in the back.
2. Take the working yarn, which is connected to the ball of yarn, and bring it in front of the working needle.
3. With your left hand, bring the working yarn between the two needles from back to front. This will create a loop around the working needle.
4. Make sure the loop of yarn is snug against the needle. You don’t want it to be too loose or too tight.
5. Now you are ready to start purling! The yarn is in the correct position to create the purl stitch.
Learn how to wrap the yarn correctly for purling
When purling in knitting, it is important to wrap the yarn correctly to achieve the desired stitch. Follow these simple steps to learn how to wrap the yarn correctly for purling:
- Hold the knitting needle with the stitches in your left hand and the working yarn in your right hand.
- Insert the right needle from right to left into the first stitch on the left needle, moving it towards the back.
- Take the working yarn and bring it in front of the right needle, crossing it over the left needle.
- With your right hand, bring the working yarn behind the right needle, wrapping it counterclockwise around the right needle.
- Use the right needle to pull the wrapped yarn through the stitch on the left needle, creating a new stitch on the right needle.
- Slide the stitch off the left needle, completing the purl stitch.
Remember to keep the tension of the yarn even as you wrap it for purling. Practice these steps until you feel comfortable and confident in your purling technique.
Step 5: Pulling through the stitch
Once you have completed the purl stitch by wrapping the yarn around the needle, it’s time to pull the yarn through the stitch.
To do this, use your right hand to hold onto the needle, ensuring that the newly created purl stitch doesn’t slip off. Take the yarn that is in your left hand and gently pull it through the stitch, towards the back of the work.
As you pull the yarn through, you will notice that the purl stitch begins to form on the right-hand needle. Make sure to keep the tension of the yarn consistent as you pull it through.
Continue pulling the yarn through until the entire stitch has been transferred to the right-hand needle. The completed purl stitch will now be on the right-hand needle.
Repeat these steps for each purl stitch in your row or pattern, pulling the yarn through to create a nice, even row of purl stitches.
FAQ:
Can you explain the steps for purling in knitting?
Sure! Purling is a basic knitting stitch that creates a raised, bumpy texture on the fabric. Here are the steps: 1. Hold the knitting needles with the purl stitch in your left hand and the empty needle in your right hand. 2. Insert the right needle from right to left into the first stitch on the left needle. 3. Wrap the yarn counterclockwise around the right needle. 4. Bring the right needle and wrapped yarn back through the stitch on the left needle, creating a new stitch on the right needle. 5. Slip the old stitch off the left needle. Repeat these steps for each stitch until you have finished purling the desired number of stitches.
Is purling a difficult stitch to learn?
Not at all! Purling is actually one of the fundamental stitches in knitting and once you understand the steps, it becomes quite simple. It may take a bit of practice to get the tension and evenness of your purl stitches right, but with some patience and regular practice, you’ll quickly get the hang of it.
What are some common mistakes beginners make when purling?
Beginners often struggle with maintaining consistent tension while purling. It’s common for the purl stitches to be tighter or looser than the knit stitches, which can result in an uneven fabric. Another common mistake is accidentally wrapping the yarn the wrong way around the needle, which can twist the stitch. Finally, beginners may also struggle with dropping stitches or unintentionally adding extra stitches while purling. These mistakes are all normal and can be corrected with practice and attention to detail.
Are there any tips or tricks for making purling easier?
Absolutely! Here are a few tips to make purling easier: 1. Use smooth yarn and needles to prevent the stitches from catching on the fibers. 2. Practice maintaining consistent tension by paying attention to how tightly you wrap the yarn around the needle. 3. Take breaks if your hands and fingers start to feel tired or cramped. 4. Count your stitches regularly to ensure you haven’t accidentally added or dropped any. 5. Watch online tutorials or take knitting classes to learn different techniques and get additional guidance. Remember, practice makes perfect, so keep at it!


