Are you a fan of pottery but don’t have access to a pottery wheel? Don’t worry, we’ve got you covered! In this step-by-step guide, we will show you how to make your very own pottery wheel at home using simple materials that you probably already have lying around.
Step 1: Gather your materials. You will need a round, sturdy surface such as a large wooden platter or a round piece of plywood. You will also need a spinning mechanism, which can be a lazy Susan bearing or an old record player. Additionally, you will need a reliable power source and some clay, of course!
Step 2: Prepare your work area. Find a comfortable and well-lit space in your home where you can set up your pottery wheel. Make sure you have enough space to work comfortably with your materials and that it is easily accessible to your power source.
Step 3: Attach the spinning mechanism to your round surface. If you are using a lazy Susan bearing, simply attach it to the center of your wooden platter or plywood using screws or adhesive. If you are using an old record player, remove the turntable and attach it in the same way.
Step 4: Connect your spinning mechanism to a reliable power source. If you are using a lazy Susan bearing, you can attach a small electric motor to the bottom of your wooden platter or plywood, ensuring that it is securely fastened. If you are using an old record player, you can connect it to a power source using the existing wiring.
Step 5: Test your pottery wheel to ensure that it spins evenly and smoothly. Adjust the power source or the spinning mechanism if necessary to achieve the desired speed and stability.
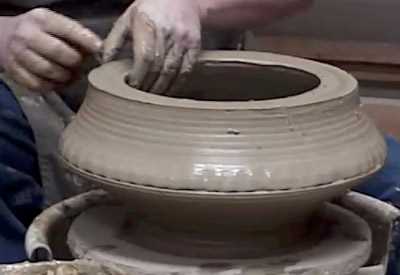
Step 6: Finally, it’s time to get creative! Place a lump of clay on your homemade pottery wheel and start shaping it with your hands. Experiment with different techniques like throwing, coiling, and molding to create beautiful pottery pieces.
Remember, practice makes perfect, so don’t be discouraged if your first few attempts are not as successful as you would like. With time and patience, you will be able to create stunning pottery pieces using your very own homemade pottery wheel. Happy crafting!
Choosing the Right Materials
When it comes to making a pottery wheel at home, choosing the right materials is crucial. Here are the materials you will need:
1. Tabletop or Base
First, you will need a sturdy tabletop or base to serve as the foundation for your pottery wheel. This can be an old table, a wooden plank, or even a sturdy piece of plywood.
2. Wheelhead
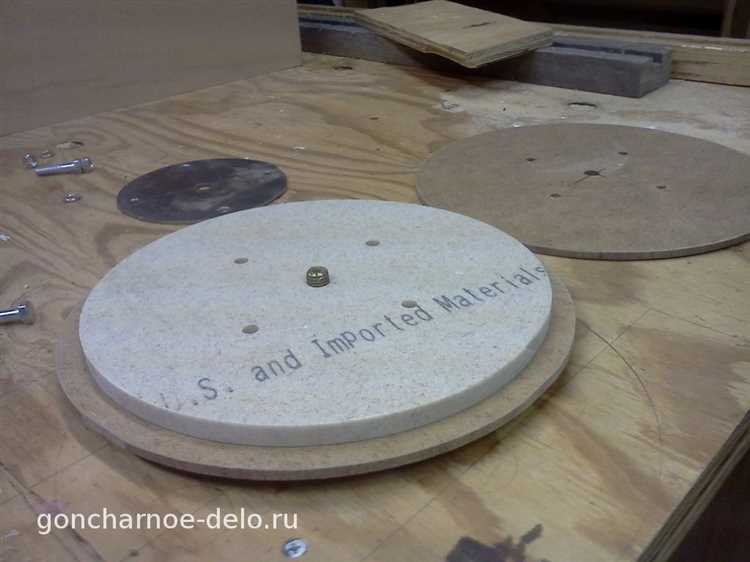
The wheelhead is the part of the pottery wheel that spins and holds the clay. You can purchase a wheelhead from a pottery supply store or repurpose an old pottery wheel by removing the wheelhead. If you prefer to make your own wheelhead, you will need a flat circular surface with a centered hole that fits onto the axle of the motor.
3. Motor
The motor is what powers the wheel and makes it spin. You can use a variety of motors for your pottery wheel, such as a repurposed washing machine motor or a motor specifically designed for pottery wheels. Make sure the motor you choose has enough power to handle the weight of the clay you will be using.
4. Belts and Pulleys
To connect the motor to the wheelhead, you will need belts and pulleys. These can be purchased from a hardware store or salvaged from old machines. Make sure the belts and pulleys are the right size and fit securely onto the motor and wheelhead.
5. Clay and Tools
Finally, you will need clay and pottery tools to create your pottery. There are various types of clay available, such as earthenware, stoneware, and porcelain. Choose the clay that suits your needs and make sure you have essential tools like clay cutters, shaping tools, and a sponge for wetting the clay.
Remember to always prioritize safety when working with machinery and materials. Wear protective gear, such as goggles and gloves, and follow the manufacturer’s instructions for any equipment you use.
Building the Base
The base of your pottery wheel is an important component that provides stability and support. Follow these steps to build the base:
- Gather the materials: You will need a sturdy wooden board for the base, four wooden legs, screws, a drill, and a saw.
- Measure and cut the board: Use the saw to cut the wooden board to the desired size for your pottery wheel. Make sure it is large enough to accommodate the wheelhead and motor, as well as leave space for your feet.
- Attach the legs: Position the wooden legs at the corners of the board and mark the spots where the screws need to be inserted. Use a drill to create pilot holes and then attach the legs securely to the board using screws.
- Stabilize the base: To further enhance the stability of the pottery wheel, you can reinforce the corners where the legs are attached to the board. This can be done by adding additional wooden supports or braces.
- Check for stability: Once the base is assembled, check for any wobbling or instability. If necessary, make adjustments or reinforce areas that may need extra support.
Remember to take proper safety precautions when using tools such as saws and drills. Always wear protective gear, such as safety goggles and gloves, and work in a well-ventilated area.
Building a solid and stable base for your pottery wheel is crucial for maintaining balance and allowing you to work comfortably. Once the base is complete, you can move on to the next steps in building your homemade pottery wheel.
Creating the Wheel Head
Once you have assembled the main frame of the pottery wheel, the next step is to create the wheel head. The wheel head is the rotating surface where you will place your clay to sculpt and shape it.
Here are the steps to create the wheel head:
- Gather the materials: You will need a circular piece of plywood or MDF board, a metal or PVC pipe, screws, a drill, and a jigsaw.
- Measure and mark: Take the circular piece of plywood or MDF board and measure its diameter. Mark the center point of the board.
- Drill a hole: Using a drill, create a hole in the center of the board. The hole should be slightly larger than the diameter of the metal or PVC pipe.
- Cut a slot: Use a jigsaw to cut a slot from the edge of the board to the center hole. The slot should be wide enough to accommodate the metal or PVC pipe.
- Attach the pipe: Insert the metal or PVC pipe into the hole and secure it with screws. Make sure the pipe is centered and sits securely in the slot.
- Attach the wheel head to the frame: Take the completed wheel head and attach it to the top of the main frame using screws or brackets.
Once the wheel head is securely attached to the frame, you can start using your homemade pottery wheel. Remember to test it out and make any necessary adjustments before working with clay.
Creating the wheel head is an important step in building your own pottery wheel at home. By following these steps, you can ensure that your pottery wheel provides a stable and reliable surface for your clay work.
Assembling the Drive Mechanism
To make a pottery wheel at home, you will need to assemble the drive mechanism. This is the part of the wheel that powers the rotation. Here is a step-by-step guide on how to assemble the drive mechanism:
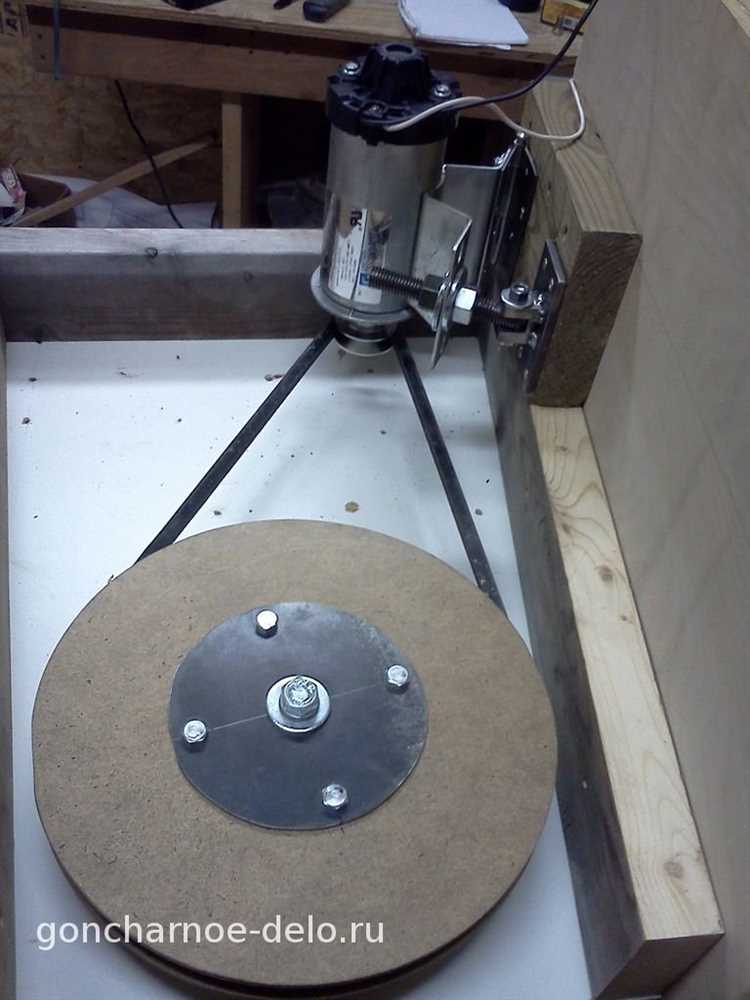
- Gather the necessary materials: You will need a motor, a pulley, a drive belt, and a wheel head.
- Attach the motor to a stable base: Place the motor on a sturdy surface or attach it to a workbench to ensure stability during the pottery wheel operation.
- Mount the pulley on the motor shaft: Slide the pulley onto the motor shaft and secure it in place. Make sure it is tightly fastened to prevent any wobbling.
- Attach the drive belt: Loop the drive belt around the motor pulley and the wheel head. Ensure that the belt is tight and properly aligned.
- Test the rotation: Turn on the motor and check if the belt rotates smoothly without any slipping or grinding noises. If needed, adjust the tension of the belt to ensure optimal performance.
Once you have assembled the drive mechanism, you can move on to constructing the rest of the pottery wheel, including the frame, the seat, and the foot pedal. The drive mechanism is a crucial component that allows the wheel to rotate and enables you to create pottery with ease.
Adding the Foot Pedal
Once you have assembled the main structure of your pottery wheel, it’s time to add the foot pedal. The foot pedal allows you to control the speed of the wheel, making it an essential component of your pottery wheel.
Follow these steps to add the foot pedal:
- Locate the foot pedal: The foot pedal is usually included in pottery wheel kits or can be purchased separately. It’s a small device that resembles a pedal, which you will use to control the speed of the wheel.
- Attach the foot pedal to the base: Take the foot pedal and position it near the base of your pottery wheel. Look for pre-drilled holes or slots on the base where the foot pedal can be attached. Use screws or bolts to securely attach the foot pedal to the base.
- Connect the foot pedal to the motor: Once the foot pedal is securely attached to the base, locate the wire or cable that comes with the foot pedal. This wire will connect the foot pedal to the motor of the pottery wheel. Look for a corresponding port or connection point on both the foot pedal and the motor. Connect the wire to both of these points.
- Test the foot pedal: Once the foot pedal is properly connected, give it a test run. Press the pedal with your foot and observe the response of the wheel. It should start spinning at a speed determined by the position of the foot pedal. Adjust the foot pedal if necessary to achieve the desired speed control.
With the foot pedal successfully installed, you now have full control over the speed of your homemade pottery wheel. Practice using the foot pedal to find the right speed for your pottery projects and enjoy the convenience it brings to your pottery-making process.
Installing the Motor
Once you have gathered all the necessary materials and built the base for your pottery wheel, it’s time to install the motor. The motor is what will provide the rotational power for the wheel, allowing you to shape and mold your pottery.
- Begin by positioning the motor on the base in a location that is both secure and accessible. Make sure the motor is aligned with the center of the wheelhead.
- Once you have determined the ideal position for the motor, mark the placement of the motor’s mounting holes on the base using a pencil or marker.
- Using a drill, create holes in the base at the marked spots. Make sure the holes are slightly smaller than the diameter of the screws that will be used to secure the motor.
- Place the motor on top of the drilled holes and align the mounting holes of the motor with the holes in the base.
- Secure the motor to the base by inserting screws through the mounting holes and into the drilled holes. Use a screwdriver or power drill to tighten the screws firmly, ensuring that the motor is securely attached to the base.
- Once the motor is securely installed, connect the power cord of the motor to a power source. Make sure to follow all necessary safety precautions and consult the motor’s instruction manual for proper wiring.
With the motor installed and properly connected to a power source, your homemade pottery wheel is now ready for use. Before you start throwing clay, however, it’s important to double-check that all components are securely fastened and that the motor is functioning correctly. Once everything is in order, you can begin exploring the art of pottery right in the comfort of your own home.
Connecting the Wiring
Once you have assembled the basic structure of your pottery wheel, it’s time to connect the wiring. This step is crucial to ensure that your pottery wheel will function properly.
Materials needed:
- Power cable
- On/off switch
- Motor
- Motor controller
- Wires
Follow these steps to connect the wiring:
- Start by attaching the power cable to the on/off switch. Strip the ends of the wires and connect them securely to the switch using wire connectors.
- Next, connect the other end of the power cable to the motor controller. The motor controller will regulate the speed and power of the motor.
- Connect the motor to the motor controller. Refer to the manufacturer’s instructions for the specific wiring connections.
- Using additional wires, connect the motor controller to the on/off switch and the power source. Again, make sure to securely attach the wires using wire connectors.
Note: It’s important to follow the manufacturer’s instructions and recommended wiring connections for your specific motor and motor controller.
Once all the wiring connections are made, double-check to ensure that everything is securely connected and there are no exposed wires. Use electrical tape or wire connectors to cover any exposed connections.
It’s always a good idea to test the pottery wheel before using it with clay. Turn on the power and switch on the motor to see if it spins smoothly and at the desired speed. Adjust the motor controller as needed.
Important Safety Note:
When working with electrical components, always make sure to follow proper safety precautions. Ensure that the power is turned off before making any wiring connections, and use caution when handling exposed wires.
Testing and Adjusting the Pottery Wheel
Once you have completed building your pottery wheel at home, it’s important to test it and make any necessary adjustments before using it for your pottery projects. Follow these steps to ensure that your pottery wheel is functioning properly:
- Check the stability: Make sure that the pottery wheel is stable and doesn’t wobble when you apply pressure. This is essential for preventing accidents during pottery making.
- Test the rotation: Turn on your pottery wheel and observe the rotation. It should spin smoothly without any jerking or uneven motion. If you notice any issues, such as excessive wobbling or the wheel not spinning at a consistent speed, you may need to adjust the motor or the belt.
- Adjust the speed: Most pottery wheels have adjustable speed settings. Test different speed levels to find the one that works best for you. It’s important to have a speed that allows you to work comfortably and control the clay effectively.
- Check the centering: Place a lump of clay on the wheel head and try to center it. The clay should stay in the center without drifting or wobbling. If it doesn’t, you may need to adjust the wheel head or the bats to ensure proper centering.
- Examine the splash pan: Ensure that the splash pan is securely attached to the pottery wheel and properly positioned to catch any water or clay splatter. It should fit snugly and should be easy to remove for cleaning.
- Test the foot pedal: If your pottery wheel has a foot pedal, check if it provides smooth and responsive control over the wheel’s speed. Make sure it’s comfortable to use and doesn’t cause any strain or discomfort during prolonged use.
- Inspect the wheel head: Examine the wheel head for any signs of damage or unevenness. It should be flat and level to ensure stable and consistent pottery making.
- Listen for unusual noises: Keep an ear out for any strange or unusual sounds coming from your pottery wheel. Grinding, squeaking, or rattling noises may indicate a problem that needs to be addressed.
By testing and adjusting your pottery wheel before use, you can ensure that it’s in optimal condition for your pottery projects, resulting in smoother and more successful pottery making experiences.


