Knitting is a popular craft that allows you to create beautiful and functional items using just a pair of needles and some yarn. One essential technique in knitting is the M1L, which stands for “make one left.” This stitch is used to increase the number of stitches in your knitting and can be used to create decorative patterns or shape your project. In this step-by-step guide, we will walk you through the process of M1L and help you master this technique.
Before we begin, it’s important to note that there are several ways to make increases in knitting, but the M1L is one of the most commonly used methods. It creates a left-leaning stitch and is often used in shaping sleeves, adding decorative details, or creating lace patterns. Once you have mastered the M1L, you will have a valuable skill that can be applied to a wide range of knitting projects.
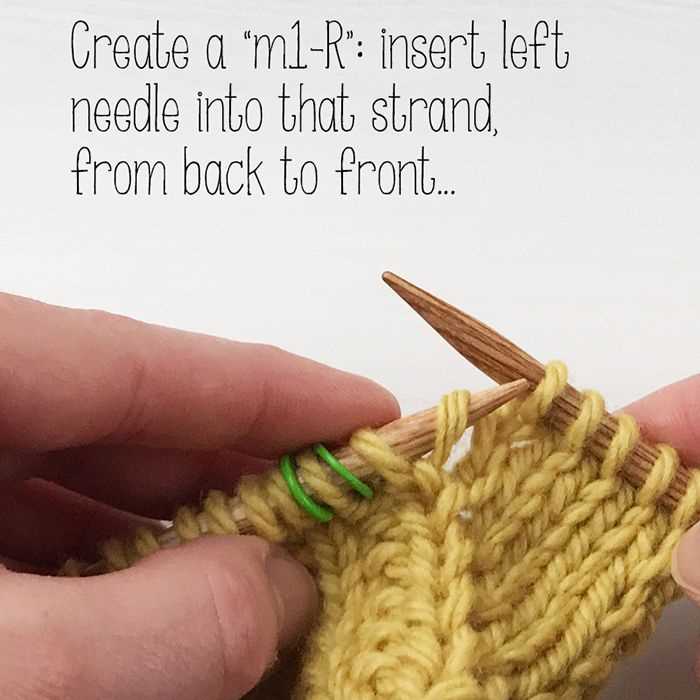
To begin, you will need a project in progress and your working yarn and needles. Locate the stitch just before the one you want to increase and insert your left needle from front to back into the horizontal strand between the two stitches. This strand will be forming a little loop, and it will be your new stitch. Ensure that your left needle is inserted into the strand correctly, so it doesn’t twist or slip when you knit it.
Next, bring your right needle to the front and knit into the back loop of the new stitch. This will create a left-leaning stitch and increase the number of stitches in your project. Once you have completed the M1L, continue knitting your project as usual, following the pattern instructions or your own creative vision.
Remember, practice makes perfect. As with any new technique in knitting, it may take some time to get the hang of the M1L. Don’t be discouraged if your first attempts are not perfect – keep practicing, and soon you will be able to execute the M1L with confidence and finesse. Happy knitting!
The Basics of M1L Stitch
The M1L stitch, also known as Make One Left, is a common increase stitch used in knitting. It creates a new stitch by lifting the horizontal loop between the stitches on the left needle and knitting into it. This technique is often used to add stitches for shaping, creating decorative patterns, or transitioning between different stitch patterns.
To work the M1L stitch, follow the steps below:
- Insert the left needle from front to back into the horizontal loop between the stitches on the left needle.
- Lift the loop onto the left needle, creating a new stitch.
- Knit the new stitch through the back loop.
When working the M1L stitch, it’s important to note that the new stitch is mounted with its left leg in front of the needle. This means that when you knit into the new stitch, you’ll need to insert the right needle through the back loop to prevent twisting.
The M1L stitch is commonly used in various patterns, such as lace, cables, and textured fabrics. It can be used to create decorative increases that lean to the left, giving a pleasing aesthetic to your knitting projects.
Here is an example of how the M1L stitch is used in a pattern:
| Row | Stitch Pattern |
|---|---|
| 1 | K1, M1L, K2, M1L, K1 |
| 2 | Purl all stitches |
| 3 | K1, M1L, K4, M1L, K1 |
In the pattern above, the M1L stitch is used to create two new stitches in each row, creating a decorative increase in the fabric.
With practice, you’ll become comfortable with the M1L stitch and be able to incorporate it into your knitting projects with ease.
Step 1: Make a Loop
To start the M1L stitch, you will need to make a loop.
- Hold the working yarn in your right hand and the knitting needle with your left hand.
- Take the working yarn and wrap it around your left index finger, creating a loop.
- Insert the knitting needle from front to back through the loop.
- Transfer the loop from your left index finger onto the knitting needle.
- Tighten the loop slightly by pulling on the working yarn.
Now you have successfully made a loop, which will be used to create the M1L stitch.
Step 2: Insert the Needle
Once you have positioned your knitting and identified the stitch you want to make, it’s time to insert the needle to create the M1L stitch.
1. Hold your knitting needle with the stitches in your left hand. Your working yarn should be coming from the back of the stitches.
2. Take your right-hand needle and insert it from front to back into the loop between the stitches you identified.
3. Make sure to insert the right-hand needle under the stitch that is closest to the tip of the left-hand needle.
4. Push the right-hand needle all the way through to the back so that the tip of the needle is now facing out towards you.
5. Wrap the working yarn around the right-hand needle in a counterclockwise direction, just like you would when knitting a regular stitch.
6. Pull the wrapped yarn through the loop and slip the loop onto the right-hand needle, creating a new stitch.
7. Tighten the stitch by gently pulling the working yarn.
Repeat these steps for each additional M1L stitch you want to create in your knitting project.
Step 3: Lift the Yarn
After inserting the left needle into the stitch below the next stitch on the left needle, you will need to lift the yarn to create a new loop and hence increase the number of stitches.
To lift the yarn, use your right hand to bring the yarn up and over the left needle, from back to front.
Make sure that the yarn is crossed over the left needle, and the new loop is formed below the original stitch on the left needle.
Practice this motion a few times until you become comfortable with lifting the yarn.
Step 4: Complete the M1L Stitch
Now that you have made the left-leaning increase stitch (M1L), it is time to complete the stitch.
- Insert the left needle into the strand of yarn that is running between the last stitch on the left needle and the first stitch on the right needle.
- Take the strand of yarn onto the left needle and knit it through the back loop.
- Transfer the newly created stitch onto the right needle, and continue knitting your project as instructed.
By completing the M1L stitch, you have successfully created a new stitch that leans to the left. This increase stitch is commonly used to shape garment pieces such as sleeves, raglans, and decorative elements.
Continue practicing this stitch until you feel comfortable and confident in your M1L technique. Once you master this increase stitch, you will be able to incorporate it into your knitting projects to add texture and shape.
Common Mistakes to Avoid
- Twisting the stitch: When making a M1L, it is important to ensure that the stitch is not twisted. This can happen if the needle is inserted incorrectly or if the yarn is not pulled through properly.
- Tightening the stitch too much: It is common for beginners to tighten the stitch too much after making the M1L. This can result in a tight and uncomfortable stitch. Remember to leave some slack in the stitch to maintain flexibility and avoid pulling too tightly.
- Skipping a stitch: Another mistake to watch out for is skipping a stitch when making the M1L. This can happen if you are not paying close attention to your stitches or if you are rushing through the technique. Take your time and ensure that each stitch is accounted for.
- Confusing M1R with M1L: M1L and M1R are similar techniques, but they result in different stitch orientations. Make sure to distinguish between the two and use the correct technique for your desired outcome.
- Not practicing enough: Like any new skill, mastering the M1L technique requires practice. Don’t get discouraged if your first few attempts are not perfect. Keep practicing and you will improve over time.
By avoiding these common mistakes, you can increase your proficiency in the M1L technique and create beautifully crafted knitting projects.
Tips and Tricks for Perfect M1L Stitch
Mastering the M1L (Make 1 Left) stitch is essential for many knitting patterns. This increase stitch creates a new stitch and avoids creating a hole in your work. Here are some tips and tricks to help you achieve a perfect M1L stitch:
- Understand the M1L stitch: The M1L stitch is an increase stitch that leans to the left. It is created by picking up the horizontal strand between two stitches and knitting into the back of it.
- Choose the right row: The M1L stitch is usually worked on the right side (RS) row. Check your pattern to make sure you are working the increase on the correct row.
- Identify the stitches: Before you start the M1L stitch, make sure you can identify the stitches correctly. This will help you pick up the correct strand and avoid any mistakes.
- Use a stitch marker: Placing a stitch marker before and after the stitch where you want to work the M1L can help you keep track of your increases and make it easier to identify the correct strand to pick up.
- Pick up the correct strand: To create a perfect M1L stitch, make sure you pick up the horizontal strand between the stitch on your left needle and the next stitch. This strand should be crossed over the left needle from the back.
- Knit into the back of the strand: Once you have picked up the correct strand, insert your right needle from the back into that strand and knit it through the back loop. This will twist the stitch and create a left-leaning increase.
- Practice: Like any knitting skill, mastering the M1L stitch takes practice. Take some time to work on a swatch before using it in your pattern. This will help you get comfortable with the technique and improve your tension and consistency.
- Keep an eye on your tension: While working the M1L stitch, pay attention to your tension. Avoid pulling too tightly on the new stitch, as it can create a pucker or distortion in your fabric. Maintain an even tension throughout the stitch.
By following these tips and tricks, you’ll be able to create a perfect M1L stitch and confidently tackle patterns that require this increase. Practice and patience are key, so don’t get discouraged if it takes a few tries to get it right!
Practice and Master the M1L Stitch
Once you have learned the basic steps of the M1L stitch in knitting, it’s important to practice and master the technique. With enough practice, you can become confident in adding this stitch to your knitting projects.
Below are some tips and suggestions to help you practice and improve your M1L stitch:
- Start with small projects: Begin practicing the M1L stitch on small projects, such as dishcloths or small scarves. This will allow you to focus on the technique without feeling overwhelmed by the size of the project.
- Use scrap yarn: Utilize scrap yarn in contrast colors for practice. This will make it easier to see your stitches and identify any mistakes.
- Repeat the stitch: Repeat the M1L stitch multiple times in a row to get a hang of the movement and increase your accuracy. The more you repeat the stitch, the more comfortable you will become.
- Take breaks: Don’t be afraid to take breaks between practice sessions. Giving yourself time to rest and reflect on your progress can help improve muscle memory and overall technique.
- Join a knitting group or class: Consider joining a knitting group or taking a class where you can receive feedback from experienced knitters. They can provide guidance on improving your M1L stitch and offer additional tips and tricks.
- Experiment with different patterns: Practice the M1L stitch in different knitting patterns to broaden your skills and understanding of its versatility. This will also help you become more comfortable with incorporating the stitch in various projects.
Remember, practice is key! The more you practice the M1L stitch, the more confident and proficient you will become. Don’t be discouraged by mistakes or initial struggles. With time and dedication, you can master this essential knitting technique.
If you’d like to create a table to summarize the tips, you can use the <table> tag. Here’s an example:
<table>
<tr>
<th>Tips for Mastering the M1L Stitch</th>
</tr>
<tr>
<td>Start with small projects</td>
</tr>
<tr>
<td>Use scrap yarn</td>
</tr>
<tr>
<td>Repeat the stitch</td>
</tr>
<tr>
<td>Take breaks</td>
</tr>
<tr>
<td>Join a knitting group or class</td>
</tr>
<tr>
<td>Experiment with different patterns</td>
</tr>
</table>
FAQ:
How do I do the M1L in knitting?
To do the M1L in knitting, insert your left-hand needle into the horizontal strand between the stitch just worked and the next stitch on your left-hand needle, from front to back. Knit into the back loop of this strand, then slide it off the left-hand needle.
What is the purpose of M1L in knitting?
The purpose of the M1L in knitting is to increase the number of stitches in your project. It creates a new stitch that leans to the left, which can be used in various stitch patterns or to shape your knitting.
Can I use M1L for lace knitting?
Yes, you can use the M1L increase for lace knitting. It creates a neat and tight increase that doesn’t disrupt the lace pattern. However, depending on the specific lace pattern, you may need to use a different type of increase to maintain the desired pattern.
Is M1L the same as make one left?
Yes, M1L is the same as “make one left” in knitting. Both terms refer to the same increase method where you create a new stitch by knitting into a horizontal strand between two stitches.
Are there any common mistakes to avoid when doing the M1L increase?
One common mistake to avoid when doing the M1L increase is twisting the stitch by knitting into the front loop instead of the back loop of the horizontal strand. Make sure to insert your needle from front to back and knit into the back loop to prevent this mistake.


