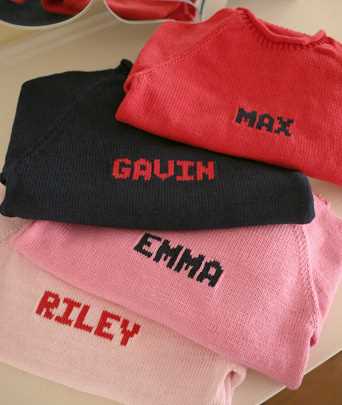
Knitting a name on a sweater is a great way to personalize your knitted garments and make them truly unique. Whether you want to showcase your own name, a loved one’s name, or even a favorite word or phrase, adding a knitted name to a sweater can be a fun and rewarding project. In this step-by-step guide, we will walk you through the process of knitting a name onto a sweater, from choosing the right yarn and needles to creating your own knitting chart and completing the design.
Before you begin, gather your materials. You will need a sweater pattern of your choice, yarn in the color of your choice, knitting needles appropriate for your yarn, a tapestry needle, and graph paper or knitting software for creating your knitting chart. It’s important to choose a contrasting yarn color for your name so it stands out on the sweater.
Once you have your materials ready, you can begin by deciding where you want to knit your name on the sweater. This could be on the front, back, or even the sleeves. Consider the size of your name and the size of the sweater to ensure the name fits well and is easily readable. You can also experiment with different fonts and lettering styles to create a unique design.
Next, create a knitting chart for your name. You can use graph paper or knitting software to design a chart that corresponds to your chosen font and letter size. Each square on the chart represents one stitch, and you will need to map out the placement of each letter of your name. This will serve as your guide as you knit the name onto the sweater.
With your knitting chart in hand, you can now start knitting your name on the sweater. Begin by following the instructions of your sweater pattern until you reach the desired location for your name. Then, refer to your knitting chart and use intarsia technique to introduce the contrasting yarn and create your name. Follow the chart stitch by stitch, carefully knitting each letter.
Once you have completed knitting your name, follow the rest of the instructions in your sweater pattern to finish the garment. Remember to securely weave in any loose ends and block the sweater to ensure a professional finish. With a little practice and patience, you will have created a one-of-a-kind sweater that showcases your name in a beautifully knitted design!
Gather the Materials
Before you begin knitting a name on a sweater, it’s important to gather all the necessary materials. Here’s what you’ll need:
Knitting Supplies:
- Knitting needles (size will depend on the weight of yarn you choose)
- Yarn (choose a color that contrasts well with the sweater)
- Darning needle or tapestry needle
- Stitch markers
- Scissors
Personalization Supplies:
- Graph paper or knitting design software
- Pencil or pen
Optional Supplies:
- Stitch holders or removable stitch markers
- Blocking pins
- Blocking mat
- Steam iron or steamer
Take some time to gather all these materials before you begin. Ensuring that you have everything you need will help make the process smoother and more enjoyable. Once you have everything, you’ll be ready to move on to the next steps!
Choose the Appropriate Stitch Pattern
When knitting a name on a sweater, it’s important to choose an appropriate stitch pattern that will showcase the letters clearly. Here are a few stitch patterns you can consider:
- Stockinette Stitch: This is the most basic and commonly used stitch pattern. It creates a smooth fabric with V-shaped stitches on the right side and purl bumps on the wrong side. It can be a good choice for simple block letters.
- Garter Stitch: This stitch pattern is created by knitting every row. It produces a ridged fabric that is reversible, with garter ridges on both sides. It can work well for bold, uppercase letters.
- Seed Stitch: This stitch pattern is created by alternating knit and purl stitches within a row and between rows. It creates a textured fabric with small dots or seeds. It can add visual interest to a name on a sweater.
- Ribbing: Ribbing is typically used for cuffs, collars, and hems, but it can also be incorporated into a name design. This stitch pattern is created by alternating knit and purl stitches in a regular pattern, such as 1×1 or 2×2 ribbing.
- Twisted Stitches: Twisted stitches create a decorative effect by knitting through the back loop of a stitch. This can be used to add emphasis to certain letters or to create a unique texture.
Consider the size and style of the letters you want to knit, as well as the overall design of the sweater. It’s also a good idea to make a swatch using different stitch patterns and yarns to see how the letters will look before starting the actual project.
Plan the Name Placement
Before you start knitting the name on your sweater, it’s important to plan the placement. Here are some considerations to keep in mind:
- Size: Think about how big you want the name to be on the sweater. Consider the number of stitches and rows it will take to create each letter.
- Font: Decide on a font style for the letters of the name. You can choose from a variety of knitting patterns or create your own.
- Position: Determine where on the sweater you want the name to be placed. Common options are across the chest, on the back, or on the sleeve. Consider the size and style of the sweater to ensure the name fits well in the chosen position.
- Color: Choose the color of yarn you want to use for the name. You can opt for a contrasting color to make the letters stand out, or use a similar color for a more subtle look.
- Charts: Create or find a chart that represents the letters of the name in the chosen font and size. This will serve as your guide while knitting.
Once you have finalized these decisions, you can move on to the next step of knitting the name on your sweater.
Transfer the Name to the Sweater
Once you have chosen the font and size for the name of your sweater, it’s time to transfer the design onto the sweater itself. There are several methods you can use to transfer the name, depending on your personal preference.
1. Using a Transfer Pen:
One common method is to use a transfer pen, which is a special type of pen that allows you to draw directly onto your knitting. Simply write out the name on a piece of paper, place it on top of the sweater, and trace over it with the transfer pen. The ink will transfer onto the fabric, leaving a clear outline of the name that you can then follow with your knitting.
2. Using Transfer Paper:
Another option is to use transfer paper, which is a thin, carbon-like paper that allows you to transfer your design onto the fabric. First, write out the name on the transfer paper using a pen or pencil. Then, place the transfer paper on top of the sweater with the name facing down, and carefully trace over the design with a ballpoint pen. The pressure from the pen will transfer the ink onto the fabric, creating a visible outline that you can follow as you knit.
3. Using a Stencil:
If you prefer a more precise and uniform look, you can create a stencil of the name using thick paper or cardboard. Cut out the letters of the name, leaving a hollow stencil. Place the stencil on top of the fabric and use a fabric marker or tailor’s chalk to mark the outline of each letter. This method requires more precision and patience, but it can give you a professional-looking result.
4. Using a Chart:
If you have experience with knitting charts, you may prefer to create a chart of the name using graph paper. Each square on the graph paper represents a stitch, and you can use different symbols or colors to represent different colors of yarn. This method is more time-consuming, but it gives you greater control over the design and allows for intricate patterns.
Regardless of the method you choose, it’s important to take your time and ensure the name is transferred accurately onto the sweater. You can also practice on a swatch or scrap piece of fabric before transferring the name onto the sweater itself. Once the name is transferred, you can begin knitting it using your chosen font and size.
Set up the Stitches
Before you can start knitting the letters of the name, you need to set up the stitches on your sweater. This involves creating a chart or pattern that guides you in placing the stitches correctly.
- Gather your materials: You will need a knit sweater, yarn in contrasting colors for the letters, tapestry needles, and a knitting chart or pattern.
- Choose your font: Decide on the font and size of the letters you want to knit. You can find knitting charts online or create your own using graph paper or knitting design software.
- Count the stitches: Determine the width of the area where you want to knit the name. Count the number of stitches across that area on your sweater. This will help you determine how many stitches to allocate for each letter.
- Divide the stitches: Divide the total number of stitches by the number of letters in the name. This will give you an approximate number of stitches to allocate for each letter. Adjust the allocation based on the width of each letter in your chosen font.
- Create a chart: Using the information from the previous steps, create a chart or pattern for your name. Allocate the appropriate number of stitches for each letter and mark them on the chart.
- Transfer the chart to your sweater: Place the chart on a flat surface next to your sweater. Use stitch markers or safety pins to mark the stitches on the sweater according to the chart.
Once you have set up the stitches, you are ready to start knitting the name on your sweater. Follow the chart or pattern you created, and remember to refer back to it as you knit each letter to ensure accuracy.
Knit the Name
Once you have prepared your materials and mastered the basic knitting techniques, you are ready to start knitting the name on your sweater. Follow these steps:
- Decide on the font and size of the letters you want to knit. You can find knitting graph paper online or create your own to help you plan out the design.
- Create a knitting chart or pattern for the name. Each square on the chart represents a knitted stitch. Use different symbols or colors to represent different stitches, such as knit, purl, or color changes.
- Start knitting the name by following the chart row by row. Read the chart from right to left for right-handed knitters, and left to right for left-handed knitters.
- Use intarsia or fair isle knitting techniques to incorporate different colors into the name. Intarsia allows you to knit different colored blocks and strands of yarn, while fair isle creates a pattern with multiple colors in each row.
- Keep track of your progress as you knit the name. Mark off each row or square on the chart to ensure accuracy and avoid mistakes.
- Double-check your work frequently to ensure the name is coming out as planned. Fix any mistakes or inconsistencies as you go.
- Once you have finished knitting the name, secure any loose ends by weaving them into the back of your work.
Remember to take your time and have patience when knitting the name on your sweater. It can be a time-consuming process, but the end result will be a personalized and unique garment that you can be proud of.
Weave in the Ends
After you have finished knitting the name on your sweater, it’s time to weave in the loose ends. Weaving in the ends ensures that they are secure and won’t come undone over time. Here’s how to do it:
- Cut the yarn: Start by cutting the yarn, leaving a tail that is about six inches long.
- Thread the needle: Thread the tail of the yarn through a large-eye yarn needle.
- Weave through stitches: Insert the needle under the stitches on the wrong side of the knitted fabric, following the path of the yarn. Be careful not to pull too tight, as this can cause the fabric to pucker.
- Weave in opposite direction: After weaving through a few stitches, change direction and weave the needle back in the opposite direction. This helps to secure the yarn more effectively.
- Repeat on different rows: Continue weaving the yarn in and out of the stitches on the wrong side of the fabric, moving up or down the rows as necessary to secure all the loose ends.
- Trim excess yarn: Once all the loose ends are woven in, trim any excess yarn close to the fabric, being careful not to cut the stitches.
It’s a good practice to weave in the ends as you go instead of waiting until the end, as it can be difficult to locate the loose ends once you have finished knitting. By weaving in the ends as you go, you can keep your work neat and tidy from start to finish.
Block the Sweater
After finishing the knitting part, it’s important to block the sweater to give it a more polished and professional look. Blocking helps to even out the stitches and make the garment lie flat.
Here is how you can block the sweater:
- Fill a basin or sink with lukewarm water. Add a small amount of wool wash or mild detergent.
- Gently submerge the sweater in the water, making sure it is completely soaked. Let it sit for about 10-15 minutes to allow the fibers to absorb the water.
- Drain the water from the basin/sink and gently press down on the sweater to remove excess water. Do not wring or twist the sweater, as this can damage the fibers.
- Lay a clean towel on a flat surface and place the sweater on top of it. Roll up the towel, along with the sweater, to absorb more moisture.
- Unroll the towel and carefully transfer the sweater onto a blocking mat or an old clean towel.
- Shape the sweater to the desired measurements. Use measurements from your pattern or use a tape measure to ensure consistent sizing.
- Pin the sweater in place using rust-proof T-pins or blocking wires. Start at the center of each section and work your way outwards, ensuring the edges are straight and smooth.
- Leave the sweater to dry completely, which can take anywhere from 24-48 hours depending on the fiber and thickness of the sweater.
- Once the sweater is dry, unpin it and check that it maintains its shape. If needed, reblock any areas that might have warped during the drying process.
Blocking is an essential step that helps to enhance the appearance and fit of your knitted sweater. It also ensures that the yarn relaxes and the stitches settle into place, giving you a more professional finish.
FAQ:
What materials do I need to knit a name on a sweater?
To knit a name on a sweater, you will need a sweater, yarn in the desired color, knitting needles, a tapestry needle, and a written or printed name template.
What is the first step in knitting a name on a sweater?
The first step in knitting a name on a sweater is to choose the font and size of the letters you want to knit. You can either create your own template or find printable templates online.
How do I transfer the name template onto the sweater?
To transfer the name template onto the sweater, you can either: 1) Use a disappearing fabric marker to trace the letters onto the sweater, or 2) Cut out the letters from the template and use them as stencils, pinning them onto the sweater and tracing around them with the fabric marker.
What knitting stitch should I use to knit the name on the sweater?
The most commonly used stitch for knitting letters or designs on a sweater is the duplicate stitch. This stitch allows you to embroider the name onto the knitted fabric using a tapestry needle and a contrasting color of yarn.
How do I start knitting the name on the sweater?
To start knitting the name on the sweater, thread the tapestry needle with the contrasting yarn and anchor the yarn on the wrong side of the sweater. Then, bring the needle up through the fabric at the start of the first letter and start embroidering the duplicate stitches over the existing knit stitches.
Can I knit names on a sweater with different colors?
Yes, you can knit names on a sweater using different colors. You will need to change colors of yarn as you move from one letter to the next. To do this, simply cut the yarn and anchor it on the wrong side of the sweater, then thread the tapestry needle with the new color and continue embroidering the duplicate stitches with the new color.


