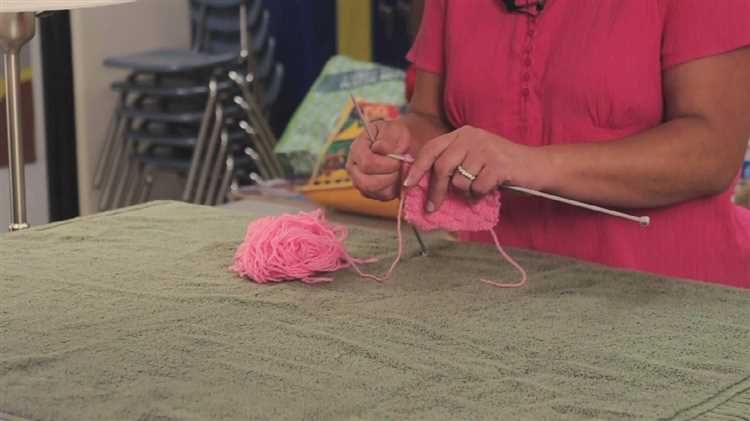
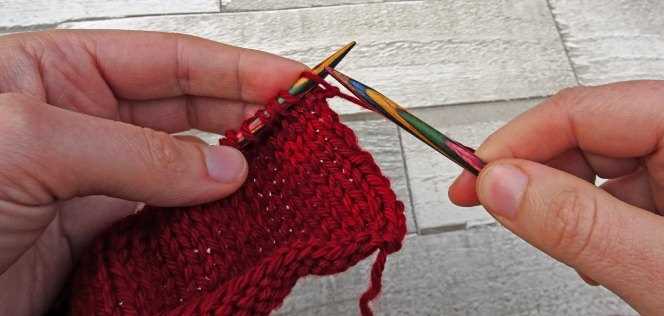
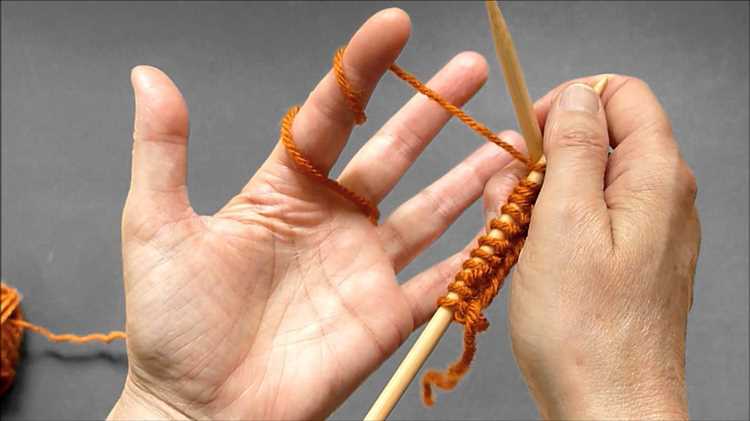
Knitting is a popular craft that allows individuals to create beautiful and functional items using just a pair of needles and some yarn. While the end result may look intricate and complex, the actual process of knitting involves a few basic techniques. One of the most important skills to learn is how to hold the knitting needles in the most comfortable and efficient way.
There are several different ways to hold knitting needles, and each technique has its own advantages and disadvantages. One common approach is the “English” or “throwing” method, where the yarn is held in the right hand and “thrown” over the needle to create stitches. This method is often taught to beginners because it is relatively easy to learn and allows for precise stitch placement.
Another popular approach is the “Continental” or “picking” method, which involves holding the yarn in the left hand and using the right needle to “pick” the yarn and create stitches. This technique is favored by many experienced knitters because it is faster and requires less hand movement. However, it can be more difficult to master, especially for those who are used to the throwing method.
No matter which technique you choose, it is important to find a comfortable and relaxed grip on the knitting needles. Holding the needles too tightly can lead to hand and wrist pain, while holding them too loosely can result in dropped stitches. Practice each method and experiment with different grips until you find the one that feels natural for you.
Remember, knitting is meant to be a relaxing and enjoyable activity, so don’t be afraid to experiment and find what works best for you. With practice and patience, you’ll soon be creating beautiful knitted items with ease.
The Top Techniques for Holding Knitting Needles
Learning how to hold knitting needles properly is an essential skill for anyone interested in knitting. The way you hold your needles can greatly affect your speed, comfort, and control while knitting. Below, we’ll discuss the top techniques for holding knitting needles and their advantages.
The English/American Technique
The English/American technique is one of the most common ways to hold knitting needles. In this technique, you hold the working needle in your right hand, similar to how you would hold a pencil. The yarn is tensioned in your left hand, and you wrap it around the right needle using your right hand’s fingers or thumb.
- Advantages:
- – Allows for greater control and precision while knitting.
- – Good for beginners as it is easy to learn and master.
- – Comfortable for those accustomed to using their right hand for fine motor tasks.
The Continental Technique
The Continental technique, also known as the German or European technique, involves holding the working needle in your left hand and the yarn in your right hand. The yarn is tensioned with your left hand fingers or thumb, and you pick the yarn using your right needle by flicking it with your right-hand finger.
- Advantages:
- – Faster knitting speed as the left hand doesn’t need to move as much.
- – Reduces the strain on the right hand.
- – Popular among knitters who also crochet.
The Portuguese Technique
The Portuguese technique involves wearing a knitting pin or a hook on your chest or shoulder. The yarn is tensioned around your neck, and you use your right hand to control the working needle. The left hand is primarily used to move the yarn under the needle.
- Advantages:
- – Ergonomically friendly, with reduced strain on the hands and wrists.
- – Great for knitters with mobility or dexterity issues.
- – Ideal for long knitting sessions.
The Combination Technique
The combination technique is a hybrid method that combines elements from both the English and Continental techniques. The yarn is held in the left hand, and you wrap it around the right needle using your right hand’s fingers or thumb. This technique is popular among advanced knitters.
- Advantages:
- – Allows for fast and efficient knitting.
- – Results in a distinct stitch pattern.
- – Allows for flexibility and customization in knitting.
Conclusion
Choosing the right technique for holding knitting needles is a personal preference. Experimenting with different methods will help you find the one that suits you best. Whether you choose the English, Continental, Portuguese, or Combination technique, make sure to practice and improve your skills for a more enjoyable knitting experience.
Classic Grip
The classic grip is a popular technique for holding knitting needles and is commonly used by knitters of all skill levels. To achieve this grip, follow these steps:
- Hold one knitting needle in your right hand and the other in your left hand.
- Place your index finger on top of the needle with your thumb underneath to support it.
- Rest the needle against your middle finger, using it as a guide for tension control.
- Allow your ring finger and pinky finger to rest comfortably against your palm.
The classic grip provides a stable hold on the needles and allows for precise control of tension. It is especially useful when working with smaller needles or intricate stitch patterns that require more control and precision.
Experiment with different variations of the classic grip to find the one that feels most comfortable for you. Some knitters prefer to hold the needles closer to the tips, while others may hold them further down. Find what works best for you and practice to develop your knitting technique.
Continental Style
In continental style knitting, also known as German knitting or picking, the working yarn is held in the left hand. This style is popular among knitters in Europe and is often considered faster and more efficient than the English style.
To hold the knitting needles in continental style, follow these steps:
- Hold the knitting needle with the cast-on stitches in your right hand, and the other needle in your left hand.
- Grasp the working yarn with your left hand, making a loose loop around your left pinky finger.
- Hold the working yarn between the ring finger and middle finger of your left hand, creating tension.
- Insert the right needle into the first stitch on the left needle, from left to right.
- Using your left hand, pick the working yarn with your needle and pull it through the stitch, transferring it to the right needle.
- Repeat steps 4 and 5 for each stitch until all stitches are transferred to the right needle. Repeat the process for each row.
Continental style knitting is known for its smooth and fluid motion, as the left hand remains relatively still while the right hand does most of the work. This style is especially useful when working with intricate stitch patterns or high stitch counts.
| Advantages | Disadvantages |
|---|---|
|
|
Try practicing continental style knitting to see if it suits your knitting style. With time and practice, it can become a valuable technique in your knitting repertoire.
English Method
The English method, also known as the throwing method, is a popular knitting technique used by many knitters. It is called the English method because it originated in England and is widely taught there.
In the English method, the knitter holds the working yarn in their right hand and “throws” it around the right needle to create each stitch. This method is known for its efficiency and speed, as well as its ease for beginners to learn.
To use the English method, follow these steps:
- Hold the knitting needles with your right hand holding the right needle and your left hand holding the left needle. The right needle should be in front of the left needle.
- Hold the working yarn in your right hand, with the tail end of the yarn wrapped around your little finger and the working end of the yarn wrapped around your index and middle fingers.
- Insert the right needle into the stitch on the left needle from right to left, going behind the left needle.
- Wrap the working yarn around the right needle by bringing it under the right needle and then over the top from right to left.
- Once the yarn is wrapped around the right needle, use your right hand to “throw” the yarn over the top of the right needle and towards the back of the work.
- Use your right hand to pull the right needle with the new loop of yarn through the stitch on the left needle.
- Drop the old stitch off the left needle and onto the right needle.
- Repeat these steps to create additional stitches.
The English method can be used for a variety of knitting stitches, including knit and purl stitches, as well as more complex stitches like cables and lace patterns.
Practice and experience will help you develop your technique and speed when using the English method of knitting.
Pencil Hold
The pencil hold is one of the most common ways to hold knitting needles. It is called the pencil hold because it resembles how you would hold a pencil when writing.
To use the pencil hold, follow these steps:
- Hold one knitting needle in your right hand as if you were holding a pencil.
- Place your thumb on top of the needle, parallel to it.
- Wrap your remaining fingers around the needle, like you would when holding a pencil.
Advantages:
- The pencil hold provides a comfortable grip and allows for precise control of the needles.
- It is easy to switch between knitting and purling stitches when using the pencil hold.
- Many knitters find that they can knit faster and with more accuracy using this hold.
Tip: When using the pencil hold, try to keep a loose grip on the needles. Holding them too tightly can lead to hand and wrist fatigue.
Knife Grip
If you are familiar with holding a knife, you will find the knife grip a natural way to hold your knitting needles. In this grip, both knitting needles are held like a knife in your hand, allowing for a firm grip and precise movements.
- Positioning: Start by positioning your dominant knitting needle in your hand as if you are holding a knife. The needle should rest against the base of your index finger with the tip pointing towards your non-dominant hand.
- Grip: With your thumb on one side and your middle finger on the other side, grip the needle firmly but not too tightly. You want to have control over the needle while still keeping your hand relaxed.
- Control: Use your thumb and middle finger to hold the needle steady while your other fingers wrap around the needle for support. This grip allows for precise control over the needle as you make your knitting stitches.
If you find that your grip is too tight or causing discomfort, try adjusting the position of the needle in your hand. Everyone’s hands are different, so don’t be afraid to experiment with different grips until you find what works best for you!
Portuguese Style
The Portuguese style of knitting is known for its unique technique of holding the working yarn. It involves using a knitting pin or a Portuguese knitting hook to manage the tension of the yarn. Here are the steps to knit using the Portuguese style:
- Start by attaching the knitting pin or hook to a piece of clothing, usually on your shoulder or chest. This will create tension on the yarn as you knit.
- Hold the knitting needle in your right hand and insert it into the first stitch on your left-hand needle.
- With your left hand, bring the working yarn under the knitting pin and hold it taut with your left thumb and index finger.
- Using your right hand, loop the yarn around the right-hand needle counterclockwise.
- Pull the looped yarn through the stitch on the left-hand needle, transferring it onto the right-hand needle.
- Repeat steps 2-5 for each stitch until you have completed a row.
The Portuguese style of knitting is known for its efficiency and speed. It is especially useful when working with intricate stitch patterns or lace knitting. The tension created by the knitting pin or hook helps in producing even and consistent stitches.
One important thing to note is that the Portuguese style of knitting is usually done while sitting. The knitting pin or hook provides a stable anchor point for the yarn and helps in maintaining an even tension.
Overall, the Portuguese style of knitting is a great technique to learn for knitters looking to improve their speed and efficiency. Give it a try and see if it works for you!
Lever Hold
The lever hold is a common holding technique that provides stability and control when knitting. It involves holding the knitting needles like you would hold a lever or a pencil.
To hold the knitting needles in the lever hold technique:
- Hold one knitting needle in your dominant hand, with your palm facing down.
- Rest the knitting needle against your hand, with the end of the needle resting on your palm, and the tips of the needles extending past your fingers.
- Place your thumb on top of the needle, positioned near the middle of the needle, providing stability.
- Wrap your fingers around the needle to hold it securely. Your index finger can rest against the side of the needle for additional support.
- Hold the other knitting needle in your non-dominant hand, with your palm facing up.
- Rest the knitting needle against your hand, with the end of the needle resting on your palm, and the tips of the needles extending past your fingers.
- Place your thumb on top of the needle, positioned near the middle of the needle, providing stability.
- Wrap your fingers around the needle to hold it securely. Your index finger can rest against the side of the needle for additional support.
The lever hold provides a firm grip on the needles, allowing for smooth and controlled knitting movements. It is a popular technique among experienced knitters who prefer a steady and controlled knitting style.
Experiment with different holding techniques to find the one that feels most comfortable and natural for you. Remember to relax your hands and wrists while knitting to prevent strain or fatigue.
Flick Hold
The flick hold is a popular technique used by many knitters because it allows for quick and efficient stitching. To use the flick hold, follow these steps:
- Hold the knitting needle in your right hand, with the pointy end facing the left.
- Rest the needle on your middle finger, with the tip resting against the fleshy part of your finger.
- Use your thumb and index finger to hold the yarn, creating tension.
- Wrap the yarn around your index finger and then bring it over your thumb.
- Insert the needle into the stitch, making sure it goes under the yarn.
- With a quick flick of the thumb, release the old stitch off the left-hand needle and allow the new stitch to slide onto the right-hand needle.
The flick hold allows for fast and smooth knitting since the movements are small and controlled. It may take some practice to get used to this technique, but once you master it, you’ll find it to be an efficient way of knitting.
FAQ:
What are the best techniques for holding knitting needles?
The best techniques for holding knitting needles depend on personal preference and comfort. Some common techniques include the pencil grip, the knife grip, and the flicking method.
Is there a specific way to hold knitting needles for beginners?
There is no one-size-fits-all answer to this question. Beginners can try different techniques such as the pencil grip or the knife grip to see which one feels most comfortable and allows for efficient knitting.
What is the pencil grip for knitting needles?
The pencil grip involves holding the knitting needle similar to how you would hold a pencil. The needle is held between the thumb and fingers, with the thumb providing stability and the fingers controlling the movement.
What is the knife grip for knitting needles?
The knife grip is when the knitting needle is held like a knife, with the hand wrapped around the needle and the fingers controlling the movement. This grip allows for more power and control.
What is the flicking method for holding knitting needles?
The flicking method, also known as lever knitting or Irish cottage knitting, involves holding the knitting needle like a pencil with the end tucked under the arm. The yarn is then wrapped around the fingers and the flicking motion of the hand produces the stitches.
Are there any other knitting needle holding techniques?
Yes, there are many other knitting needle holding techniques such as the Continental, the Portuguese, and the Norwegian purl. Each technique has its own unique way of holding the needles and manipulating the yarn.
Are there any tips for finding the most comfortable knitting needle holding technique?
Experimentation is key to finding the most comfortable knitting needle holding technique. It’s important to try different grips and pay attention to how your hand and wrist feel during and after knitting. A comfortable grip should allow for smooth and pain-free knitting.


