Knitting is a popular pastime for many people around the world. It’s a relaxing and creative hobby that allows you to create beautiful and unique pieces of clothing and accessories. One of the most important techniques in knitting is casting off, which is also known as binding off. Casting off is the process of finishing your knitting project by creating a neat and secure edge. In this step-by-step guide, we will walk you through the process of casting off in knitting.
Before you start casting off, you need to make sure that you have finished your pattern or project and you are ready to finish the edge. Casting off is a crucial step that gives your knitting a polished and professional look. It’s important to take the time to do it correctly, as a poorly cast-off edge can ruin the overall appearance of your project.
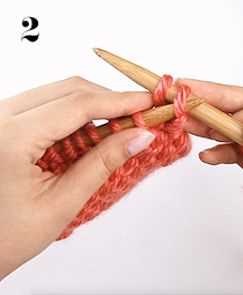
To begin casting off, you will need a pair of knitting needles with your project still attached. Start by knitting the first two stitches as you normally would. Then, use your left-hand needle to lift the first stitch over the second stitch and off the right-hand needle. This is called binding off one stitch.
Pro tip: When binding off, be sure not to pull the working yarn too tightly, as it can create a tight and puckered edge. Maintain a consistent tension throughout the process.
What is Casting Off in Knitting?
Casting off, also known as binding off, is the final step in the knitting process. It involves removing the stitches from the knitting needle to create a finished edge. Casting off is important because it helps secure the stitches and prevents them from unraveling.
When you cast off in knitting, you are essentially creating a new row of stitches that will form the edge of your knitted item. This edge can be used as a decorative feature or to create a clean and finished look.
There are different methods of casting off in knitting, such as the basic bind off, the stretchy bind off, and the picot bind off. The method you choose will depend on the type of project you are working on and your personal preference.
During the casting off process, you will work with one stitch at a time, transferring it from the left-hand needle to the right-hand needle and creating a new stitch in the process. This is done by knitting or purling the first two stitches, then passing the first stitch over the second stitch and off the needle, repeating this process until all the stitches have been cast off.
Once all the stitches have been cast off, you can cut the yarn, leaving a tail that can be used for sewing or weaving in the ends to secure them. This will complete your knitting project and give it a polished finish.
Learning how to cast off in knitting is an essential skill for any knitter, as it allows you to complete your projects with a professional and neat edge. With practice, you will become more comfortable with the casting off process and be able to create beautiful finished pieces.
Why is Casting Off Important?
Casting off, also known as binding off, is an important technique in knitting. It is the final step in completing a project and creates a finished edge that prevents the stitches from unraveling. There are several reasons why casting off is important:
- Secures the Stitches: Casting off creates a secure edge for your knitting project, ensuring that the stitches remain in place and do not come undone. This is particularly important for garments and accessories that will be worn or used regularly.
- Provides Structure: The cast off edge adds structure and stability to your knitting. It helps maintain the shape and form of the finished piece, whether it’s a sweater, scarf, or hat.
- Gives a Neat Finish: Casting off neatly and evenly creates a clean edge that enhances the overall appearance of your project. It gives a polished and professional finish to your knitting.
- Prevents Unraveling: When you cast off, you create a barrier that stops the stitches from unraveling. This is especially important when working with delicate or fine yarns that are prone to unraveling easily.
- Facilitates Blocking: Blocking is the process of shaping and stretching a knitted item to the desired size and shape. Casting off makes it easier to block the project by providing a secure edge to pin and stretch.
Overall, casting off is an essential skill in knitting that ensures the longevity, appearance, and overall quality of your finished projects.
Step 1: Prepare Your Work
Before you start casting off in knitting, it’s essential to prepare your work. Here are the steps to follow:
- Complete all desired knitting stitches before casting off. Ensure that you have knit the required number of rows or rounds according to your pattern.
- If you are working with multiple yarn colors, make sure to finish off any color changes before casting off. This will give your finished project a cleaner look.
- Check for any mistakes or dropped stitches in your work and fix them before proceeding with the casting off process. It’s much easier to correct errors at this stage than after casting off.
- Ensure that you have enough yarn remaining on your working yarn (the yarn connected to your ball or skein) to complete the cast off. If you’re unsure, it’s best to have some extra yarn on hand to avoid running out during the process.
- Take a moment to review the instructions for the specific casting off method you will be using. Different methods may require different techniques or stitch patterns, so familiarize yourself with the steps beforehand.
By taking the time to prepare your work properly, you’ll set yourself up for a successful casting off process and a beautifully finished knitting project.
Review Your Stitches
Before you start learning how to cast off in knitting, it’s important to review your stitches and ensure they are in the correct order.
Here are some key stitches to keep in mind:
- Knit stitch: This is the basic stitch in knitting, where the needle is inserted into the stitch from the front and the yarn is wrapped around.
- Purl stitch: This stitch is the reverse of the knit stitch, where the needle is inserted into the stitch from the back and the yarn is wrapped around.
- Stockinette stitch: This stitch is created by alternating rows of knit and purl stitches, resulting in a smooth fabric on one side and a bumpy texture on the other.
- Garter stitch: This stitch is created by knitting every row, resulting in a fabric with a ridged texture.
It’s important to know these basic stitches before attempting to cast off, as casting off involves working with the stitches already on your needle.
Take the time to review your stitches and ensure they are in the correct order before moving on to the next step.
Trim the Yarn
Once you have finished casting off your knitting project, it’s time to trim the excess yarn. Trimming the yarn helps give your finished piece a clean and polished look. Here are the steps to trim the yarn:
- Leave a tail: When casting off, leave a tail of yarn that is long enough to weave in later. This tail should typically be around 6-8 inches long.
- Cut the yarn: Using a pair of sharp scissors, cut the yarn from the ball or skein, leaving a few inches of yarn after the end of your knitting.
- Tie a knot: If desired, you can tie a small knot at the end of the tail to prevent it from unraveling. This step is optional, as the tail can also be woven in securely without a knot.
- Weave in the tail: Take the trimmed tail and using a yarn needle or even just your fingers, weave it into the stitches on the wrong side of your knitting. Weave in the tail for about an inch or two, ensuring it is securely hidden within the fabric.
- Trim any excess: Once the tail is fully woven, carefully trim any excess yarn, making sure not to cut the fabric. Use sharp scissors for a clean cut. Trim the excess as close to the fabric as possible without cutting into the stitches.
By trimming the yarn and neatly weaving in the tail, you give your knitting project a professional and finished appearance. Make sure to take your time and be precise when trimming the yarn to achieve the best results.
Step 2: Begin the Cast Off
Once you have completed your final row of knitting, you are ready to begin the cast off process. The cast off is the method used to finish off your knitting and create a neat edge.
To begin the cast off, start by knitting the first two stitches as usual.
Next, take your left needle and pass it into the first stitch on the right needle, as if you were going to knit it. Lift this stitch up and over the second stitch, and then off the needle. This will leave one stitch on your right needle.
Repeat this process of knitting a stitch and then passing the previous stitch over it until you have only one stitch remaining on your right needle. This is known as casting off.
Once you have cast off all of your stitches, cut your working yarn, leaving a tail of around 6 inches. Thread this tail through the remaining stitch and pull tight to secure it.
Now you have successfully cast off your knitting! You can now remove the stitches from your needle and admire your finished project.
It is important to note that the cast off method you choose can vary depending on the type of project you are working on and the desired finished edge. There are many different cast off techniques to choose from, so feel free to explore and experiment to find the one that works best for you!
Start with a Knit Stitch
In knitting, there are two basic stitches: the knit stitch and the purl stitch. The knit stitch is the most common and is often used as the foundation for many knitting projects. To start casting off with a knit stitch, follow these steps:
- Begin by knitting the first two stitches as you normally would.
- Insert the left needle into the first stitch on the right needle.
- Pass the first stitch over the second stitch and off the right needle.
- Continue knitting the next stitch, and then pass the first stitch over the second stitch again.
- Repeat steps 3 and 4 until you reach the end of the row.
- When you have one stitch remaining on the right needle, cut the yarn, leaving a tail of several inches.
Once you have cast off all the stitches, you can weave in the ends of the yarn to secure them. To do this, thread the tail of yarn onto a tapestry needle and weave it in and out of the stitches on the wrong side of the fabric. Trim any excess yarn.
Now you know how to cast off using the knit stitch. Practice this technique and you’ll be ready to complete your knitting projects with a polished finish.
Pass the First Stitch Over
Once you have cast on all the stitches, it is time to pass the first stitch over the second stitch. This step is important to create a neat and secure cast off edge.
Here is how to pass the first stitch over:
- Insert your right-hand needle into the first stitch on the left-hand needle, from left to right.
- Slip the first stitch off the left-hand needle and onto the right-hand needle.
- Now you have the first stitch on the right-hand needle and the second stitch on the left-hand needle.
- Using your left-hand needle, lift the second stitch on the left-hand needle over the first stitch and off the right-hand needle.
- You have successfully passed the first stitch over the second stitch.
- Continue repeating this process until you have cast off all stitches, leaving only one stitch on the right-hand needle.
Remember to keep your tension even and not pull too tightly when passing the stitches over to prevent the edge from becoming too tight. Once you have cast off all stitches, you can cut the yarn, leaving a long enough tail for weaving in.
Passing the first stitch over is a crucial step in the knitting process, as it ensures a clean and finished edge. With practice, you will become more comfortable and confident with this technique.
Step 3: Continue the Cast Off
Now that you have completed the first few cast off stitches, you can continue the cast off process by following these steps:
- Gently hold the last stitch you cast off with your non-dominant hand to prevent it from unraveling.
- Insert the right needle into the next stitch on the left needle.
- Using your yarn, wrap it around the right needle from back to front in a counterclockwise motion, just as you would for a regular knit stitch.
- Slide the right needle with the wrapped yarn through the stitch on the left needle, creating a new stitch on the right needle.
- Using your left hand, carefully lift the first stitch on the right needle over the second stitch and off the needle, casting it off.
- Repeat steps 2-5 until you have cast off all of the stitches on the left needle, except for the last stitch.
As you continue the cast off process, make sure to keep your tension consistent. You don’t want your cast off edge to be too tight or too loose.
Continue repeating steps 2-5 until you reach the end of your knitting project.
Once you have cast off the last stitch, you can either cut the yarn, leaving a tail for weaving in later, or you can thread the tail through the last stitch and pull it tight to secure the end of your knitting.
Knit the Next Stitch
After you have successfully cast off your stitches, you are ready to move on to the next stitch in your knitting project. To knit a stitch, follow these steps:
- Hold the end of the right needle with the cast-on stitches in your right hand and the empty needle in your left hand.
- Insert the tip of the empty needle into the first stitch on the right needle from left to right, going under the left needle.
- Take the working yarn, which should be attached to the free end of the right needle, and bring it over the left needle, from back to front.
- Using the right needle, catch the working yarn and pull it through the stitch on the left needle, bringing the new stitch onto the right needle.
- Slip the old stitch off the left needle, making sure to keep the new stitch securely on the right needle.
- Repeat steps 2-5 for each stitch in your knitting project.
- Continue knitting each stitch until you reach the end of the row or until your pattern specifies a different instruction.
Remember to maintain an even tension on your yarn as you knit each stitch to ensure that your finished project looks consistent. With practice, knitting will become easier and more natural.
FAQ:
What is casting off in knitting?
Casting off in knitting is the process of removing the stitches from the knitting needle and finishing the edges of the fabric.
Why is casting off important in knitting?
Casting off is important in knitting because it creates a neat and finished edge to the fabric. It also prevents the stitches from unraveling and helps to maintain the shape of the knitted item.
How do you cast off in knitting?
To cast off in knitting, you start by knitting the first two stitches. Then, using the left needle, lift the first stitch over the second stitch and off the needle. Continue this process until you have only one stitch left on the right needle. Cut the yarn, leaving a long tail, and pull the tail through the last stitch to secure it.


