Have you always been fascinated by the art of knitting? Do you want to learn how to create beautiful, handmade clothing and accessories? Knitting is a relaxing and rewarding hobby that allows you to unleash your creativity while also producing functional and stylish items. If you’re a beginner and have never picked up a pair of knitting needles before, don’t worry – we’re here to help you get started!
If you’re eager to embark on your knitting journey but don’t know where to begin, fear not. In this step-by-step guide, we’ll walk you through the process of knitting your first row. We’ll cover all the basics, from choosing the right yarn and needles to mastering essential stitches. With a little patience and practice, you’ll be well on your way to creating your own knitted masterpieces.
Before you start knitting, it’s important to gather all the necessary supplies. You’ll need a pair of knitting needles, typically made of aluminum or bamboo, and a skein of yarn in your desired color and weight. It’s best to start with a medium-weight yarn, as it’s easier to work with for beginners. Additionally, make sure to choose needles that are appropriate for the thickness of your yarn, as indicated on the label.
Once you have your supplies ready, it’s time to cast on your first row. Casting on is the process of creating a foundation row of stitches on your knitting needle. To start, hold one needle in your right hand and the other in your left hand. Make a slipknot by crossing the yarn over itself and looping it through. Place the slipknot on the needle in your left hand and tighten it gently. Congratulations, you’ve just cast on your first stitch!
Choosing the Right Knitting Needles
Knitting needles come in a variety of materials, sizes, and types. Choosing the right knitting needles for your project is important to ensure successful and enjoyable knitting experience. Here are some factors to consider when selecting knitting needles:
- Material: Knitting needles can be made from different materials, such as metal, wood, bamboo, plastic, or even glass. Each material has its own unique characteristics. Metal needles are durable and provide smooth stitches, while wooden needles are lightweight and warm to the touch. Bamboo needles are known for their flexibility and grip, making them great for slippery yarns. Plastic needles are affordable and lightweight, but they may not be as durable as other materials.
- Size: Knitting needles are available in various sizes, which are indicated by numbers or letters. The size of the needle you choose depends on the thickness of your yarn and the desired tension of your stitches. Thicker yarns generally require larger needles, while thinner yarns require smaller needles. The recommended needle size for your project can usually be found on the yarn label or in the knitting pattern.
- Type: There are different types of knitting needles, such as straight needles, circular needles, and double-pointed needles. Straight needles are the most traditional type and are used for knitting flat pieces, such as scarves or blankets. Circular needles consist of two needle tips connected by a flexible cable and are used for knitting in the round or for large projects. Double-pointed needles are shorter needles with points at both ends and are commonly used for knitting small circumference items like socks or hats.
- Comfort: Knitting can be a relaxing activity, so it’s important to choose needles that are comfortable to hold and work with for long periods. Consider the length and weight of the needles, as well as the shape and texture of the tips. Some knitters prefer a certain needle shape or grip, so it may be worth trying out different types of needles to find what works best for you.
When choosing knitting needles, it’s important to consider your personal preferences, the type of yarn you’re working with, and the technique or project you’re planning to knit. Experimenting with different needle materials and sizes can help you find the perfect needles for your knitting needs. Happy knitting!
Selecting the Perfect Yarn
When starting out with knitting, one of the most important decisions you’ll make is selecting the perfect yarn. The right yarn can make all the difference in the final look and feel of your project. Here are some factors to consider when choosing your yarn:
- Fiber: Yarn comes in a variety of different fibers, each with its own characteristics. Popular choices include wool, cotton, acrylic, and blends. Consider the properties of each fiber, such as warmth, softness, drape, and durability, to determine what will work best for your project.
- Weight: Yarn is categorized into weights which indicate its thickness. Common yarn weights include lace, fingering, sport, worsted, and bulky. The weight you choose will depend on the type of project you’re working on and the desired outcome. Thicker yarns tend to create chunkier, more substantial fabrics, while thinner yarns result in lighter, airier fabrics.
- Color: The color of your yarn can have a big impact on the overall look of your project. Consider the color palette you want to work with and whether you prefer solid colors, variegated yarns, or self-striping yarns. Keep in mind that different colors may have different dye lots, so if you need a lot of yarn for your project, make sure to buy enough from the same dye lot to ensure consistency.
- Texture: Yarn can vary in texture, from smooth and silky to fluffy and textured. Think about the desired texture of your finished project and choose a yarn that will help you achieve that effect.
- Budget: Yarn can range in price, so consider your budget when selecting your yarn. Keep in mind that more expensive yarns may be higher quality and provide a better result, but there are also great options available at more affordable prices.
Once you’ve considered all these factors, it’s time to go shopping for your perfect yarn! Remember to check the yarn label for additional information about the fiber, weight, care instructions, and yardage. Happy knitting!
Understanding Basic Knitting Terms
When learning how to knit, it’s important to start by familiarizing yourself with some basic knitting terms. These terms will help you understand instructions and patterns as you progress in your knitting journey. Here are some common knitting terms you should know:
- Knit Stitch: The most basic knitting stitch, where the yarn is pulled through a loop from the front to the back.
- Purl Stitch: Another basic knitting stitch, where the yarn is pulled through a loop from the back to the front.
- Cast On: The process of creating the first row of stitches on your knitting needle. This is how you begin a project.
- Bind Off: The process of finishing off your knitting project by creating a secure edge.
- Stockinette Stitch: A pattern created by alternating rows of knit and purl stitches. This produces a smooth, flat fabric.
- Gauge: The number of stitches and rows per inch in your knitting. This is important for ensuring a project’s size and fit.
- Pattern: A set of instructions that guide you through creating a specific design or item.
- Row: A horizontal line of stitches in your knitting. Each row is worked from one end of the needle to the other.
- Needle Size: The diameter and length of your knitting needles. Different projects require different needle sizes to achieve the desired tension.
- Yarn Over: A technique used to create an extra stitch and an eyelet hole in your knitting.
As you continue to explore the world of knitting, you’ll come across more advanced terms and techniques. However, understanding these basic knitting terms will give you a solid foundation to build upon. Happy knitting!
Casting On Your Stitches
Before you can start knitting, you’ll need to cast on your stitches. Casting on is the process of creating the foundation row of stitches on your knitting needle. Here’s a step-by-step guide on how to cast on:
- Hold the knitting needle in your right hand and the yarn in your left hand.
- Make a slipknot by forming a loop with the yarn, crossing the end over the loop, and pulling it through.
- Slide the slipknot onto the needle and tighten it by pulling the yarn end.
- Hold the needle with the slipknot in your right hand and use your left thumb and index finger to hold the working yarn, leaving a tail of at least 4 inches.
- Insert the needle through the slipknot from front to back, keeping the working yarn below the needle.
- With your right hand, wrap the yarn counterclockwise around the needle, forming a loop.
- With the needle, pull the loop through the slipknot, creating a new stitch.
- Repeat steps 5 to 7 until you have cast on the desired number of stitches. Make sure to keep the stitches loose enough to easily slide along the needle.
Once you have finished casting on your stitches, you are ready to start knitting your first row. Happy knitting!
Knitting the First Row
To start knitting your first row, follow the step-by-step instructions below:
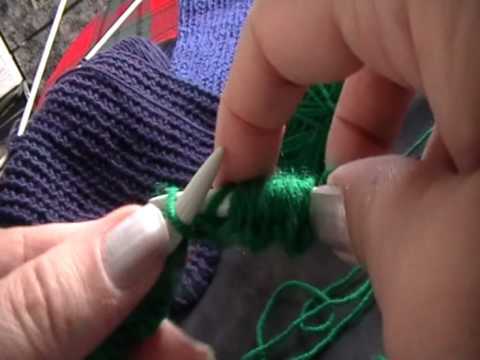
- Hold the knitting needle with the cast-on stitches in your right hand.
- Insert the left needle into the first stitch on the right needle from left to right, with the left needle tip going under the right needle.
- Using your right hand, bring the yarn over the right needle from the back to the front, creating a loop around the tip of the right needle.
- Use the right needle to pull the loop through the first stitch, sliding the stitch off the left needle and onto the right needle.
- Repeat steps 2 to 4 for each stitch until you have completed the entire row.
Tip: As you knit each stitch, make sure to keep the yarn tension consistent. Avoid pulling it too tight or leaving it too loose.
Once you have finished knitting the first row, you can proceed to the next row or continue with your knitting project following the pattern instructions.
Creating a Neat Edge
When starting a new knitting project, it’s important to create a neat edge to ensure that your finished piece looks polished and professional. Here are some tips to help you achieve a tidy edge:
- Slip the first stitch: Instead of knitting the first stitch of each row, simply slip it purlwise from the left needle to the right needle without working it. This will create a smooth and neat edge.
- Use a selvedge stitch: Another option is to utilize a selvedge stitch, which is an extra stitch at the beginning or end of each row that helps create a clean edge. You can choose to slip the first stitch of every row and knit the last stitch, or vice versa. Experiment to see which method works best for you.
- Tension control: Pay attention to your tension as you knit the first few rows. Pulling the yarn too tight can cause the edge to become distorted, while knitting too loosely can make the edge look messy. Practice finding the right balance to achieve a neat edge.
- Blocking: After completing your knitting project, blocking can help further refine the edge and give it a polished look. Wet blocking involves soaking your knitted piece in water, shaping it to the desired dimensions, and letting it dry. This helps even out the stitches and gives the edge a crisp appearance.
By following these tips and practicing your knitting technique, you’ll be able to create a neat and professional-looking edge for your knitting projects. Remember, practice makes perfect, so don’t be discouraged if your first attempts don’t turn out exactly as you’d like. With time and experience, you’ll improve your knitting skills and achieve beautiful results.
Fixing Common Beginner Mistakes
Learning to knit can be a fun and rewarding experience, but it’s common for beginners to make some mistakes along the way. Here are some common beginner mistakes and how to fix them:
- Twisted Stitches: Twisted stitches can happen when you accidentally twist the stitch as you knit it. This results in a twisted look and can affect the overall appearance of your project. To fix this, simply insert the needle into the stitch from the correct direction and knit as usual.
- Dropped Stitches: Dropped stitches can be frustrating, but they can be easily fixed. When you notice a dropped stitch, use a crochet hook or your knitting needle to pick up the dropped stitch and bring it back onto the needle. Make sure to secure it properly so it doesn’t unravel further.
- Inconsistent Tension: Inconsistent tension occurs when your knitting stitches are not the same size throughout your work. This can affect the overall look of your project. To fix this, try practicing knitting with a consistent amount of tension. You can also try using different needle sizes to achieve the desired tension.
- Wrong Needle Placement: Sometimes beginners make the mistake of knitting into the wrong part of the stitch, resulting in a twisted or uneven appearance. To fix this, make sure to properly insert the needle into the stitch before knitting.
- Wrong Yarn Over: Yarn overs are used to create eyelet stitches or increase stitches. It’s common for beginners to accidentally yarn over in the wrong direction, resulting in a different stitch than intended. To fix this, make sure to wrap the yarn over the needle in the correct direction.
Remember, knitting is a skill that improves with practice. Don’t be discouraged by these common mistakes. With time and patience, you’ll become more confident and skilled in your knitting abilities.
Practice and Improvement Tips
Learning to knit can be challenging at first, but with practice and dedication, you can become a skilled knitter. Here are some tips to help you practice and improve your knitting skills:
- Start with simple projects: As a beginner, it’s important to start with simple knitting projects that allow you to practice basic stitches and techniques. Scarves, dishcloths, and simple hats are great projects for beginners.
- Practice regularly: Consistency is key when learning to knit. Set aside regular practice time, even if it’s just a few minutes each day. The more you practice, the more comfortable and skilled you will become.
- Take it slow: When learning a new stitch or technique, take your time and go at a pace that feels comfortable for you. Knitting requires coordination and dexterity, so it’s important to master each step before moving on.
- Use quality materials: Using good quality yarn and needles can make a big difference in your knitting experience. Choose yarn that is soft and easy to work with, and invest in a good set of knitting needles that suit your preferences.
- Join a knitting group: Knitting can be a social activity, and joining a knitting group or taking classes can provide valuable support and guidance. Being part of a knitting community can also inspire and motivate you to keep practicing and improving.
- Don’t be afraid to make mistakes: Mistakes are a normal part of the learning process. Don’t get discouraged if you make a mistake or have to unravel your work. Use these moments as an opportunity to learn and grow as a knitter.
- Challenge yourself: Once you feel comfortable with the basics, don’t be afraid to take on more challenging projects. Trying new stitches, patterns, and techniques will help you expand your skills and become a more well-rounded knitter.
- Keep a knitting journal: Keeping a journal can be a helpful way to track your progress, jot down new techniques or patterns you want to try, and document your knitting journey. It can also serve as a source of inspiration when you’re feeling stuck.
Remember, knitting is a skill that takes time and practice to master. Be patient with yourself and enjoy the process of learning and creating beautiful knitted items.
FAQ:
What materials do I need to start knitting?
To start knitting, you will need a pair of knitting needles and some yarn. You can choose the size of the needles depending on the thickness of the yarn you are using.
How do I hold the knitting needles?
Hold one knitting needle in your dominant hand, like you would hold a pencil. The other knitting needle should rest in your non-dominant hand, with the tip pointing upwards.
What is casting on?
Casting on is the first step in knitting. It is the process of creating the first row of stitches on the needle. This will provide a foundation for your knitting project.
How do I cast on stitches?
To cast on stitches, make a slipknot with the yarn and place it on the needle. Then, insert the needle into the slipknot and tighten it. Repeat this process until you have the desired number of stitches on the needle.
How do I knit the first row?
To knit the first row, insert the right needle from front to back into the first stitch on the left needle. Wrap the yarn around the right needle and pull it through the stitch, slipping the stitch off the left needle. Repeat this process until all the stitches have been worked.
What should I do if I make a mistake in the first row?
If you make a mistake in the first row, you can simply unravel the stitches back to the mistake and fix it. Use the point of the left needle to pick up the stitches correctly, and then continue knitting.


